Do you have a question about the JINKA 1351 and is the answer not in the manual?
Checks contents after opening the packing box.
Lists all included accessories with quantities.
Lists parts required for assembling the machine stand.
Step-by-step guide for assembling the machine stand.
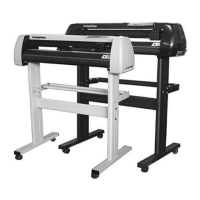
Identifies components of the 0 type cutting plotter.
Identifies components of the 1 type cutting plotter.
Guides on adjusting pinch roller placement for optimal paper loading.
Instructions for correctly loading vinyl/paper into the plotter.
Details the cutter holder structure and its parts.
Explains how to install and adjust the cutting blade.
Describes the plotter holder and its components for plotting.
Step-by-step guide for installing the cutter or plotter holder.
Explains the reset mode and its function.
Describes the online mode for receiving data and making adjustments.
Details offline mode for manual control and pausing operations.
Explains how to enter setup mode to change settings like baud rate.
Explains the copy status for re-cutting previous jobs.
Procedure for performing a test cut to check blade force.
How to adjust cutting force for optimal results.
Explains causes for deformed or incomplete patterns.
Lists reasons for abnormal plotting behavior.
Identifies causes for paper feeding deviation.
Explains why parts of letters might be missing during cutting.
Addresses inconsistent cutting depth on the same line.
Explains the causes of rippling effects on cut letters.
Guidance on settings for cutting small letters.
Guidance on settings for cutting large letters.
Steps to install the USB driver for the cutting plotter.
Verifying the plotter connection via Device Manager.
Configuring the software to use the plotter via USB.
Configuring device settings for serial port communication.