JL AUDIO 10W6v2-D4/12W6v2-D4/13W6v2-D4 3
1 - Customizable Trim Ring: This removable
ring can be painted to match the installation theme,
if desired.
2 - W-Cone™ (Patent-Pending):The W-Cone™
unit-body cone assembly delivers astonishing cone-
stiffness with minimal mass.
3 - Floating-Cone™ Attach Method
(Patent-Pending): This unique assembly technique
ensures proper surround geometry in the
assembled speaker for better excursion control
and dynamic voice coil alignment.
4 - Plateau-Reinforced Spider Attachment
(U.S. Patent #6,118,884): A derivative of JL Audio's
famous VRC technology, this bulletproof suspension
attachment relieves stress from the spider material
at high excursions for enhanced reliability.
5 - Pole and Cone Venting (Patent-Pending):
Vents at the neck of the lower cone body work in
conjunction with the pole vent at the rear of the
motor structure.These vents effectively remove hot
air during high power operation to improve sound
quality and reliability.
6 - Forced-Air-Cooled Aluminum Alloy Frame
(U.S. Patent #6,219,431 and #6,229,902):
Cool air is directly pumped onto the voice coil of
the speaker through slots between the frame and
top-plate.This enhances power handling and sound
quality by minimizing dynamic parameter shifts and
power compression.
7 - Highly Optimized Motor Systems:
Highly linear, FEA-optimized motors reduce audible
distortion and improve transient behavior for
superior sound quality and dynamic stability.
8 - Large, Progressive-Roll Spiders:
Optimized to control the long excursion of the
W6v2's without limiting it.
9 - Engineered Lead Wires and Connectors:
Connections for both voice coils terminate in a
unique configuration block on one side of the
basket.The extruded lead wire casing and
carefully engineered attachments ensure controlled
behavior and improved reliability under extreme
excursion demands.
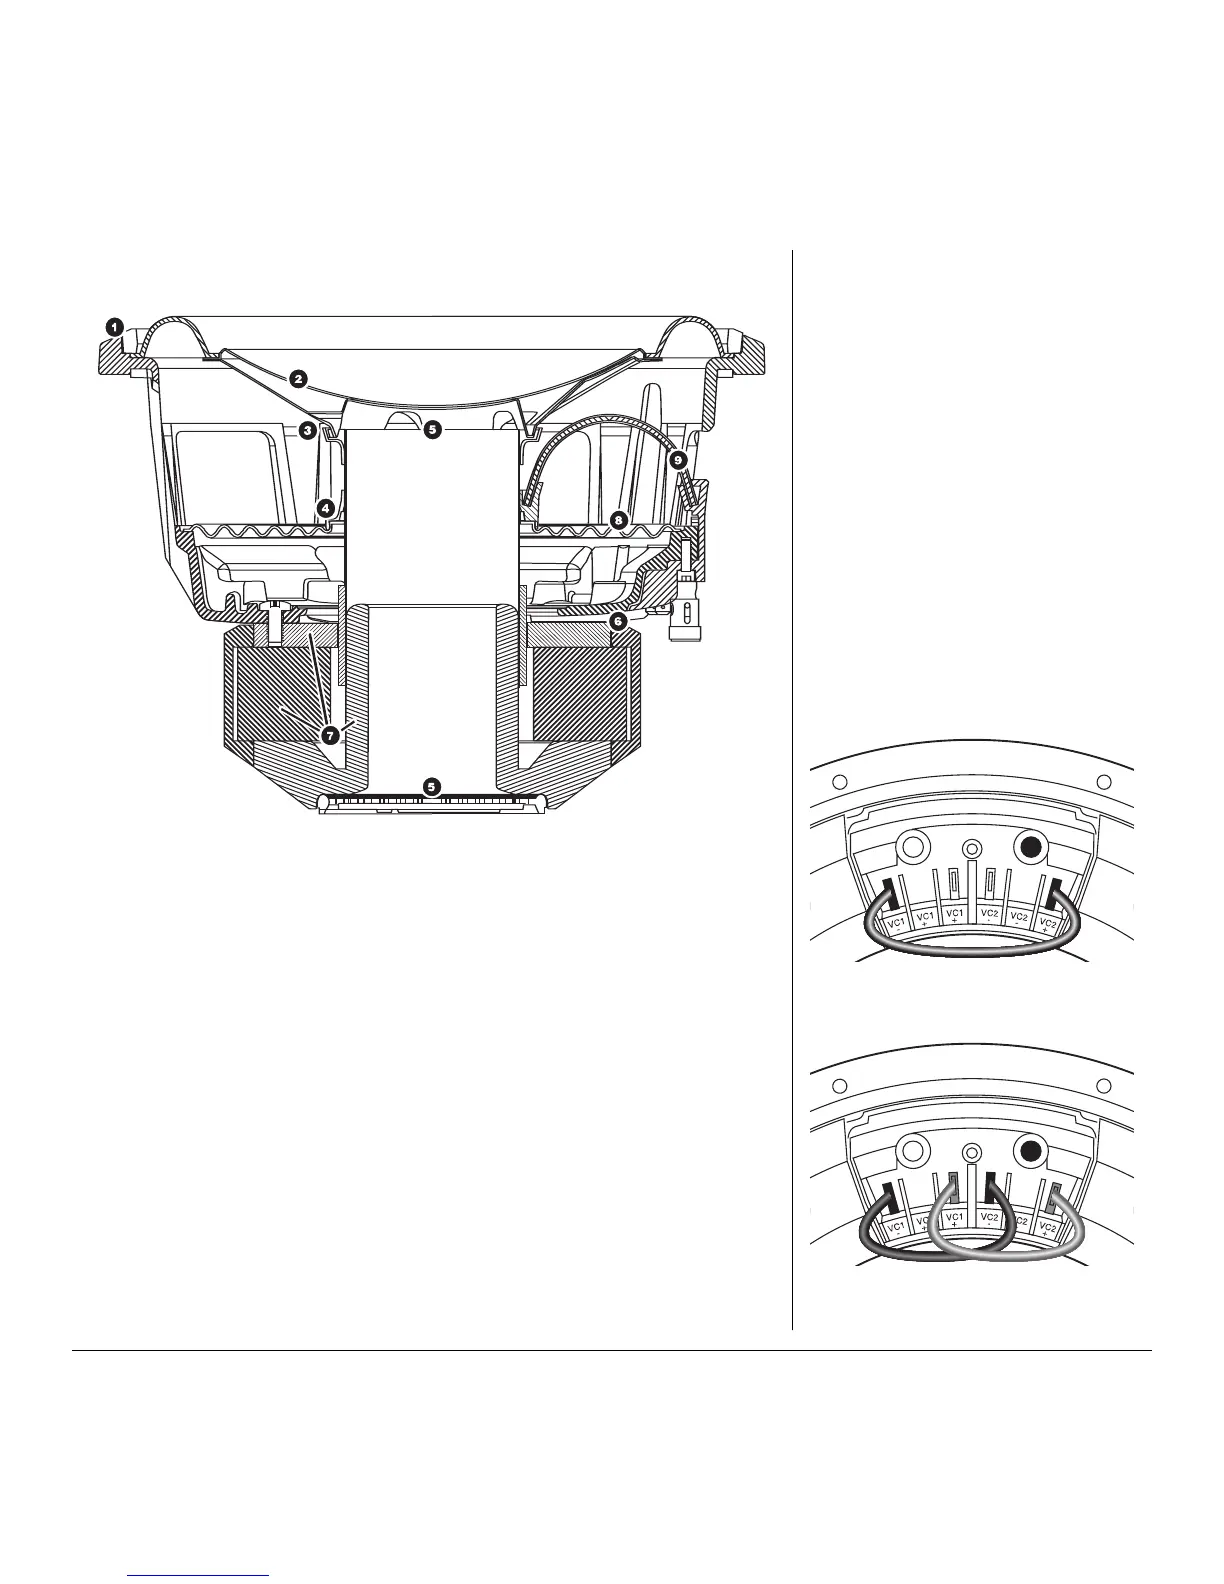
W6v2 TECHNOLOGIES W6v2 TERMINAL JUMPER SYSTEM
Please note that the W6v2 is a dual voice coil driver.
BOTH voice coils must be connected to the
amplifier (in series or parallel) for the speaker to
operate properly. To accomplish this, each W6v2
features a pair of main input connection push-
terminals and four voice coil configuration tab
terminals. These are located behind the main input
connectors and are used to interconnect the dual
voice coils in one of two ways: Diagram A shows a
series connection (8Ω nominal impedance per
speaker). Diagram B shows a parallel connection
(2Ω nominal impedance per speaker) and is the way
the speaker is configured at the factory. After
verifying that the tabs are properly configured using
the supplied jumper(s), connect the amplifier’s
output wires to the W6v2’s main input push-
terminals and install the speaker into the enclosure.
Warning! Failure to properly connect the
configuration tabs will result in no output and may
damage the speaker.
Diagram A: Series Connection (8Ω):
Use one jumper from “VC1–” to “VC2+”
Diagram B: Parallel Connection (2Ω):
Use two jumpers... one from “VC1–” to “VC2–” and
one from “VC1+ to “VC2+”.
 Loading...