This document is an assembly instruction manual for a JNH Lifestyles infrared sauna, specifically models MG417HB and MG417RB. The manual provides a step-by-step guide for assembling the sauna and includes an overview of the components and required tools.
Function Description:
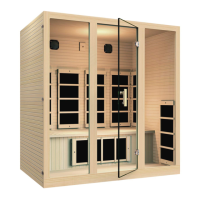
The device is an infrared sauna designed for personal use, promoting joyful, natural, and healthy living. Infrared saunas use infrared heaters to emit radiant heat, which directly warms the body rather than heating the air around it, offering a different experience compared to traditional saunas. The assembly instructions detail the process of constructing the sauna cabin from its individual panels and connecting the various electrical components like heaters, power supply, and control panel. Once assembled, the sauna is ready for operation according to a separate user manual.
Important Technical Specifications (derived from parts list and assembly steps):
- Model Numbers: MG417HB / MG417RB
- Structure: Composed of multiple panels including a bottom panel, rear panel, left panel, right panel, front panel, and top panel.
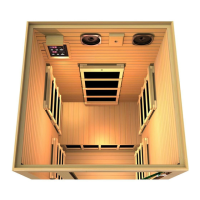
- Heating Elements: Features 8 heaters (Item 009 in parts list). The assembly process involves attaching these heaters to the rear, left, and right panels, as well as to the bench support panel.
- Control System: Includes a control panel (Item 017) and a control panel wood frame (Item 018).
- Power Supply: Equipped with a dedicated power supply unit (Item 016) and a power cord cover (Item 025).
- Lighting: Includes an LED light (Item 020) and a chromo light socket (Item 036), suggesting chromotherapy capabilities.
- Audio/Connectivity: Features 2 speakers (Item 022), a cable for an MP3 player (Item 033), and an MP3 auxiliary jack panel (Item 035), indicating built-in audio entertainment options.
- Air Quality: Includes a cable for an oxygen ionizer (Item 021), suggesting air purification features.
- Ventilation: Equipped with 4 vents (Item 026), with one specifically noted to be placed at the front of the unit.
- Door: Consists of a glass door (Item 010) with a door handle (Item 012), a round handle (Item 013), and 2 door hinges (Item 014). A magnet (Item 015) is also listed, likely for door closure.
- Windows: Includes 2 glass windows (Item 011).
- Seating: Features a bench support panel (Item 007) and a bench panel (Item 008).
- Fasteners: A variety of screws are used for assembly:
- 3 x 16 Screw (Item 024): 4 pieces
- 4 x 16 Screw (Item 027): 2 pieces
- 4 x 40 Screw (Item 028): 18 pieces (for heaters)
- 4 x 40 Screw (Item 029): 12 pieces (for roof panel)
- 6 x 35 Screw (Item 030): 1 piece (for door handle)
- 6 x 15 Screw (Item 031): 1 piece (for round handle)
- 4 x 10 Internal Rope Thread (Item 034): 18 pieces
- PMW4*16 screws: 2 pieces (for power box)
- TM4*40 screws: 18 pieces (for heaters)
- KA3*16 screws: 4 pieces (for seat bench)
- KA4*40 screws: 12 pieces (for roof panel)
- Latches: 18 latches (Item 032) are used to secure panels together.
- Switch: Includes a switch (Item 019).
- Fixed Parts: 2 fixed parts (Item 023).
Usage Features (implied by components and assembly):
- Modular Design: The sauna is delivered in 3 boxes, indicating a modular design for easier shipping and assembly.
- Tongue and Groove Assembly: Panels are connected using a tongue and groove system, which helps ensure a tight fit and structural integrity.
- Latching Mechanism: Latches are used to secure the panels together, simplifying the assembly process and allowing for a firm connection.
- Internal Control Panel: The presence of a control panel suggests user-friendly operation from within the sauna.
- Entertainment Options: Integrated speakers and MP3 connectivity allow users to enjoy music or audio during their sauna sessions.
- Chromo Light: The chromo light socket indicates the possibility of color therapy, enhancing the user experience.
- Oxygen Ionizer: The inclusion of an oxygen ionizer suggests features for improving air quality inside the sauna.
- Door Handles: Both a door handle and a round handle are provided, likely for interior and exterior access, or for different types of door operation.
- Glass Elements: The glass door and windows allow for visibility and a more open feel within the sauna.
Maintenance Features (implied by assembly and general product type):
- Clearance for Assembly: The instruction to ensure no gaps prior to latching and to center the top panel correctly suggests the importance of precise assembly for optimal performance and longevity.
- Secure Fastening: The use of various screws and latches for different components ensures a secure and stable structure, reducing the need for frequent re-tightening if assembled correctly.
- Removable Glass Protectors: The instruction to remove glass protectors with a screwdriver indicates a protective measure during shipping and assembly, which should be removed for proper use and aesthetics.
- Future Reference: The recommendation to keep the instruction manual for future reference implies that it contains information useful for troubleshooting or potential disassembly/re-assembly.
- Contact for Installation Questions: The provision of a contact number for installation questions highlights customer support for assembly-related issues, which can indirectly contribute to proper maintenance by ensuring correct initial setup.
- User Manual for Operation: The final note about reading the user manual for operating instructions suggests that the user manual will contain crucial information regarding the daily use, cleaning, and care of the sauna, which are essential for its maintenance.