-Please remember that if the machine does not work properly it should not be used.
-Please keep your hands away from the moving parts.
REMEMBER THAT PERSONS WITH HEALTH PROBLEMS MUST CONSULT THEIR
DOCTOR BEFORE STARTING AN EXERCISE PROGRAMME.
ASSEMBLY
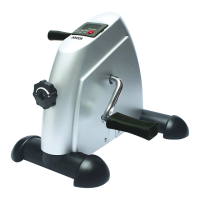
1-Put the front (Part C)and rear stabilisers in place (Part B) in the main frame (Part A) of the
appliance with the screws and washers.
2.-For a correct pedal placing you have to put yourself in front of a bike that always has to look
on you, other words, with adjusting roulette in the front.
3.-Afterwards, take a pedal marked by R (right) at the end of fixing screw and screw it on in the
right direction using a supplied wrench.
4.-Do the same with a pedal marked by L (left) but screw it on in the left direction.
NOTE: the right way to screw the pedals on - from the front to the backward, if you keep the
correct position mentioned before.
BEFORE USING THE MACHINE PLEASE CHECK THAT ALL THE SCREWS ARE
TIGHTENED DOWN.
INSTRUCTIONS FOR USE
1-Press the START button located on the counter and start to pedal. In this way the counter will
start to work.
2-Adjust the peddling effort by turning the regulator. If you turn it to the right the peddling
resistance will increase. If you turn it to the left it will decrease.
3-In order to see the exercise results obtained, please read the following procedure carefully:
Automatic mode to see the results:
-Press START just once. “SCAN” will blink. You will see the results obtained one by one (TIME,
COUNT, T-COUNT, CAL).
Manual mode to see the results:
-Press START twice consecutively. “TIME” will appear on the screen. This indicates the amount
of time you have been pedalling.
-Press START three times consecutively. “COUNT” will appear on the screen. This indicates the
number of times you have pedalled since you started exercising.
-Press START four times consecutively. “T-COUNT” will appear on the screen. This indicates the
number of times you have pedalled since the first time you used the appliance.
-Press START five times consecutively. “CAL” will appear on the screen. This indicates the
number of calories that have been burnt with the exercise carried out.
4-To put the counter back to “ZERO”. Press the START button for a few seconds. All the
counters will go back to “0”, except the “T-COUNT”.
WARNING: Battery change- Remove the counter from its original position (G) with the help of
the three notches located around the counter.
CLEANING AND STORAGE
-Clean first with a damp cloth and then a dry cloth.
-Keep the appliance in a safe place.
TECHNICAL DATA
3V DC (1 x CR2032 3V)
This device conforms to the safety requirements and provisions of directives 2006/95/EC on
Low tension devices and 2004/108/EC on Electromagnetic Compatibility.
PROTECTION OF THE ENVIROMENT - DIRECTIVE 2002/96/EC
 Loading...