EasyManua.ls Logo

Johns Manvillle GoBoard Point Drain User Manual

Johns Manvillle GoBoard Point Drain
12 pages
To Next Page IconTo Next Page
Page #1 background imageLoading...
Page #1 background image
Preassembled
Preassembled
to drain cover
C
F
A
B
G
D
E
J
I
H
x4
K
x2
Caulk Gun
3/16"
V-Notch
Utility Knife
Pencil
Tape Measure
1/4" x 1/4"
Square -Notch
1/2" Drill Bit
(if using Jig Saw)
Thin Set mixing tools are also needed
Drywall T-Square
Rubber Mallet
Straight Edge
(for cutting diagnals)
Speed Square
Level
5 Gallon Bucket
5” Hole Saw or Jig Saw
#2 Phillips Bit
Cordless or
Corded Drill
Inside Pipe Cutter
(if needed)
90˚ Putty Knife, Drywall Tool
Parts and Hardware Included in Kit
Recommended Tools
Materials Needed Sold Separately:
4–GoBoard
®
Wedges, 1/2" GoBoard
®
Panels, GoBoard
®
Curb
(3.5" H x 2.5" W x 48" L), GoBoard
®
Sealant, GoBoard
®
Fasteners or GoBoard
®
Washers, thin set mortar and PVC
primer and solvent cement.
Installation Instructions
A. Drain Cover*
B. Drain Riser
C. Clamping Collar
D. Membrane
E. PVC Drain Body**
F. Clamping Collar Screws
G. Mixing Valve Seal
H. Waterproof Pipe Seal
I. 2" Plastic Putty Knife
J. 4" Round Tape Dot
K. Drain Cover Screws
* Most conventional drain covers fit drain riser (snap on and screw on). Custom holes can be drilled in riser if needed for installation.
**The drain body accepts both threaded and unthreaded drain risers from other manufacturers that are approximately 2” inside diameter.
©2019 Johns Manville. All Rights Reserved
Question and Answer IconNeed help?

Do you have a question about the Johns Manvillle GoBoard Point Drain and is the answer not in the manual?

Johns Manvillle GoBoard Point Drain Specifications

General IconGeneral
BrandJohns Manvillle
ModelGoBoard Point Drain
CategoryBathroom Fixtures
LanguageEnglish

Summary

Site Preparation

Install GoBoard to Wall Studs

Install GoBoard to wall studs using fasteners and leaving 1/8" gaps between subfloor and bottom edge.

Mark and Cut Drain Hole

Mark the center of the shower pan area and cut a 5" diameter hole for the drain.

Ensure Waste Pipe Height

Verify the waste pipe top is at least 1 5/8" below the top of the subfloor.

Drain Assembly Installation

Install GoBoard Point Drain Assembly

Install the GoBoard Point Drain assembly and fasten to the subfloor using provided screws.

Glue Waste Pipe

Use PVC primer and solvent cement to glue the waste pipe and GoBoard Point Drain.

Valve Seal and Pipe Collar Installation

Install Valve Seal and Waterproof Pipe Seal

Install valve seal (G) over valve and waterproof pipe seal (H) over shower pipe using GoBoard Sealant.

GoBoard Curb Installation

Measure and Cut Curb Section

Measure distance between walls, ensure 1/8" gap, and cut curb section to correct length.

Apply GoBoard Sealant to Curb

Apply sealant to curb surfaces in contact with subfloor and walls, spreading excess.

Secure Curb (Optional)

Optionally secure curb to subfloor with screws and apply sealant over screw locations.

GoBoard Wedge Installation

Measure and Cut Wedge Panels (Back/Front)

Measure and cut back and front wedge panels, accounting for 1/8" gap.

Place Wedge Panels (Back/Front)

Place front and back wedge panels ensuring 1/8" gap at collar and side walls.

Mark 45° Angles on Wedge Panels

Mark 45° angles on left and right wedge panels using drain center as reference.

GoBoard Wedge Installation (continued)

Cut and Dry Fit Wedge Panels

Cut front and rear wedge panels, dry fit to ensure 1/8" gaps.

Measure and Cut Wedge Panels (Left/Right)

Measure and cut left and right wedge panels, accounting for 1/8" gap.

Place Wedge Panels (Left/Right)

Place left and right wedge panels ensuring thinner side faces the drain.

Place Front/Back Wedge Panels

Place cut front and back wedge panels on top of uncut left and right wedge panels.

GoBoard Wedge Installation (continued)

Mark 45° Angles on Left/Right Panels

Mark 45° angles on left and right wedge panels using front/back panel edges.

Cut Wedge Panels to Final Size

Cut all wedge panels to final size, ensuring 1/8" gaps between panels and walls.

Dry Fit All Wedge Panels

Dry fit all four wedge panels to confirm 1/8" gaps at collar, walls, and curb.

Install Wedge Panels in Thin Set

Apply thin set mortar and install wedge panels, ensuring 1/8" gap.

GoBoard Wedge Installation (continued)

Install Front and Back Wedge Panels

Install front and back cut wedge panels into thin set, ensuring 1/8" gap.

Transition Membrane Installation

Fill Gaps with Sealant

Fill 1/8" gaps with sealant, using a putty knife for corners.

Apply Sealant to Clamping Collar

Apply sealant to clamping collar and perimeter of drain base.

Adhere Membrane with Sealant

Unfold membrane and adhere to wedge panels with sealant, smoothing outwards.

Transition Membrane Installation (continued)

Spread Excess Sealant

Spread excess GoBoard Sealant around the perimeter of the membrane.

Apply Sealant to Drain Flange

Apply a bead of GoBoard Sealant around the perimeter of the PVC drain flange.

Drain Cover Installation

Install Drain Cover Assembly

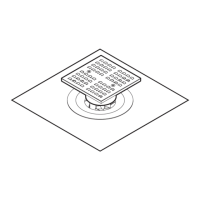
Install the drain cover assembly into the center of the drain.

Pack Thin Set Mortar

Pack thin set mortar underneath the drain cover.

Level Drain Cover with Tile

Gently level drain cover with surrounding tile using a rubber mallet.

Drain Cover Installation (continued)

Set Remaining Tile and Grout

Set remaining tile, grout enclosure, and grout/caulk around drain riser.

Recommended Layouts

Maximum Square Shower Pan Area (4 Wedges)

Layout for a maximum square shower pan area using four 48" x 48" GoBoard Wedges.

Maximum Rectangular Shower Pan Area (4 Wedges)

Layout for a maximum rectangular shower pan area using four 48" x 48" GoBoard Wedges.

Recommended Layouts (continued)

Maximum Square Shower Pan Area (8 Wedges)

Layout for a maximum square shower pan area using eight 48" x 48" GoBoard Wedges.

Offset Drain Example

Example of an offset drain layout using four 48" x 48" GoBoard Wedges.

Recommended Layouts (continued)

Tub to Shower Conversion (3 Wedges)

Layout for tub to shower conversion using three 48" x 48" GoBoard Wedges.

Curbless Tub to Shower Conversion (4 Wedges)

Layout for curbless tub to shower conversion using four 48" x 48" GoBoard Wedges.