– 13 –
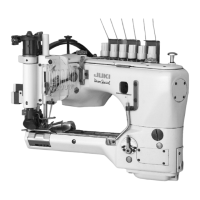
1. How to install and use the synchronization adjustment gauge
(1) Put the steel rod in the front looper base and tighten the
setscrew .
(Caution) Use a key wrench (3 mm) instead of the steel rod if
necessary.
(2) Loosen the setscrew slightly and move the front looper base
with the steel rod integrated to the most left position.
(3) Install the throat plate and tighten the setscrew .
(4) Rotate the pulley to move the steel rod to the most left position,
set the clearance between the right surface of the steel rod and the
left surface of the throat plate to 19 mm, and tighten the setscrew
securing the front looper base .
(5) Rotate the pulley counterclockwise and stop it when the steel rod
touches the left surface of the throat plate .
(6) Mount the timing gauge to the needle bar . Be sure to mount
the timing gauge so that the top surface of the timing gauge
touches the bottom surface of the lower needle bar bushing .
(Caution) Use a clip instead of the timing gauge if necessary.
(7) When the pulley is rotated clockwise, the steel rod moves from
side to side.
Touch the steel rod with the left surface of the throat plate again.At
this moment, make sure that the clearance between the bottom
surface of the lower needle bar bushing and the top surface of
the timing gauge is within the allowable range.
(Caution) The bottom surface of the lower needle bar bushing
may touch the top surface of the timing gauge ahead
of the other touch. In such a case, make sure that the
clearance between the steel rod and the throat plate
is within the allowable range.
(8) If the timing between the looper (steel rod ) and the needle bar
is inappropriate, follow the procedure below.
2. Corrective points and corrective measures
(1) For adjusting the timing between the looper (steel rod ) and the
needle bar , loosen 9 setscrews securing the rear top cover
and remove the rear top cover and the packing.
(2) Loosen 3 fixing nuts securing the front and rear main shaft
couplings ( and ) and engage a key wrench (3/32") with the
setscrew to move the front main shaft coupling in the clockwise-
counterclockwise direction for adjustment while keeping the rear
main shaft coupling unmoved. (For the fixing nut , use a 1/4"
spanner.)
(Caution) 1. Align the match marks.
2. For moving the front main shaft coupling ,
temporarily tighten one of the fixing nuts , which
is close to the match mark, and make an adjustment.
oTo increase the clearance between the steel rod and throat plate
, rotate the front main shaft coupling clockwise.
oTo decrease the clearance between the steel rod and throat plate
, rotate the front main shaft coupling counterclockwise.
(3) After adjustment, put the rear top cover and packing back on
and tighten the setscrew .
oImproper synchronization position
adjustment may cause stitch
skipping or thread breakage.
Adjustment Procedures Results of Improper Adjustment
 Loading...