6
en Instructions for Use – JURA WiFi Connect
Proper use
The WiFi Connect may only be used with specified JURA coffee machines. It provides wireless
communication between the coffee machine and various accessories (for compatible devices
see jura.com). Use for any other purpose will be deemed improper. JURA cannot accept any
responsibility for the consequences of improper use.
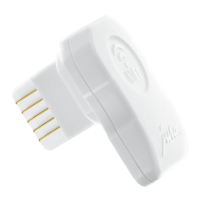
WiFi Connect at a glance
Installation
The WiFi Connect must be inserted into the coffee machine's service socket. This is usually on
the top or back of the machine, beneath a removable cover. If you don't know where the service
socket of your coffee machine is, ask your dealer or visit jura.com.
T Plug the WiFi Connect into the coffee machine's service socket.
In order for your machines to communicate wirelessly, connect them to a network.
T Configure the network via J.O.E.® – your JURA app. To do this, enter the network name (SSID)
and the password.
LED indicators
Z LED does not light up: The coffee machine is switched off; the WiFi Connect is not being
supplied with power.
Z LED lights up: The wireless connection between the WiFi Connect and the accessory has
been established.
Z LED flashes (1× / second): The network has not been configured.
Z LED flashes (2× / second): Attempting to establish a wireless connection.
Z The LED lights up on an alternating basis for 5 sec. and pauses for 1 sec.: WiFi Connect can-
not establish a connection.
1 LED: Indicates the status of the WiFi Connect
2 Connector: Inserted into the service socket on the coffee
machine
1
2
 Loading...