EasyManua.ls Logo

Kami D201 - User Manual

Kami D201
20 pages
Print Icon
To Next Page IconTo Next Page
Loading...
D201V2.2
Website:www.kamihome.com
E-mail:support@kamihome.com
https://kamihome.com/legal/fcc
D201 Kami Doorbell Camera User Manual
165×165mm
PANTONE 541 Ul
PANTONE Cool Gray 11 C+Kl
68g晨鸣云镜双
图号
料号
D20
609
骑马钉装订(两钉)
DoorbellCamera
InstallationGuide
2020/08/07 新建
2020/08/11 1. 二极管安装图示修改 2. 认证编号更新 3. 安装定位线图示更新
4. 背板上墙图示更新 5. 尺寸更新 6. 安装顺序调整 7. 安全提示
8. 文字更新 9. 版本更新。
2020/08/12 1. 文字更新 2.版本更新
2020/08/13 1. 11页加一段话 2.版本更新
2020/08/14 1. 电话改回 2. 版本升级
2020/09/03 1.语音播报更新 2. 版本升级
2020/09/16 1.第 9页文字翻译调整 2. 版本升级(V1.8
2021/01/22 1.翻译大调整 2. 增加两个配件图示及说明 3. 第8页图示更新
4. 14-16页线条调整 5. 去掉FCC ID 6. 版本升级
2021/03/04 1. 封底去掉认证信息 2. FCC ID更新 3.版本更新
2021/04/07 1. 更新FCC ID 2. 增加IC认证编号及声明 3. 版本更新
Question and Answer IconNeed help?

Do you have a question about the Kami D201 and is the answer not in the manual?

Overview

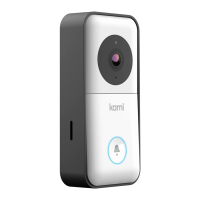
The Kami Doorbell Camera is a smart home device designed to enhance security and convenience at your doorstep. It functions as a video doorbell, allowing you to see, hear, and speak to visitors from anywhere using the Kami Home or YI Home App on your smartphone. The camera features a lens, microphone, speaker, PIR sensor for motion detection, and a doorbell button for visitors to press. It is powered by a rechargeable battery and can be connected to existing doorbell wiring for continuous power and integration with your home's chime system.

Technical Specifications:

  • Optimal Detection Range: 0-4m / 0-13ft
  • Recommended Installation Height: 1.2m / 4ft
  • Power Source: Rechargeable battery, can be hardwired to existing doorbell power.
  • Connectivity: Wi-Fi (2.4GHz network required for pairing)
  • Included Hardware: Battery, manual, screw bag (A x2, B x4, C x4), installation hardware, extension wires x2, chime connector, diode, backplates x3 (Flat, Horizontal Angle, Vertical Angle), charging cable, screwdriver x2.

Usage Features:

  • Remote Monitoring: View live video feed from your doorbell camera on your smartphone via the Kami Home / YI Home App.
  • Two-Way Audio: Communicate with visitors in real-time using the built-in microphone and speaker.
  • Motion Detection: The PIR sensor detects motion, triggering alerts and recording events.
  • Doorbell Button: Visitors can press the doorbell button to alert you via the app and, if connected, your indoor chime.
  • App Integration: Seamlessly integrates with the Kami Home / YI Home App for setup, live viewing, event playback, and settings management.
  • Wi-Fi Connectivity: Connects to your home's Wi-Fi network for remote access and notifications.
  • Multiple Backplate Options: Comes with three different backplates (Flat, Horizontal Angle, Vertical Angle) to adjust the camera's angle for optimal viewing, depending on your installation location.
  • Reset Function: A reset button allows for quick device reset (press for less than 1 second).
  • Tamper Button: Located on the back of the doorbell, this button likely triggers an alert if someone attempts to remove the doorbell from its mounting.

Installation and Setup:

  1. Charge Battery: Charge the included battery using a micro USB cable and a power adapter (not included). The indicator light will be red while charging and turn white when fully charged.
  2. Remove Protective Cover: Press down on the face of the doorbell with your thumbs and pull the outer protective cover up and away from the main body.
  3. Insert Battery: Push the charged battery into the battery compartment, ensuring the pins face up. To remove the battery, push the tab and pull the battery straight down.
  4. Pairing with App:
    • Download and sign in to the Kami Home / YI Home App.
    • Ensure your phone is connected to a 2.4GHz Wi-Fi network and "Location" services are enabled and authorized for the app.
    • Tap "+" in the app, select "Kami Doorbell Camera," and wait for the "Waiting to connect" voice prompt.
    • Enter your Wi-Fi password.
    • Point the QR code displayed on your phone's screen towards the camera lens until you hear "QR code scan is successful connecting to Wi-Fi" and "Wi-Fi is connected."
    • Assign a name to your doorbell in the app.
  5. Installation Options (Optional):
    • Remove Original Doorbell: If replacing an existing doorbell, switch off power, remove the old doorbell, and disconnect wires.
    • Electronic Doorbell Setup (Diode Installation): If connecting to an electronic bell (digital chime with a speaker), install the included diode. Do NOT install a diode if using a mechanical indoor doorbell, as it will cause damage.
    • Mechanical Doorbell Setup (Chime Connector Installation): If using a mechanical chime, install the chime connector to ensure a stable power supply. If you don't want the chime to make a sound, connect the wires as shown in the diagram for connection method-2. Always ensure power to the doorbell is shut down before wiring.
  6. Fixing the Backplate:
    • Choose the appropriate backplate (Flat, Horizontal Angle, or Vertical Angle) based on your desired camera angle.
    • Place the backplate flat on the wall where the doorbell will be installed.
    • Use a pen to mark the wall through the two holes in the back panel. Screw anchors are not required for wood installations.
  7. Connecting Wires (Optional): Connect each of the existing doorbell wires to either of the screws in the back of the doorbell. The order does not matter. If wires are too short, use the included extension wires and wire nuts. Ensure power is shut down before wiring.
  8. Mount the Doorbell:
    • Flat Backplate: Feed all wires (and wire nuts, if used) into the wall. Use four Screw C (fine threads) to secure the doorbell to the Flat Backplate #1.
    • Angled Backplate: Use Screw B (coarse threads) to secure the doorbell to Angled Backplate #2 or #3.
  9. Install Front Panel:
    • Use Screw A (tapered head Torx) to keep the doorbell front panel in place.
    • Use Mounting Screw A to fix the camera.
  10. Turn Power On: Switch the circuit breaker for the doorbell back to ON and test the doorbell's operation.

Maintenance Features:

  • Rechargeable Battery: The battery can be easily removed and recharged using a standard micro USB cable.
  • Easy Battery Removal: A tab mechanism allows for straightforward removal of the battery for charging or replacement.
  • Protective Cover: The outer protective cover can be removed for battery access and installation.

Important Notes:

  • The device complies with FCC and IC regulations.
  • Maintain a distance of no less than 20cm between the user and the product.
  • Always ensure power is off when performing wiring or installation steps involving electrical connections.
  • The Kami Doorbell Camera is designed for optimal performance when installed at the recommended height and within the specified detection range.

Kami D201 Specifications

General IconGeneral
BrandKami
ModelD201
CategoryIntercom System
LanguageEnglish