The device described in the manual is a Kangaroo Sewing Furniture cabinet, designed to enhance the sewing experience by providing a comfortable and organized workspace. The manual covers assembly instructions, parts lists, and general guidelines for use and maintenance.
Function Description:
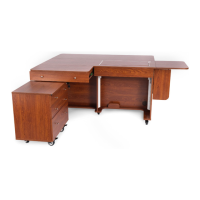
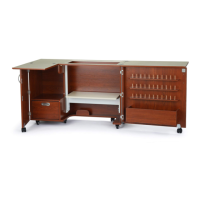
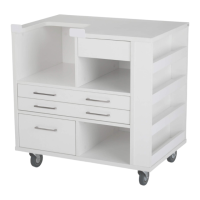
The Kangaroo sewing cabinet is a piece of furniture specifically designed for sewing enthusiasts. Its primary function is to provide a dedicated and ergonomic space for sewing machines, offering features that improve comfort and efficiency during long sewing sessions. The cabinet includes a lift mechanism for the sewing machine, allowing it to be stored flush with the tabletop when not in use, or raised to a flatbed position for sewing. It also features a quilt extension panel, support leaves, and a drawer unit for storage of sewing notions, patterns, and accessories. The design aims to create a flush, ergonomic surface for flatbed sewing, which can help prevent wrist strain and improve stitch quality. The cabinet is mobile, equipped with casters for easy repositioning within a sewing studio.
Important Technical Specifications:
The manual provides a detailed parts list for the cabinet, including various panels, hardware, and pre-installed components.
- Panels: The cabinet consists of numerous panels, identified by item numbers and names such as Left Side Panel (X), Right Side Panel (Z), Partition (Y), Back Panel (D), Top Panel (A), Support Panel (A3), Platform (A2), Quilt Extension Panel (A1), Right Leaf Panel (A5), and various drawer components (L, L1, L2, L3, L4). There are also gate legs (01, 02) and leaf support panels (03, 04). The panels are distributed across three packs.
- Hardware: A comprehensive list of hardware is provided, including:
- Cam Bolts: 6x35 Cam Bolt (c1) - 30 pieces
- Cam Covers: 5/8" Cam Cover (c2) - 30 pieces
- Dowel Pins: 8x30 Dowel Pin (d1) - 26 pieces, Threaded Dowel Pin (p1) - 3 pieces
- Fix Bolts: 8x16 Fix Bolt (b1) - 20 pieces, 4x20 Fix Bolt (b2) - 2 pieces
- Screws: 3.5x14 Screw (s1) - 108 pieces, 3x14 Screw (s2) - 14 pieces, 3.5x35 Screw (s3) - 4 pieces
- Alignment Pins: (s4) - 4 pieces
- Wrenches: Allen Wrench (a) - 1 piece, 14mm Wrench (r3) - 1 piece
- Knobs: (h1) - 2 pieces
- Hinges: Butt Hinge (h2) - 14 pieces
- Magnets: (m) - 5 pieces
- Casters: Caster (t1) - 2 pieces, Plate Caster (t2) - 5 pieces
- Ball Catches: (b3) - 2 pieces
- Pre-installed Parts: The cabinet comes with pre-installed cams (c5), caster brackets, and drawer runners.
- Lift Mechanism: The cabinet incorporates a lift mechanism for the sewing machine. A crucial warning is provided regarding a small wooden block that secures the lift's piston during assembly. This block should not be removed until assembly is complete to prevent cables from retracting, which would make installation difficult.
- Tools Required for Assembly: Phillips Screwdriver, Hammer, Electric Screwdriver (Torque set to 3-5).
Usage Features:
- Ergonomic Design: The cabinet is designed to create a flush, ergonomic surface for flatbed sewing when a custom acrylic sewing insert is used. This helps in reducing wrist strain and promoting better posture.
- Machine Lift: The integrated lift mechanism allows the sewing machine to be easily raised for use or lowered for storage, creating a flat tabletop surface when not in use.
- Storage: A drawer unit provides storage for sewing notions, patterns, and other accessories, helping to keep the workspace tidy and organized.
- Extension Panels: The Quilt Extension Panel (A1) and Right Leaf Panel (A5), along with support panels (03, 04) and gate legs (01, 02), provide additional workspace for larger projects like quilting. These panels can be extended or folded as needed.
- Mobility: Equipped with casters, the cabinet can be easily moved around the sewing studio, offering flexibility in workspace arrangement. The casters can be locked to secure the cabinet in place.
- Custom Inserts (Optional Accessory): Custom acrylic sewing inserts are available to fill the gap between the sewing machine and the cabinet's lift opening, creating a perfect flush surface tailored to specific sewing machine models.
Maintenance Features:
- Cleaning: The cabinet requires minimal maintenance. For cleaning marks and enhancing the surface, a gentle all-purpose cleanser should be used. Ammonia-based, harsh chemicals, or abrasive cleaning agents should be avoided. The surface should be wiped dry immediately after cleaning.
- Electrical and Hydraulic Lifts: These components require annual lubrication with WD-40 or a similar lubricant to ensure smooth operation.
- Cam Fastener Understanding: The manual provides clear instructions on how to properly use and tighten cam fasteners, which are critical for the structural integrity of the cabinet. A tip suggests using WD-40 or a similar lubricant in cam bolt holes to facilitate screwing them in.
- Wood Dowels: Glue is provided for securing wood dowels, though its use is optional. If used, a small amount of glue should be placed in the hole before inserting the dowel, and excess glue wiped away immediately.
- Lift Rail Lubrication: After installing the lift rails, it is recommended to spray a small amount of WD-40 or similar lubricant onto a paper towel and wipe the rails to make lift installation and operation easier.
The product comes with a Limited Lifetime Warranty from Arrow Companies, LLC, covering defects in materials or workmanship of furniture components. Electrical and mechanical components are warrantied for 5 years. The warranty does not cover issues resulting from improper assembly, misuse, intentional damage, or lack of maintenance. The product is designed for residential use only.