EasyManua.ls Logo

KegLand Cannular KL15769 - User Manual

KegLand Cannular KL15769
27 pages
Print Icon
To Next Page IconTo Next Page
Loading...
Cannular Semi-Auto Instruction Manual
Page 1 of 27 www.KegLand.com.au Last Updated 2/03/2021 4:22 PM
Cannular Compact Semi-Auto
Canning Machine
Instruction Manual
KL15769
KegLand Distribution PTY LTD
www.KegLand.com.au
Question and Answer IconNeed help?

Do you have a question about the KegLand Cannular KL15769 and is the answer not in the manual?

Summary

Important Safety Information

Beverage Compatibility

Aluminium cans are tested for beer only; other beverages are not verified.

Operational Safety Precautions

Confirm chuck, check roller contact, unplug for adjustments to prevent injury.

Electrical Component Protection

Strictly avoid contact between electrical components and any liquids.

Getting Started

Initial Inspection and Setup

Inspect unit for damage, set up for can sizes, and ensure chuck compatibility.

Power Supply Requirements

Machine requires a 24V, minimum 20amp power supply with specific plug types.

Machine Mounting Options

Recommends securing the machine to a bench for stability during extended use.

Initial Startup and Calibration

Roller-Chuck Clearance Check

Ensure rollers do not contact the chuck during rotation; adjust if necessary.

Performing an Initial Seaming Test

Test seam quality by filling a can, running the machine, and inspecting for leaks.

Refer to Calibration Instructions

Directs users to detailed calibration steps on pages 14-27 if seam leaks occur.

Machine Components and Controls

Key Part Identification

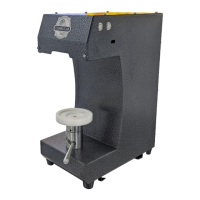
Labels major components like the table, chuck, and various switches for user reference.

Power and Operation Buttons

Explains the function and operation of the main power switch and momentary operation button.

Chuck Adjustment and Replacement

Compatibility and Chuck Selection

Explains B64 chuck compatibility and need for specific chucks for non-KegLand cans.

Chuck Removal Procedure

Details steps to unscrew grub nuts and pull the chuck from the drive shaft.

Chuck Installation Procedure

Covers pushing the new chuck onto the shaft and securely tightening grub screws.

Calibrating the Seamer

Bottom Die (Turn Table) Height Adjustment

Adjust coupling nut to raise/lower turntable for firm can contact against the chuck.

Table Position Alignment

Guidance on identifying and performing small adjustments for concentric can placement.

Performing Large Table Adjustments

Steps for significant table repositioning involving machine tipping and bolt adjustment.

Roller Setup and Adjustment

Setting Rollers for Tin Cans

Explains how to rotate detented rollers for different can types like aluminium vs. tin.

1 st Op Roller Height and Gap

Adjusting Y-axis (0.05mm) and X-axis (0.6mm +/- 0.1mm) for the first operation roller.

2 nd Op Roller Height and Gap

Adjusting Y-axis (1.35mm +/- 0.05mm) and X-axis (0.3mm +/- 0.1mm) for the second roller.

Fine X-axis Roller Adjustment

Performing precise movements of the roller towards or away from the chuck.

Verifying Roller Spin and Seam Quality

Ensuring Free Roller Movement

Check hex bolts are tight and rollers spin freely without excessive resistance.

Post-Adjustment Verification

Manually run the chuck to ensure rollers do not contact it at any point.

Double Seam Process Overview

Explains the roles of the 1st and 2nd operations in creating a hermetic seam.

Measuring Seam Parameters

Actual Overlap Measurement

Steps to prepare, cut, and examine overlap on test cans for seal integrity.

2 nd Op Seam Thickness

Measuring seam thickness using calipers on a test can (Can B), average 1.2-1.3mm.

Seam Length 2 nd Op

Measuring seam length using calipers on Can B, ideally 2.3-2.4mm.

Overview

The Cannular Compact Semi-Auto Canning Machine (model KL15769) is a portable, lightweight device designed for seaming cans. Its primary function is to create a double seam on cans, ensuring a hermetic seal for beverages. While primarily calibrated for KegLand 500mL B64 aluminum cans, it can be adjusted to accommodate a range of can heights and diameters, including tin cans, by changing the chuck and adjusting the rollers.

Function Description:

The Cannular operates through a two-stage seaming process. The first operation roller forms the initial seam by taking the can end curl and can flange, initiating the forming process. This first seam is critical for controlling the effectiveness of the second operation. The second operation roller then compresses the previously formed first operation double seam, completing the seal. The machine is semi-automatic, meaning that once a can is placed and the table is raised, a single press of the operation button will cause the motor to run through its full seaming cycle and return to its starting position.

Important Technical Specifications:

  • Power Supply: Requires a 24V DC power supply rated to a minimum of 20 amps with a standard Anderson Plug. Compatible power supplies include the un-wired 20A power supply (KL10856) or the 24V 12.5A DC power supply (KL17343), both sold separately.
  • Chuck Compatibility: Comes standard with a B64 chuck, compatible with KegLand cans. For non-KegLand cans or different can ends (e.g., VISY or CDLE/CDL), a different chuck (e.g., KL14670 for VISY chuck) may be required and must be sourced separately.
  • Roller Adjustment: Features detented rollers that can be rotated 360 degrees around the drive shaft for fine x-axis adjustments, accommodating various can diameters.
  • Seam Specifications (for B64 cans):
    • 1st Op Roller Gap (x-axis): 0.6mm +/- 0.1mm.
    • 1st Op Roller Height (y-axis): 0.05mm gap from the flat face of the roller to the top of the chuck.
    • 2nd Op Roller Gap (x-axis): 0.3mm +/- 0.1mm.
    • 2nd Op Roller Height (y-axis): 1.35mm +/- 0.05mm.
    • Actual Overlap (after 1st operation): Ideally more than 0.4mm (distance between the bottom of the body hook and the top of the cover hook).
    • Actual Overlap (final seam): At least 0.4mm, ideally over 1mm.
    • 2nd Op Seam Thickness: Average of 4 measurements around the can circumference should be between 1.2-1.3mm.
    • Seam Length 2nd Op: Ideally about 2.3-2.4mm, but a tight seal can be achieved up to 3.3mm if sufficient actual overlap is maintained.

Usage Features:

  • Initial Setup: Upon unpacking, the unit should be inspected for damage. Before initial operation, the rollers must be checked to ensure they do not contact the chuck by manually turning the flywheel or chuck.
  • Can Placement: Cans are placed on the turntable, and the turntable lever is used to raise the can and lid firmly into the chuck.
  • Operation Buttons:
    • Power Switch (On/Off): Depressed for full operation.
    • Operation Switch (Momentary): When the power switch is not depressed, this nudges the rollers for adjustment. When the power switch is depressed, it initiates the full seaming cycle.
  • Portability and Mounting: The machine is lightweight and has feet designed to grip the benchtop. For extended use, it can be clamped or mounted to a bench using screws through the mounting brackets on the bottom.
  • Chuck Changing: The chuck can be changed by unscrewing two grub nuts with a 3mm Allen key, pulling the chuck downwards, then pushing the new chuck onto the drive shaft as far as it goes and fastening it with the grub nuts.

Maintenance Features:

  • Calibration Checks: It is recommended to check the seam specifications every 50,000 cans or once a year to ensure cans remain within allowable tolerances.
  • Bottom Die (Turn Table) Height Adjustment: The turntable height can be adjusted by loosening the coupling nut with an Allen key or steel rod and rotating the table support counter-clockwise to raise or clockwise to lower. The can should be held firmly against the chuck without buckling.
  • Turn Table Position Adjustment:
    • Small Adjustments: Loosen the coupling nut, then use two fingers to slightly move the turntable in the desired direction while re-tightening the coupling nut.
    • Large Adjustments: Unplug the machine, tip it on its back, and use a 5mm Allen key to undo the three bolts securing the turntable to the base. Adjust the turntable position for concentricity with the chuck, then re-tighten the bolts.
  • Roller Height and Gap Adjustment (y-axis and x-axis):
    • Safety First: Always unplug the Cannular before making adjustments. Never turn the chuck anti-clockwise when adjusting rollers to avoid motor damage.
    • 1st Op Roller (Right): Loosen the y-axis adjustment nut (14mm spanner/socket) to set the "Y" gap (0.05mm) from the flat face of the roller to the top of the chuck. Then loosen the x-axis adjustment nut (14mm spanner/socket) to set the "X" gap (0.6mm +/- 0.1mm) between the chuck and the roller, ensuring the feeler gauge is flush with the chuck face at the same angle. Tighten nuts firmly.
    • 2nd Op Roller (Left): Follow the same procedure as the 1st Op roller. Set the "Y" gap to 1.35mm +/- 0.05mm and the "X" gap to 0.3mm +/- 0.1mm.
    • Fine x-axis Adjustments: Loosen the y-axis adjustment nut just enough to allow the roller to be held in position. Insert a 4mm Allen key into the hex socket on the underside of the roller and loosen it slightly (counter-clockwise). This allows the roller to be rotated around the drive shaft 360 degrees for fine x-axis adjustments. Be careful not to loosen too far, as the hex screw holds the roller to the shaft.
  • Roller Spin Check: After adjustments, ensure the rollers can spin freely without much resistance, even after tightening the Allen key bolts on their underside.
  • Overlap Assessment: To assess seam quality, prepare two test cans: one with only the first operation seam (Can A) and one with both operations (Can B). Cut a wedge out of the top of Can A (using an angle grinder or hacksaw) and scrape it clean to visually inspect the overlap. The actual overlap after the first operation should be more than 0.4mm. Then, examine Can B for final seam overlap, which should be at least 0.4mm, ideally over 1mm.
  • Seam Thickness Measurement: Use calipers to measure the 2nd Op Seam Thickness on Can B. The average of four measurements should be between 1.2-1.3mm.
  • Seam Length Measurement: Use calipers to measure the 2nd Op Seam Length on Can B. Ideally, it should be about 2.3-2.4mm, but a tight seal can be achieved up to 3.3mm if sufficient actual overlap is maintained.
  • Electrical Safety: Avoid contact of any electrical components with liquid. Ensure the Cannular is unplugged before placing any body part near moving parts or manually rotating the motor or chuck to prevent serious injury or damage.

KegLand Cannular KL15769 Specifications

General IconGeneral
BrandKegLand
ModelCannular KL15769
CategoryFood Saver
LanguageEnglish