This manual describes the Kelty H-Frame Series of backpacks, specifically the Trekker, Yukon, and Junior Tioga models. These backpacks are designed for outdoor activities like hiking and trekking, offering a classic workhorse frame for carrying loads.
Function Description:
The Kelty H-Frame Series backpacks are designed to carry gear comfortably and efficiently, especially for users with wider torsos. The H-Frame design moves the waistbelt down, which helps prevent towering loads and improves load transfer to the hips. The suspension system is highly adjustable to ensure a custom fit for various body types and preferences, aiming to maximize comfort and stability on the trail.
Important Technical Specifications:
The manual lists several models within the H-Frame Series:
- Trekker 4300
- Trekker 3900 ST
- Yukon 3500
- Yukon 3200
- Junior Tioga 2000
While specific capacities (e.g., in cubic inches or liters) are not detailed for each model beyond their names (which often indicate capacity), the general design emphasizes robust load-carrying capability.
Usage Features:
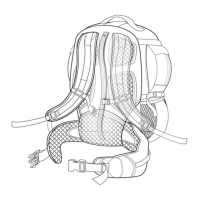
Pack Components:
- Adjustable Shoulder Straps: These straps can be adjusted to different widths to accommodate various shoulder anatomies and prevent pinching.
- Adjustable Back Panel: This panel slides up and down, allowing users to adjust the pack for different torso sizes, ensuring the waistbelt and shoulder straps align correctly.
- Adjustable Height Sternum Strap: Designed for a perfect fit, this strap crosses the chest high, just below the clavicle, to prevent interference with breathing and to draw the shoulder straps together for stability.
- Adjustable Height Frame: The frame itself can be customized to fine-tune the pack's fit.
- Belt Stabilizer Straps: Located on the waistbelt, these straps help transfer and control the load, enhancing stability.
- Contoured Waistbelt: Features plastic reinforcement for superior load support, distributing weight effectively to the hips.
Custom Fitting Your Pack:
The manual provides a detailed, sequential process for custom fitting:
-
Waistbelt Position:
- Start by loosening all load-lifter and belt stabilizer straps.
- Weight the pack with at least 25 lb (35 lb is ideal) before fitting.
- Put the pack on and tighten the waistbelt. The waistbelt should ideally sit on the hip bones, just under the rib cage, with the buckle approximately over the belly button. Wearing the belt high on the waist ensures proper loading of the skeletal frame and engages strong muscle groups (quadriceps and gluteals), preventing restricted blood flow, muscle fatigue, nerve pinching, and numbness that can occur if worn too low. If a low position is preferred, add one to two inches to your torso length measurement.
-
Shoulder Strap Position:
- Once the waistbelt is correctly positioned, tighten the shoulder straps by pulling the webbing at their lower ends down and back.
- The top of the load-lifter strap should be 3-4 inches above the top of your shoulder. During this step, load-lifter straps should be kept loose.
- If the shoulder strap position is incorrect, the suspension panel and shoulder straps need adjustment.
-
Shoulder Strap Adjustment:
- If shoulder straps pinch the neck/shoulders or feel too wide, adjust the clevis pin that attaches the straps to the frame. This involves removing a split ring, sliding the clevis pin out, inserting it into a desired hole, and replacing the split ring. This process is repeated for the opposite side.
-
Suspension Adjustment:
- Locate and loosen the vertical strap behind the backpanel (accessed from the bottom of the mesh panel).
- Locate chrome buttons and clevis pins on the frame under the backpanel.
- Adjust the height of the waistbelt by removing the clevis pins.
- Push in the two chrome buttons while sliding the frame up or down.
- Replace the clevis pins in holes just underneath the chrome buttons and tighten the vertical strap.
-
Various Straps Adjustments:
- Load-Lifter Straps (if applicable): Snug these straps to lift the shoulder straps (and pack's weight) off the top of the shoulders. Avoid pulling them more than 1/2 inch off the shoulder to prevent pressure points.
- Sternum Strap (optional): Position this strap high on the chest, just below the clavicle, to avoid interfering with breathing. It draws and tightens the shoulder straps; slight loosening may be desired.
- Belt Stabilizer Straps (if applicable): Pull these straps just snug, being wary of overtightening, which can create gaps between the user and the belt. It's suggested to leave them loose for the first 15-30 minutes of hiking.
Packing Hints:
Proper loading significantly impacts comfort:
- Heavy Items: Pack high and close to the back for trail walking and gentle terrain. This includes water, stove, fuel, food, and tent poles.
- Lightest Items: Place these items (sleeping bag, pad, rain/wind gear, bivy sack, bulky clothing/fleece) at the bottom of the pack. The sleeping bag should always be at the bottom.
- Medium Items: Pack around heavy items to prevent shifting. This includes cooking utensils, some clothing, some foods, and the tent body and fly.
- Accessibility: Items needed during the day should be packed in the top of the main compartment, top pocket, or side pockets.
- External Carry: Foam pads and odd-sized equipment (like long tent poles) can be carried on the outside using accessory patches, ice axe loops, or ski slots.
- Avoid: Do not put heavy items like water bottles or climbing equipment in pockets far from your back, as this can cause the pack to lean away from the shoulders, indicating a weight distribution problem.
Maintenance Features:
The manual includes a Warranty section:
- Kelty products are warranted against defects in materials and workmanship for the product's lifetime.
- This warranty does not cover damage due to normal wear and tear, natural hazards, abuse, or alteration.
- For warranty service, customers are directed to call the Kelty Customer Service Department at 800-423-2320.
Kelty's address, phone, fax, and website are provided for support and warranty claims:
- 6235 Lookout Road, Boulder CO 80301
- Phone: 800.423.2320
- Fax: 800.504.2745
- Website: WWW.KELTY.COM