The Kendon Go! Series Stand-Up Trailer is a versatile and compact trailer designed for transporting motorcycles, ATVs, and other equipment, with a unique stand-up storage feature. The trailer is manufactured by Kendon Industries, LLC, located at 2990 E. Miraloma Ave., Anaheim, CA 92806 USA. They can be reached at 714-630-7144 or info@KendonUSA.com, and their website is www.KendonUSA.com.
Function Description:
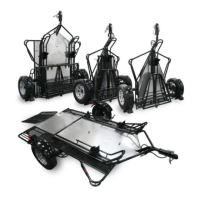
The Kendon Go! Series Stand-Up Trailer is primarily used for transporting motorcycles and other small vehicles. Its standout feature is the ability to fold in half and stand upright for compact storage, which is ideal for users with limited garage or storage space. The trailer utilizes a torsion suspension system for a smooth ride and independent wheel movement. It is designed for easy loading and unloading with integrated ramps and wheel chocks.
Important Technical Specifications:
- Cargo Capacity Limits:
- Go! Series Single Rail Transport: 1,000 pounds U.S.
- Go! Series Dual Rail Transport: 2,000 pounds U.S.
- Go! Series 3-Rail/Combo Trailer: 1,500 pounds U.S.
- ATV / Utility Trailer: 2,000 pounds U.S.
- Tires: ST175/80R13 Radial Tires with Steel Chrome Plated Rims/Wheels.
- Offset: Neutral, or zero (0), offset.
- Speed Rating: 65 MPH for all ST tires.
- Ball Height: The maximum approved ball height to carry the maximum approved weight for your loaded trailer is 19 inches.
- Hitch Type: Class 2 or greater hitch with a 2-inch or greater trailer hitch ball.
- Coupler: 2" fits 2" ball.
- Electrical Connector: 4-Pin Flat.
- Lug Nuts: ½"-20.
- Spare Tire Lug Nuts: ½"-20 open end.
- Hub/Bearing Grease: Lucas Oil Red N' Tacky.
- Black Powder Coat: Cardinal T009-BK12 or DuPont Bike Black PFB 603 S9.
- Powder Coat Touch Up Spray Paint: Krylon Fusion Gloss Black or Rust-Oleum Gloss Black (rust inhibiting).
- Axle: Torsion suspension system, completely self-contained within the axle tube, providing independent suspension.
Usage Features:
- Loading and Unloading:
- Proper attachment of loading ramps is crucial. The ramp hooks must be properly inserted into the trailer slots, allowing the ramp to pivot freely to the ground.
- A spotter is recommended for loading and unloading motorcycles due to varying designs and weights.
- The front wheel chock must be in the "open" or "load" position (rotated towards the rear, flat on the trailer rail) before loading.
- Motorcycles should be secured with at least four tie-down straps, triangulating the system for stability. Specific tie-down locations are recommended: two forward tie-down points (outer-ear/outrigger) and two rear tie-down points (rear swing-arm or suspension area).
- Ramps are clearly marked as "Right" and "Left" and are not interchangeable. They are designed for rider footing during loading/unloading, not to hold vehicle weight.
- Ramps must be properly secured to the trailer prior to towing.
- Towing:
- Maintain proper tire inflation and maintenance as recommended by the wheel/tire manufacturer.
- Perform a "Shakedown" Drive for at least one short trial run to familiarize with the trailer's characteristics.
- Drive at moderate to slow speeds, especially in curves, and avoid sudden starts and stops.
- Be courteous to other drivers and signal intentions clearly.
- Never tailgate; maintain at least one car and trailer length for each 10 M.P.H. of speed.
- In case of problems, pull over safely and check the load and tie-down straps.
- When towing empty, the rear section must be secured in the folded position using the rubber latch.
- Storage:
- The trailer folds in half and stands upright for compact storage.
- To fold, disconnect from the vehicle, roll it by the tongue to its storage location with weight on the street tires (not casters).
- Lift the tongue and the rear of the trailer will rotate from the street tires onto the integrated casters.
- Once on the casters, it can be smoothly rolled to its final storage area.
- For final storage, ensure the back half of the trailer is secure using the rubber latch.
- For safety, it's recommended to secure the trailer to a wall using a safety chain to an eye-bolt in the wall.
- A spotter/helper is recommended when practicing the stand-up procedure, especially on uneven surfaces.
Maintenance Features:
- Wheel Installation:
- Install wheels onto hubs and tighten lug nuts with a torque wrench to 60 foot-pounds using a "star" pattern.
- Re-tighten lug nuts after the first 50 miles.
- Trailer wheels may need to be balanced before first use.
- Tail Light Installation:
- Connect tail light wiring harness to the tail light bracket, ensuring proper wire connections (color-coded).
- Attach the ground wire with a wire ring connector to one of the tail light bolts.
- Bearing Maintenance:
- Check and repack bearings after the first 500 miles, and every 6 months or 2000 miles thereafter. Higher mileage use may require more frequent inspections.
- To repack bearings, remove the aluminum dust cap, cotter pin, castle nut, washer, and outer bearing. The entire hub assembly can be pulled off the spindle.
- Clean and repack bearings with fresh grease (Lucas Oil Red N' Tacky Grease). Adding grease to dirty bearings without cleaning is not recommended.
- Coupler Maintenance:
- The trailer coupler is a simple spring-loaded latching mechanism.
- Apply a light grease or spray lubricant to moving parts to prevent squeaking and rust.
- Apply a little grease inside the 2" coupler so the trailer ball moves freely and does not chip the powder coat on the underside of the coupler.
- Exposed Bolt/Nut Maintenance:
- Use anti-seize or light spray lubricant to prevent threads of bolts and nuts from sticking and/or corroding over time.
- Wash the trailer after use to maintain the powder coat.
- Diamond Plate Care:
- Clean with commercial motorcycle or automobile car wash detergents.
- Do not use harsh chemicals.
- Diamond plate is not warranted against denting.
- Powder Coat Frame and Components:
- Powder coating provides a durable finish.
- Regular cleaning helps maintain the finish.
- Touch-up paint (Krylon Fusion Gloss Black or Rust-Oleum Gloss Black) can be used for scratches or chips.
- Trailer Caster Care:
- Kendon Go! Series trailer casters do not require much maintenance other than occasional re-greasing of bearings.
- Use a light grease or liquid lubricant.
- Casters should be removed and re-greased for lasting performance.
- Avoid rolling casters on rough surfaces like lawns or cobblestones.
- Trailer Frame Limited Warranty: The frame assembly is warranted against defects in manufacture or design for a period of one (1) year from the date of original purchase. This is a LIMITED WARRANTY.
- Trailer Axle Limited Warranty: The trailer axle assembly is warranted against defects in material or workmanship for a period of one (1) year from the date of original purchase. This is an EXCLUSIVE & IN LIEU OF ALL OTHER WARRANTIES. Bearings and seals are covered for a period of six (6) months from the date of purchase.
- Wheel & Tire Warranty: The original manufacturer of the wheels and tires provides their own warranties. Refer to supplied literature or contact Kendon for referral.
- Warranty Exclusions: Improper installation, damage not resulting from defect or malfunction, unreasonable use (including failure to provide reasonable and necessary maintenance), and improper wheel nut torque.
- Remedy: Repair or replacement of a covered defect. Kendon is not liable for incidental or consequential damages.
The manual emphasizes safety warnings throughout, including the risk of serious injury, death, or property damage from improper use, loading, and unloading. It stresses the importance of reading and understanding all instructions, using the trailer for adult use only, and keeping children away. It also highlights the need to ensure the front wheel chock does not contact the bottom rear of the front fender, fairing, or other parts of the motorcycle BEFORE loading.