EasyManua.ls Logo

Kenmore 117-95 - Bobbin Case and Shuttle Operations; Threading the Bobbin Case; Placing and Removing Bobbin Case in Shuttle

Kenmore 117-95
20 pages
Print Icon
To Next Page IconTo Next Page
To Previous Page IconTo Previous Page
Loading...
PIN
Fi
gure
6
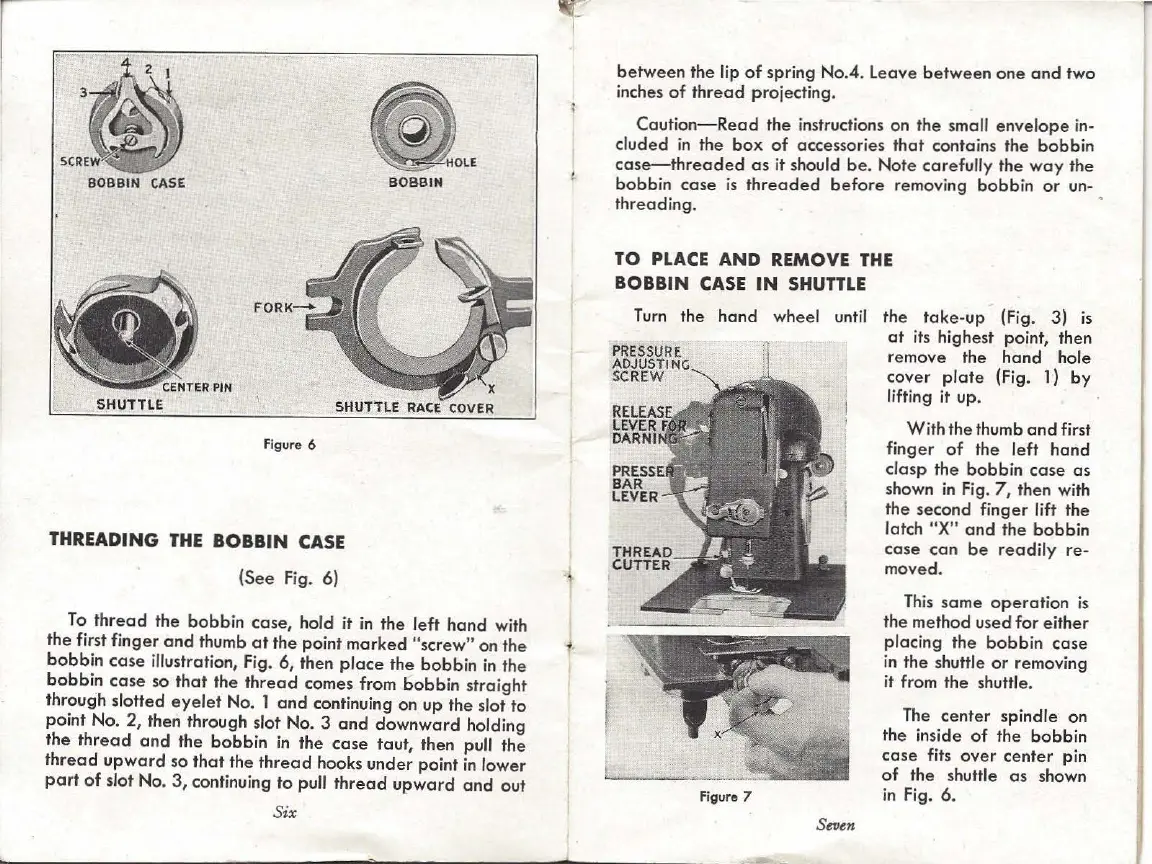
THREADING
THE
BOBBIN
CASE
(See Fig.
6)
BOBBIN
To
thread
the
bobbin
case
, hold it
in
the left
hand
with
the
first finger
and
thumb
at
the point
marked
"screw" on
the
bobbin
case
illustration, fig.
6,
then
place
the bobbin
in
the
bobbin
case
so
that
the
thread
comes from
bobbin
straight
through slotted
eyelet
No. 1
and
continuing on
up
the slot
to
point No.
2,
then through slot No. 3
and
downward
holding
the
thread
and
the
bobbin
in
the
case
taut
, then pull the
thread
upward
so
that
the
thread
hooks
under
point
in
lower
part
of
slot No.
3,
continuing
to
pull
thread
upward
and
out
Six
between
the lip
of
spring No.4. Le
ave
between
one
and
two
inches
of
thread
projecting.
Caution-Read
the instructions on the small
envelope
in-
cluded
in
the
box
of
accessories
that
contains the
bobbin
case-threaded
as
it should
be.
Note carefully the
way
the
bobbin
case
is
threaded
before
re
moving bobbin
or
un·
threading
.
TO
PLACE
AND
REMOVE
THE
BOBBIN
CASE
IN
SHUTTLE
Turn
the
hand
wheel until
PRESSURE
ADJUSTING
SCR
EW
Fi
gure
7
Ser~en
the
take-up
(Fig. 3)
is
at
its highest point, then
remove the
hand
hole
cover
plate
(Fig. 1) by
lifting it up.
With the thumb
and
first
finger
of
the
left
hand
clasp
the
bobbin
case
as
shown
in
fig. 7, then with
the second finger
lift the
latch
"
X"
and
the bobbin
ca
se
can
be
readily
re-
moved.
This
same
operation
is
the method used for
either
placing
the
bobbin
case
in
the shuttle
or
removing
it from the shuttle.
The
center
spindle on
the inside
of
the
bobbin
ca
se fits
over
center
pin
of
the shuttle
as
shown
in
fig.
6.