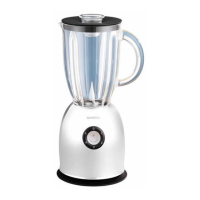
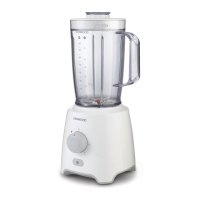
key
blender
filler cap
dual action locking lid
lid seal
glass goblet
sealing ring
blade unit
base
pulse control
speed control
power unit
cord storage
to use your blender
1 Fit the sealing ring - ensuring the
seal is fully located under the rim
of the blade unit. Leaking will
occur if the seal is damaged
or not fitted correctly.
2 Clip the blade unit into the base.
3 Screw the goblet onto the blade
unit.
4 Put your ingredients into the
goblet.
5 Push the lid seal onto the
underside of the lid.
6 Fit and lock the filler cap in the lid,
by turning one position .
7 Fit the lid to the goblet and turn
the filler cap to to lock.
The filler cap can be located in 3
different positions (see
A)
- filler cap removable for
adding ingredients to the goblet.
- lid unlocked/filler cap
locked to the lid for fitting and
removing the lid.
- lid locked.
8 Place the blender onto the power
unit.
9 Plug in and the off switch “0” will
light up.
10 Select a speed and the relevant
number will light up.
Use your blender for soups,
sauces, drinks, pâtés,
mayonnaise, dressings etc.
safety
●
CAUTION: Blending very hot
liquids may result in hot
liquid and steam being
forced suddenly past the lid
or filler cap. Allow the liquid
to cool or reduce the
quantity and select a lower
speed if available. Protect
your hands with a cloth or
oven gloves when handling
the hot goblet and lid.
●
Switch off and unplug:
●●
before fitting or removing parts
●●
after use
●●
before cleaning.
●
Keep hands and utensils out of the
blender when it’s on the power
unit.
●
Don’t touch the sharp blades.
●
Don’t let children or infirm people
use the machine unsupervised.
●
Never use a damaged machine.
Get it checked or repaired: see
‘service’.
●
Never use an unauthorised
attachment.
●
Never leave the machine on
unattended.
●
Don’t let children play with the
machine.
●
When removing the blender from
the power unit:
●●
wait until the blades have
completely stopped;
●●
don’t accidentally unscrew the
goblet from the blade unit.
●
Never run the blender empty.
●
Only use the machine for its
intended domestic use.
●
Always unplug your blender
when not in use.
●
Only operate the blender with the
lid in place.
before plugging in
Make sure your electricity supply is
the same as the one shown on the
underside of the machine.
Important – UK only
●
The wires in the cord are coloured
as follows:
Green and Yellow = Earth,
Blue = Neutral,
Brown = Live.
●
The appliance must be protected
by a 3A approved (BS1362) fuse.
●
WARNING: THIS APPLIANCE
MUST BE EARTHED.
Note:
●
For non-rewireable plugs the fuse
cover MUST be refitted when
replacing the fuse. If the fuse cover
is lost then the plug must not be
used until a replacement can be
obtained. The correct fuse cover is
identified by colour and a
replacement may be obtained
from your Kenwood Authorised
Repairer (see Service).
●
If a non-rewireable plug is cut off it
must be DESTROYED
IMMEDIATELY. An electric shock
hazard may arise if an unwanted
non-rewireable pug is inadvertently
inserted into a 13A socket outlet.
●
This machine complies with
European Economic Community
Directive 89/336/EEC.
before using for the first
time
1 Remove all packaging.
2 Wash the parts: see ‘cleaning’.
recommended speed chart
speed usage/food items max. quantity
1 - 2 Frothing milk 500ml
Light mixes e.g. batters, milkshakes,
scrambled egg 1 litre
3 - 4 Soups 1.3 litres
Thicker mixes e.g. sauces, pâtés
Mayonnaise 3 eggs + 450ml
oil
Smoothie drinks
Place the fresh fruit and liquid ingredients in 800ml liquid
first (includes yoghurt, milk and fruit juices)
Then add ice or frozen ingredients (includes
frozen fruit, ice or ice cream)
5 Ice crushing 6 cubes
Automatic pulsing action
(P) Operates the motor in a start/stop action. The
pulse motor keeps running for as long as the button
is pushed in, this allows you to control the
texture of various foods e.g. Pâtés
Important
●
To ensure long life of your blender,
never run it for longer than 60
seconds. Switch off as soon as
you’ve got the right consistency.
●
Don’t process spices – they may
damage the plastic.
●
The machine won’t work if the
blender is fitted incorrectly.
A