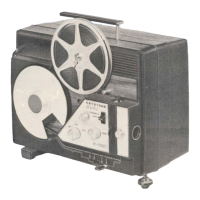
The Keystone Projector Model K-109 is an 8mm film projector designed for home use, enabling users to project life-like pictures of familiar people and scenes onto a screen.
Function Description:
The projector's primary function is to display 8mm motion picture film. It achieves this by feeding film through an aperture, illuminating it with a lamp, and projecting the image through a lens onto a screen. The motor drives the film movement, and various controls allow for adjustment of projection speed, focus, and image position. It also includes features for still projection, reversing film movement, and rewinding film. A built-in splicer allows for film repair and editing.
Important Technical Specifications:
- Film Type: 8 millimeter
- Model: K-109
- Standard Equipment: One empty 400-foot film reel, a 1" projection lens, and a 750-watt lamp.
- Motor Operation: Operates on 110-120 volts alternating or direct current.
- Lamp: T12 medium prefocus base, 750 watt, 115 volt. A 500-watt lamp can also be used, though with less illumination. The average life of the lamp is 18 to 30 hours when used at rated voltage.
- Projection Lenses: Interchangeable lenses are a key feature, allowing for various picture sizes at different projection distances. The manual provides a chart for 3/4", 1", and 1 1/2" focal length lenses, showing the width of the picture at distances from 4 feet to 40 feet.
- Film Material: All 8mm film on the market is non-inflammable and safe from fire hazard.
Usage Features:
- Operation: Simple to operate, but requires accurate following of instructions to prevent damage to the machine or film.
- Setup: Requires a firm table or stand in front of a screen. The room should be as dark as possible for maximum brilliancy.
- Lamp Installation: The lamp is carefully inserted into the socket, ensuring the lugs on the base fit into the corresponding slots, then pressed down and turned clockwise to lock.
- Pilot Light: Illuminates when the cord is plugged in, and can be shielded by rotating its dome top.
- Master Switch: Controls current to the motor and lamp. Mid-position operates the motor; fully right turns on the lamp while the motor runs.
- Speed Control: A rheostat knob regulates motor speed. Turning clockwise increases speed, counter-clockwise decreases it. Normal speed is achieved just beyond where light flicker stops. The lamp cannot be turned on if the motor is not running.
- Tilting Knob: Pivots the projector up or down to adjust picture height on the screen.
- Framer Lever: Adjusts the picture on the screen to compensate for film shrinkage.
- Projection Lens: Turns right or left to bring the picture into sharp focus.
- Reversing Switch: Allows for reversing film movement for special effects.
- Still Projection: A "still picture" lever stops the film on any desired picture. A heat-resistant glass moves in front of the condenser to protect the film from excessive heat. The hand setting knob may need to be turned to open the shutter if the screen is dark.
- Rewinding: The rewind lever must be moved to the "on" position while the projector is stopped. Film is rewound directly from the take-up reel to the supply reel, bypassing the film gate and sprocket.
- Room Lamp Plug Receptacle: A floor or table lamp can be plugged in here, automatically turning off when the projector's master switch is ON and back on when it's OFF.
- Splicer Drawer: Contains a built-in splicer for repairing film breaks.
Maintenance Features:
- Oiling: Moving parts should be oiled occasionally with high-grade watch oil or Keystone projection oil. 9 oil holes are indicated for this purpose. Oiling is recommended after about 10 hours of running or every month or two for infrequent use.
- Cleaning Aperture: Dust and lint can collect, causing fuzzy edges. The projection lens can be pulled out, and a soft-haired brush or cloth-wrapped pencil can be inserted through the lens holder to clean the aperture.
- Removing Pressure Plate: The pressure plate can be removed to clean the film channel and prevent scratches on valuable film. It should be wiped with a lintless cloth moistened with alcohol or dry cleanser.
- Cleaning Condenser: The condenser holder can be pulled out, and the lens wiped clean with a soft lintless cloth.
- Cleaning Reflector: The reflector can be removed by taking out two screws, but only after the projector has cooled off.
- Cleaning Projection Lens: The lens must be kept clean and free from dirt or oil. Outside surfaces should be wiped with a soft, clean lintless cloth. Disassembly of the lens is not recommended.
- Adjusting Lamp: The lamp socket can be adjusted by loosening two screws under the lamphouse base and turning the lamp adjusting screw until the filament is in the correct position for even illumination. A 3/32" space between the condenser and the lamp is crucial for proper ventilation.
- Film Care: Film should be stored in a cool, moist place, ideally in Keystone Film Cans, to prevent brittleness. If brittle, placing the reel in a covered can with a moist sponge for 24 hours can restore flexibility. Kodachrome film should be kept dry and cool.
- Splicing: Detailed instructions are provided for using the built-in splicer to repair film breaks, emphasizing keeping the emulsion side up and ensuring clean, dry surfaces before applying cement.