EasyManua.ls Logo

KidKraft Cedar Summit Adventure Ridge Playset User Manual

KidKraft Cedar Summit Adventure Ridge Playset
129 pages
To Next Page IconTo Next Page
Page #1 background imageLoading...
Page #1 background image
INSTALLATION AND OPERATING INSTRUCTIONS
ADVENTURE RIDGE PLAYSET - F25730
Rev 02/02/2018
Table of Contents
Warnings and Safe Play Instructions .............pg. 2
Protective Surfacing Guidelines. . . . . . . . . . . . . . . . . . pg. 3
Instructions for Proper Maintenance ............pg. 4
About Our Wood – Limited Warranty ............pg. 5
Keys to Assembly Success .......................pg. 6
Part ID ..........................................pg. 8
Step-By-Step Instructions ..................... pg. 19
Installation of I.D./Warning Plaque .........Final Step
OBSTACLE FREE SAFETY ZONE -33’2” x 30’10” (10.3 x 9.4 m) area requires Protecve Surfacing. See page 3.
MAXIMUM VERTICAL FALL HEIGHT - 6’ 7” (2.01 m)
CAPACITY - 15 Users Maximum, Ages 3 to 10; Weight Limit 110 lbs. (49.9 kg) per child.
RESIDENTIAL HOME USE ONLY. Not intended for public areas such as mul-unit residences, schools,
churches, nurseries, day cares or parks.
WARNING
Cedar Summit by KidKraft
4630 Olin Road
Dallas, TX 75244, United States
customersupport@kidkraft.com
Online Parts Replacement:
Cedarsummitplay.com/parts-center-warranty-claim
Customer Service:
1(800) 933-0771 or (972) 385-0100
KidKraft Netherlands BV
Olympisch Stadion 29
1076DE Amsterdam, The Netherlands
Europe Customer Service: +31 (0)20 305 8620
europecustomerservice@kidkraft.com
EU Online Parts Replacement: parts.kidkraft.eu
5.4m
6.3m
9.4m
10.3m
Adventure Ridge
Costco.com 2018
Safety Zone
10 - 12 Hrs
FOR FORT & SWING
TWO PERSON
ASSEMBLY
2-4 Hrs
10 - 12 Hrs
FOR FORT & SWING
TWO PERSON
ASSEMBLY
10 - 12 Hrs
FOR FORT & SWING
Approx. 2 Hrs
TUBE SLIDE
To reduce the risk of serious injury or death, you must
read and follow these instrucons. Keep and refer to these
instrucons oen and give them to any future owner of this
play set. Manufacturer contact informaon provided below.
By
Question and Answer IconNeed help?

Do you have a question about the KidKraft Cedar Summit Adventure Ridge Playset and is the answer not in the manual?
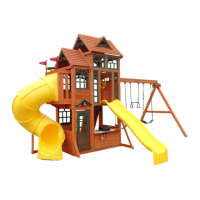
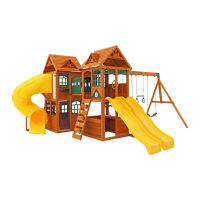
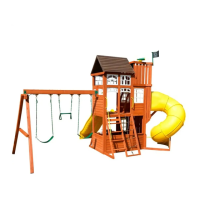
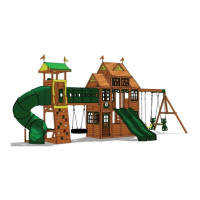
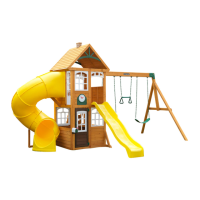
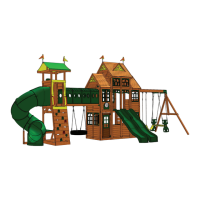
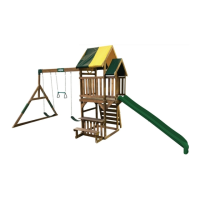
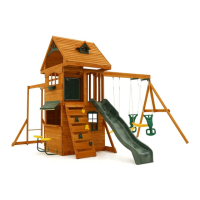
KidKraft Cedar Summit Adventure Ridge Playset Specifications

General IconGeneral
MaterialCedar Wood
Assembly RequiredYes
Recommended Age3-10 years
Featureschalkboard, and telescope
Product TypePlayset
Warranty1-year limited warranty

Summary

Warnings and Safe Play Instructions

General Safety Instructions

Follow all warnings and recommendations for safe play and supervision.

Serious Head Injury Hazard

Install shock-absorbing surfacing under and around the playset to reduce fall injury risk.

Collision Hazard

Ensure playset is placed 6 feet away from any obstructions.

Choking Hazard / Sharp Edges

Adult assembly required; keep small parts away from children until fully assembled.

Strangulation Hazard

Never allow play with cords or wear loose clothing/items that can cause entanglement.

Tip Over Hazard

Choose a level location and anchor the play set properly to prevent tipping.

Protective Surfacing

Loose-Fill Materials

Maintain recommended depth of wood mulch, EWF, or rubber for equipment height.

Poured-In-Place Surfaces or Rubber Tiles

Professional installation usually required; check ASTM F1292 compliance.

Placement Guidelines

Extend surfacing at least 6 feet from equipment and specific distances for swings.

Instructions for Proper Maintenance

Hardware Checks

Inspect and tighten hardware, check for rust, sharp edges, and protruding threads.

Shock Absorbing Surfacing Maintenance

Rake and check depth of loose-fill surfacing, replace as necessary.

Swing Hangers and Swings/Rides Checks

Check for secure orientation, wear, fraying, corrosion, or damage; lubricate if needed.

About Our Wood

Weathering Effects and Reduction

Wood weathers naturally; apply water repellent/stain annually to reduce effects.

5 Year Limited Warranty

Keys to Assembly Success

Tools and Parts Identification

Lists required tools, explains part identification system, and assembly symbols.

Proper Hardware Assembly

Details correct methods for using lag screws, bolts, washers, and T-nuts.

Part Identification

Hardware Identification

Related product manuals