This document is a user manual for the KING BIRD Greenhouse, specifically for models 1313G, 1313W, 1354G, and 1354W. The greenhouse dimensions are 10' x 6.6' x 6.6'.
Function Description
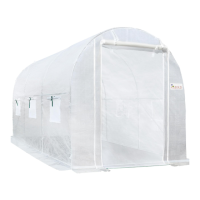
The KING BIRD Greenhouse is designed to provide a controlled environment for growing plants, protecting them from adverse weather conditions, and extending the growing season. It features a sturdy frame and a cover, with some models including a watering kit for automated irrigation. The greenhouse aims to create an optimal climate for plant growth, allowing users to cultivate a variety of plants, vegetables, and herbs.
Important Technical Specifications
Dimensions:
- All models: 10' x 6.6' x 6.6' (length x width x height)
Models:
- 1313G: 10 x 6.6 x 6.6 ft Greenhouse (Green cover)
- 1313W: 10 x 6.6 x 6.6 ft Greenhouse (White cover)
- 1354G: 10 x 6.6 x 6.6 ft Greenhouse with watering kit (Green cover)
- 1354W: 10 x 6.6 x 6.6 ft Greenhouse with watering kit (White cover)
Parts List (Common to 1313G/1313W and 1354G/1354W, unless specified):
- Arch Pole 1 (61.8"): 8 pieces
- Pole with 2 Female Ends (40.2"): 9 pieces
- Pole with Male & Female End (40.2"): 14 pieces
- Floor Pole with 1 Male End (39.7"): 2 pieces
- Floor Pole with 1 Female End (39.7"): 2 pieces
- Long Diagonal Pole (56.3"): 2 pieces
- Cover: 1 piece (Green for 1313G/1354G, White for 1313W/1354W)
- Screw Kit: 1 set (includes 2 x M6x30mm Screws and 20 x M6x50mm Screws)
- Tool Kit: 1 set (includes 2 x Small Wrenches and 2 x Allen Keys)
- Ground Stake: 18 pieces
- Glove: 4 pieces (2 Pairs)
- Screw Cap: 22 pieces
- Pole Plug: 10 pieces
- Tie Rope: 4 pieces
Additional Parts for Watering Kit (Models 1354G/1354W):
- Hose (49.2"): 1 piece
- Sprinkler: 3 pieces
- Hose-Sprinkler Connector: 3 pieces
- Hose Plug: 1 piece
- Faucet Converter: 1 piece
- Stainless Steel Clamp: 5 pieces
- Hose Cutter: 1 piece
Usage Features
Soil Foundation Preparation:
- A firm and compact soil foundation is crucial for stability.
- The ground should be flat. Using a roller, vibrating plate, or spirit level is recommended.
- The foundation should be prepared to the greenhouse size (10' x 6.6') and at least 4 inches deep.
- The manual emphasizes burying the extended edge of the cover at both sides into the soil for stability.
Assembly Steps:
- General: It is important to check all parts against the Parts List before assembly. A prepared foundation is necessary. The manual recommends wearing gloves (#13) for safety.
- Steel Pipe Assembly:
- Assemble four curved supports using longer bolts for preliminary fixation.
- Assemble two floor supports using shorter bolts.
- Assemble two horizontal supports using longer bolts for preliminary fixation.
- Frame Assembly:
- Step 1 (Bottom Frame): Lay out the bottom frame using 2 x Part #2, 4 x Part #3, 2 x Part #4, and 2 x Part #5. Do not tighten all joints at this stage.
- Step 2 (Attaching Poles): Attach poles #6, #2, and #3 to the bottom frame. Ensure all 4 x poles (#2) are on the SAME SIDE and all 4 x poles (#3) are on the OTHER SIDE. The diagonal poles (#6) should stay in-between at each corner joint.
- Step 3 (Forming the Tunnel): Use 8 x Part #1, 2 x Part #2, and 4 x Part #3. Assemble the first two layers of the top tunnel from the opening, connecting poles (2 x #2, 2 x #3) at both sides, then adding 4 x poles (#1). Continue with the next layers, adding poles (#1) at the top, poles (#3) at both sides, and poles (#1) at the top in turn, until the tunnel is formed. Ensure the ends of poles (#2 & #3) are in front of the ends of poles (#1) at each joint to protect the cover.
- Step 4 (Reinforcing the Tunnel): Reinforce the tunnel with 1 x pole (#2) and 2 x poles (#3). Ensure the ends of poles (#2 & #3) are in front of the ends of poles (#1) at each joint. Tighten all screws at each joint.
- Cover Installation (Step 5 for 1313G/1313W, Step 6 for 1354G/1354W):
- Equip the joint of frames with 22 x Screw Caps (#14) and 10 x Pole Plugs (#15).
- Unzip the cover, raise it over the frame (either from the left or right side), carefully drape it on the assembled frame, and finally fix it to the frame with built-in Velcro tapes.
- Secure the structure to the ground using 18 x Ground Stakes (#12) and 4 x Tie Ropes (#16). Tie a stake at the rope end, circle it over the tunnel, and insert the other end of the rope down to the ground with another stake added. Tie down the bottom frame poles.
- Weigh down the structure by adding bricks, stones, sandbags, etc., to the extended edge of the cover.
Watering Kit Installation (Models 1354G/1354W - Step 5):
- Reminders:
- Compatible faucet size: all common sizes. Remove the innermost one to fit the 20mm faucet.
- Adjust water pressure to be small to high, checking if the faucet is tightened.
- Adjust the direction of water sprinklers by bending the hoses.
- Control water spray force by rotating the nozzle properly.
- Steps:
- Use the Hose Cutter (#G) to divide the Water Hose (#A) into 3 sections.
- Connect the water hose and your faucet with the Faucet Converter (#E). Fix the hose with the preinstalled stainless steel clamp.
- Connect the Sprinklers (#B) and water hose with the Connectors (#C).
- Use the Stainless Steel Clamps (#F) to secure the Watering Kit on the top bars.
Maintenance Features
To maintain the greenhouse in optimal condition and for longer service life, the following are recommended:
- Cleaning: Regularly clean up snow or accumulated water to prevent damage from overloading.
- Securing: Secure the cover at all times by tying all the Velcro or ropes inside and fixing the extended part of the cover with extra weights (soil, bricks, stones, sandbags, etc.).
- Ventilation: Open all doors and windows to let the winds pass through, especially during hot weather.
- Protection from Extreme Weather: Put down the cover, or move the greenhouse and plants somewhere sheltered before extremely bad weather (hurricanes, tornadoes, etc.).
- Temperature Control: Understand that local weather influences the performance. Other equipment like a heater or else, if higher or certain temperatures are required, may be necessary.
Warranty:
- The limited warranty covers materials and craftsmanship under normal use and service conditions.
- Proof of order (order number or shipping information on the shipping carton) is required for warranty claims.
- 365-day warranty: For Poles, Cover, and the Watering Kit.
- Lifetime warranty: For other parts not mentioned above.
Reminders for Warranty Claims:
- To access your order information online, contact customer service.
- To get what you need as soon as possible, provide the following information at your first inquiry:
- Order number
- Required parts (name, quantity, and part number)
- Pictures (or video clips, if applicable)
Warning:
- Restructuring the product without written permission from KING BIRD will VOID the warranty.
- Damages due to improper use in severe weather conditions, including but not limited to high winds, heavy rain, sleet, snow, etc., will NOT be covered by the warranty.