3
• Remove the faceplate by removing the screw at the bottom of the product and lifting off
• Mark the location of the fixing holes and drill ensuring not to infringe with any gas / water pipes or electrical
cables
• Remove the cable knock-out on the baseplate and guide the mains cable through
• Fix the base to the mounting surface using the fixings provided
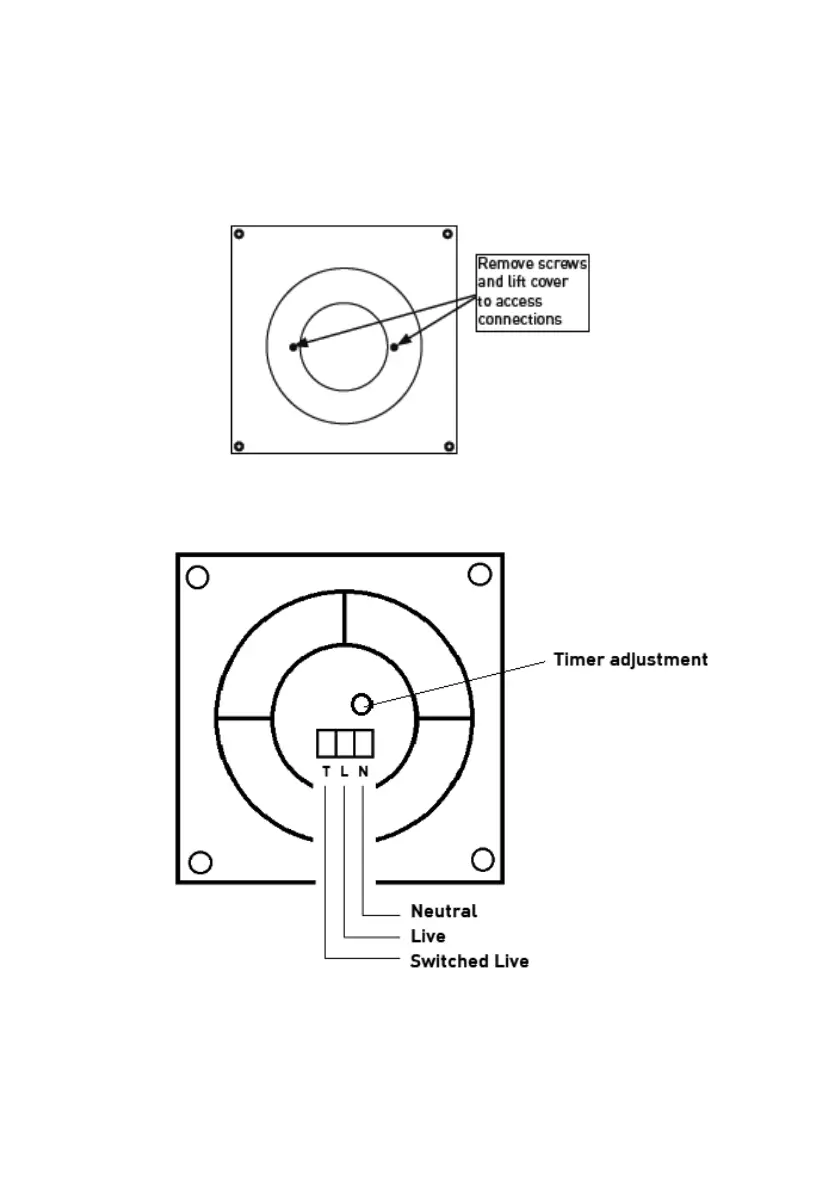
• Remove the terminal cover by removing the two screws (see Fig. 2)
• Carefully bring the wires into the terminal enclosure and ensuring correct polarity is observed, wire as
shown in Fig. 3
• Adjust the overrun timer with the aid of a small screwdriver. Turn anti-clockwise to reduce (to a minimum
of 2 minutes) and clockwise to increase (to a maximum of 30 minutes)
• Reassemble the terminal cover, faceplate and front fascia
• Switch on and check for correct operation
Fig. 2
Fig. 3
Fig. 2
• Carefully bring the wires into the terminal enclosure and ensuring correct polarity is observed, wire as
shown in Fig. 3
Fig. 3
• Adjust the overrun timer with the aid of a small screwdriver. Turn anti-clockwise to reduce (to a
minimum of 2 minutes) and clockwise to increase (to a maximum of 30 minutes)
• Reassemble the terminal cover, faceplate and front fascia
• Switch on and check for correct operation
WARNING
This product must be disconnected from the circuit if subjected to any high voltage or insulation resistance
testing. Irreparable damage will occur if this instruction is not followed.
GENERAL
The LED lamps fitted in this product are non-replaceable. The product should be recycled in the correct manner
when it reaches the end of its life. Check local authorities for where facilities exist.
Clean with a soft dry cloth only, do not use aggressive cleaning products or solvents which may damage the
product.
This product is non-dimmable.
WARRANTY
This product has a warranty of 3 years from date of purchase. Failure to install this product in accordance with
the current edition of the IEE Wiring Regulations (BS7671), improper use, or removal of the batch code will
invalidate the warranty. If this product should fail within its warranty period, it should be returned to the place of
purchase for a free of charge replacement. ML Accessories does not accept responsibility for any installation
costs associated with the replacement product. Your statutory rights are not affected. ML Accessories reserve
the right to alter product specification without prior notice.
 Loading...