A. LED indicators
(displays
shutter speed or exposure
warning).
-+
See Fig.
23 and24.
B. Battery charged
indicator
(When
the
batteries used
in
the
dedicaied
flash are fully charged,
"125
+"
lights up.
-+
See
Fig.
35.
C.
Exposure control
mark
(The
+/- sign lights up
while the exposure
is being adjusted).
-+
See Fig. 30.
D. View
frame
->
See Fig. 9.
E. Focus
frame
(range
for setting focus).
-->
See
Fig. 17.
Field of
view frame
and
lightmeter
range
* This camera
is equipped with a view-frame
for 28mm, 35mm,
50mm,75mm,90mm,
and 135mm
lenses.
* The
view
frame changes depending on
what lens is used
(Fig.
9).
Make sure the subject
is within the view frame and then take
the
picture.
* The view
frame for each lens automatically
adjusts
parallax
(differences
in viewing angle) during
photography
according to
the
range at which the
image is
brought
into focus.
* The lightmeter range
for
each
lens is almost the same as the
diagram in Fig. 9
(blue
dotted
line).
Manually switching
the view
frame
*
Operating
the view-frame switching
lever
@
allows checks to
be
made
of
the
different
photography ranges for each focal
distance of each lens even
without havine the lens attached.
* Pressing the view
frame switching levei@ inward
makes the
view frame
(Fig.
l0)
used
for 28mm and 90mm
focal distances
appear.
The lever in vertical
position
displays
view frames for
50mm
and 75mm
(Fig.
I l). Move the lever
position
toward
the
outside to show view
frames for
35mm
and l35mm
(Fig.
12).
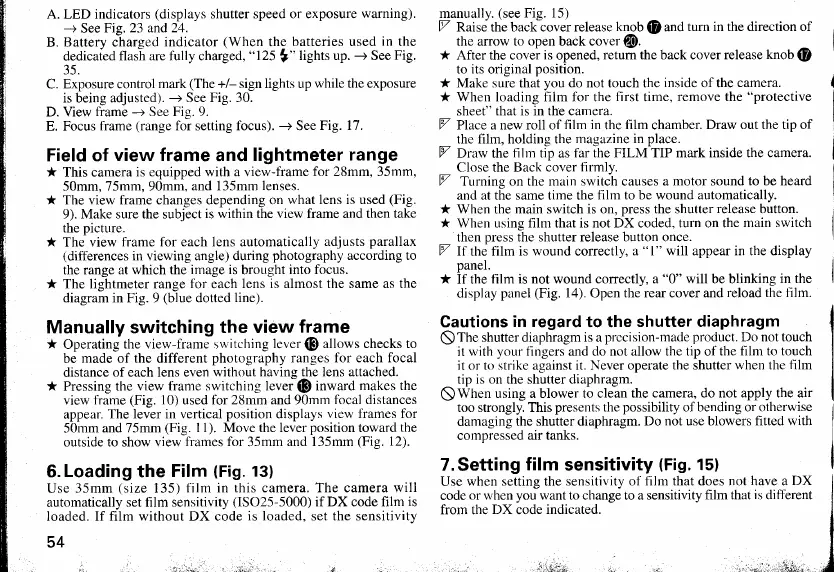
6.
Loading
the
Film
(Fig.
13)
Use
35mm
(size
135)
film in this camera. The camera will
automatically
set film sensitivity
(ISO25-5000)
if DX code film
is
loaded.
If film without DX code
is loaded, set the sensitivity
54
manually.
(see
Fie. 15)
Z
Raise the backlover release
knob
@and
turn in the direction of
the arrow to open back cover
@.
* After the covei
is
opened,
return the back cover release
knob
@
to
its
original
position.
* Make sure
that
you
do not touch the
inside
of the
camera.
* When loading film for the
first
time,
remove the
"protective
sheet" that is in the camera.
7 Place a new roll of
film in
the
film
chamber.
Draw out the tip of
the fllm. holdine the
masazine in
place.
7 Draw ttre
film
tio as
far it.re
pILV^tp
mark inside the camera.
Close the Back cover
firmlv.
F7 Turning on the main switch causes a
motor sound to be heard
and at the same time the
film to be wound automatically.
't
When the
main
switch
is on.
Dress
the shutter
release
button.
* When usine film that is not DX coded. tum on the
main switch
then oress ihe shutter release button once.
7
rc tn6 film is wound correctly,
a
"1"
will appear in the display
panel.
* If the film
is
not wound
correctly, a
"0"
will be blinking
in the
display
panel
(Fig.
l4).
Open
the rear cover and
reload the frlm.
Cautions
in regard
to the
shutter diaphragm
S
The
shutter
diaphragm is a
prccision-made
product.
Do not touch
it
with
your
fingers and do not allow the tip of the
film to touch
it
or
to strike against it. Never operate the shutter
when the
t'ilm
tip is on the shutter diaphragm.
$Wtren
using a blower tb cle-an the
camera, do not apply the air
too strongly. This
presents
the
possibility
of bending or otherwise
damaging
the
shutter
diaphragm. Do
not
use blowers
fitted with
compressed
air tanks.
T.Setting
film
sensitivity
(Fig.
15)
Use
when setting the sensitivity
of film that does not have a
DX
code
or when
you
want to change to a sensitivity
film that
is
different
from the
DX
code
indicated.
:iX!L;
 Loading...