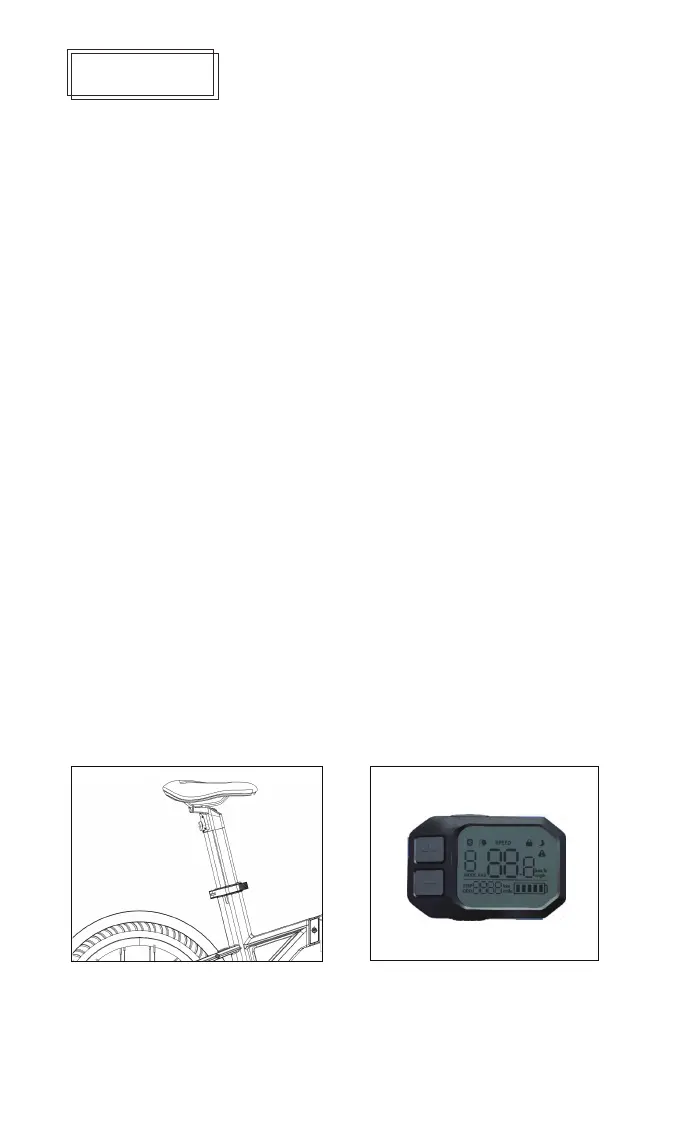
FUNCTION
Up key (switch machine)
Down button
(light on button)
charging port
±Key (gear addition
and subtraction)
3. Switch on and off: Turn on the battery power switch, and press and hold the button on the meter for 3
seconds to switch the power of the e-bike on and off.
4. Light switch: Press the down button of the instrument once to turn on or off the front and rear lights of the
e-bike.
5. Power-assist mode: When riding, step on the pedal to assist the electric output. The power-assist is
divided into 3 gears, corresponding to the speed limit of 15km/h, 20km/h and 25km/h respectively.If you need
to adjust the gear, short press the "+-" button to complete the gear switching, and the instrument will display
the current corresponding assist gear.
6. Pure electric mode: Press the accelerator dial, the e-bike can be directly accelerated electrically, and the
maximum speed of pure electric is 25km/h.
7. Multi-function display: Speed display, gear display, total mileage/single mileage display (press the down
button of the instrument quickly 2 times to switch single/total mileage), speed unit display (press the down
button of the instrument 3 times to switch KMH/ MPH) etc.
8. Power-off brake and tail light: When the power-off brake lever is squeezed, the controller first cuts off the
motor output, and then the disc brake mechanically brakes. When the brake lever is not fully rebounded,
neither the dial nor the power assist can give electric acceleration.
9. Tail lights: Night running lights/brake lights, night running lights and headlights synchronous switch, tail
lights flashing when braking.
10. Battery removal and installation: The seat tube is detachable. To adjust the seat tube battery,you need to
open the seat tube handle switch with a key. You can adjust the seat tube battery up and down and remove
the seat tube battery. After unplugging the power cord, you can pull out the battery.
(If the battery is damaged and needs to be replaced, please contact the official customer service.)
Multifunction display
1. Unpacking assembly and debugging: After unpacking, take out the electric bike, assemble the handlebar,
lock the handlebar quick release, install the front wheel in the hook groove of the front fork, install the quick
release lock, lightly hold the brake lever several times, wait for The brake line is restored to the best state,
and it is confirmed that there is no abnormal noise when the front wheel rotates, and that the front and rear
brakes are functioning properly. Adjust the seat tube height, lock the quick release handle after adjusting to a
suitable height, install the power cord, and install the foot pedal.
2. Charging: First connect the DC end of the charger to the charging port of the electric bike, and then
connect the AC end of the charger to the household power socket. After the charger is connected, it starts to
charge. During charging, the indicator light of the charger shows a red light. The indicator light changes from
red to yellow-green, indicating that the battery is fully charged.
11. Instrument setting: Press the "+/-" keys at the same time to enter the instrument setting interface, the "+/-"
key to adjust the setting mode P0-P2, P0: voltage setting; P1: mileage reset; P2: wheel diameter setting.
After switching to the corresponding mode, press the down key of the meter to switch to the mode setting
item. After switching to the mode setting item, press the "+/-" key to switch the setting option. After the switch
is completed, press the upper key of the meter to exit the setting mode.
battery
power switch
 Loading...