KDS-7-MNGR Quick Start Guide
This guide helps you install and use your KDS-7-MNGR for the first time.
Go to www.kramerav.com/downloads/KDS-7-MNGR to download the latest user manual and check if
firmware upgrades are available.
Step 1: Check what’s in the box
KDS-7-MNGR 4K AVoIP Manager
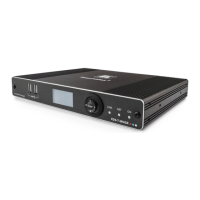
Step 2: Get to know your KDS-7-MNGR
USB Type A Charging
Ports
Connect to a keyboard and mouse to control the units via UI using a display connected to the unit
via HDMI output port.
Use for device information and configuration.
Press to return to the previous menu.
Press to move up to the next configuration parameter.
Press to go to the next menu.
Press to move down to the next configuration parameter.
Plug the 24V DC power adapter into the unit and connect it to an AC wall outlet for power. (Optional,
not required if the unit is powered via PoE).
Press and hold for about 20 seconds, until all LEDs flash, to reset the device to its factory default
values..
Connect directly, or through a network switch, to your PC/ laptop to control the unit via WebGUI/Telnet.
Connect to a display to control the unit directly.
LED Functionality
KDS-7-MNGR LEDs function as follows:
A link is established between KDS-7-MNGR and the TV and is transmitting A/V
signals.
No IP address is acquired.
A valid IP address has been acquired.
Flashes Green very fast (for 60sec)
A device identification command is sent (Flag me).
Device falls back to default IP address.
Security is blocking IP access.
On fallback address acquiring, device ‘ON’ LED flashes continuously in slow
0.5/10sec cadence
Device is in standby mode.
FW is downloaded in the background.
Flashes Green very fast (for 60sec)
A device identification command is sent (Flag me).
Device falls back to default IP address
Security is blocking IP access.
Post reboot, all LEDs light for 3 seconds then return to their normal LED display mode.