Do you have a question about the Kreg PRS1010 and is the answer not in the manual?
Comprehensive safety instructions and precautions for operating woodworking machinery safely and preventing injuries.
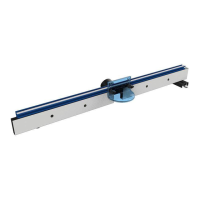
Locate and position the Table Mount under the corner of the router table top and secure it with screws.
Insert bolts into the Table Mount and attach with washers and nuts, leaving them loose.
Slide the Mounting Rail over the hex bolts and tighten to ensure it is flush with the table top.
Slide Clamp Block onto Mounting Rail and insert nylon set screws to remove play.
Align and secure Fence Mount to Clamp Block using screws and washers, without fully tightening.
Attach Fence End Caps to the Large Fence using nylon snap rivets, aligning curved notches.
Attach Dust Port to the back of the Large Fence using Phillips screws, angling it upwards.
Flip the Large Fence and insert Trak Bumpers into the slots on the underside to reduce friction.
Insert screws through Fence Faces and thread jam nuts, then slide faces onto the fence t-slot and tighten.
Slide hex bolts into the T-slot on the back of the Large Fence, align with Fence Mount slots, and lock with washers and T-knobs.
Ensure fence is centered and parallel to the miter slot, then tighten screws installed in Step 5.
Slide hex bolt into T-slot, attach Right Angle Bracket with washer and nut, align with table slot, and secure with T-nut and extension knob.
Trim and apply the 48" Center Reading Tape to the edge of the Large Fence, ensuring it is smooth and aligned.
Slide T-bolts into the fence T-slot, add spacer washers, place Fence Guard, and fasten with washers and T-knobs.
Slide Tape Slider into Mounting Rail, secure with thumb screw, and apply 8" Measuring Tape to the slider.
Slide Precision Lens Cursor into Mounting Rail and lock it in place using the nylon screw.
Learn how to position the fence relative to the router bit for accurate cuts, using a straight edge and adjusting the tape slider.
Set up the fence for jointing by adjusting fence faces, using jointing rods for offset, and testing the position.
| Brand | Kreg |
|---|---|
| Model | PRS1010 |
| Category | Wood Router |
| Language | English |