.---.--".-
..--.----...---..
"-'-"-'--'--'---'"
- --. ..-.... - ....- - .....-
";;,,..
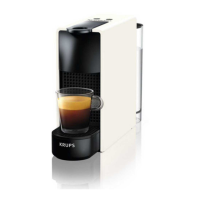
,Features.
.:;;; This is achieved by pre-
first time we recommend
. Insert the capsule holder
This will require you to Step 2
"'."
cisely applying the right running water through the (d) without the Nes-
stay with the machine to
...
'.'.""
. Insert the capsule holde
. Thermoblock Heating
amount of pressure, which machine to remove any presso capsule into the
empty each cup as It
without a capsule into
System clears the ma-
draws out allof the coffee' s
dust particles which may
machine.
becomes full upon
the machine.
natural richness. With the
have settled during
1
Do not use capsule at completion of each cup
chine of any excess water
turn of a switch you can shipping.
this time.
return to "0" position.
. When the yellow
in the machinc's system.
enjoy the fullbodied flavor
Note:
thermostat light goes
. Microchip Monitored
and aroma of authentic & Attention!
. When inserting the
out, set the program dia
capsule holder into the
Your machine has a
Steam Pump control
espresso, or Yo:.Jrchoice of
Before you start,make sure
machine, the handle
thermostat that controls the
to the" $ " position an<
delivers a constant flow
premium Nespresso
that the overflow grid is in temperature continuously so
heat the cup with the jet
I
of "ciry"steam. This
coffees.
place and the removable
should be at a 90° angle
that itwillbe ready for use
of steam. Then place th,
unique dryness of
After unpacking your
drip tray is properly
(flg.5).
at any time. You may leave
cups onto warming plat'
Raise the capsule holder
(flg.16).
steam and its regulated
KRUPS "Nespresso inserted (flg.18).
up into the machine and
your machine on for several
pressure froth milk for
System", verify that all
Before plugging appliance
turn filterholder to the
hours using a minimum
cappuccino.
accessories have been
into an electricaloutlet,
right untilthe handle can
amount of power.
Step 3
. ProqramSwitch
included in the package.
make sure that the program
go no further (flg.5).
Ifyou don't intend to use the
. After the preheating. tur
enables you to select the
(2) sleeves of Nespresso
dial is in the "0" position
Now you are ready to
machine for a long period of
the program dial to the
brewing mode or steam
Coffee
and the ON/OFF switch is in
warm up the machine.
time (overnight, for
"0" position.
mode
(2) Nespresso demitasse
the "0" position.
example), itis recommen-
ded that you turn itoff.
. KRUPS unique "Perfect
cups with saucers
Step 2
Every Day Use
Froth" attachment takes
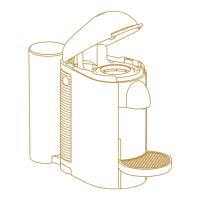
(1) Capsule holder Step 1
. Place one espresso cup For
Preparing
allthe guesswork out of
(2)Capsule housing
To'cleanse internalsystem under the capsule holder
Preheating Cups
Espresso
frothing milk.
removal device
letwater run through the
spout (flg.6).
. Large Capacity
(1)Cleaning needle
machine.
When using the appliance.
Step 1
removable water
instrument
. Make sure that the
you should preheat the
reservoir.
.Pressdown on the
program dialisin"0"
cups with hot water.
. Fillthe water reservoir(i
ribbed surfaced lidof the
position.Then turnthe
Afterwards, you can keep
with fresh,cold water
. Warming Plate for
UsingYourKRUPS
removable water reser-
"ON/OFF" switch to the
the cups on the appliance (flg.1-4).
warming cups and
,"." ,::.""'.,"'!;"'-;,.
voir (a) (flg.1). "I"position (flg.7).
at their ideal temperature
keeping beverages hot.
..Nespm
The handle willemerge.
by placing them on the
Caution:
.. ForThersf1lttle Fillthe reservoir with
. The two indicator lights
warming plate upside
Ifthe water reservoir is
. Removable Drip Tray
fresh,cold water (flg.l).
willilluminate, both yellow
down. You may also want
empty and the pump is
allows for easy cle<m up.
and red.
We recommend thatyou
Or, you may choose to
As soon as the yellow
to place e dish cloth on top
running, you will hear a
get familiar with all the
remove the reservoir by
thermostat light (h) goes
of the cups to help keep
distinct noise, which is
parts of your KRUPS
lifting the reservoir
r.
them warm.
louder than the normal
Introduction
_'iS
I
"out", the machine is hea-
"Nespresso System" before
handle up and drawing
J
operating sound.
operating the machine.
out the reservoir tank
ted up and ready to use.
Preheating cups:
Turn off the machine.
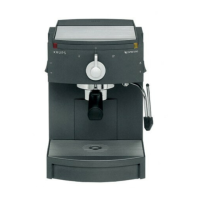
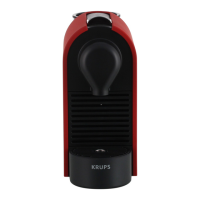
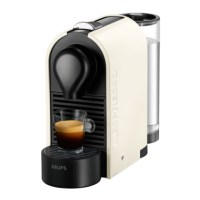
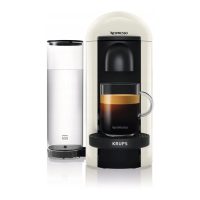
The KRUPS "Nespresso
Insert the capsule holder
(flg.3).
Step 1
Never let the pump run
System" extracts. rich, into the machine and
This allows you to
Step 3
when the water reservoir i J
natural flavors from the
remove and replace water
conveniently bring the
. Set the program dial to
empty, this can damage
coffee beans and brings all reservoir. Move the steam
water reservoir to the
. Turn the program dial to
the "0" position.
the pump.
of those flavors to a single
nozzle.Wash allloose
faucet.
the" ,g " position and
. Switch "ON" the
perfect cup of espresso.
parts in warm soapy water,
Replace the reservoir
allowwater to run
appliance using the
Step 2
rinse thoroughly and dry.
back into the machine.
through the machine into
"ON/OFF" switch.
. Leave the capsule
making surethat the
the cup (fig.8).Repeat
holder in the machine
When using your KRUPS
handle and lid are
this process one more
without any capsules
"NespressoSystem"forthe
closed (flg.4).
time.
and allow it to heat up
8
':.'HF:::";';:.::,TrF:
'.'" . "YJ''';'-:
..':':?i!:,:.:;?7':.': ;!-i:
';-:"1!7.'.F "''''.7'''''''''
." """"'. .
",'"
',.
.'.
'.".. ".
".
 Loading...