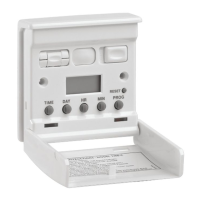
To access controls, with thumb and
forefinger on either side, ease cover
f
orward. With tip of ballpoint pen, press
reset button J to clear memory. Press and
hold down TIME button C continuously.
Press DAY button D until present-day is
displayed.Press HR and MIN buttons E
and F until correct time is set using a
24-hour clock.Release TIME button C.
E.g. L.C.D.display
B showing current
t
ime is 3.15pm on
Wednesday.
N
OTE
Continued pressure on any of the
DAY,HR,MIN buttons whilst TIME button
is depressed will advance the display
rapidly.
There are a maximum of 6 ON and 6
OFF times available. Each ON/OFF time
can be used individually on any day(s)
throughout the week, OR can be set to
repeat on one of the following
combination of days: to run a
programme, override switch L must be in
the auto position.
MO TU WE TH FR SA SU (days of the week);
MO TU WE TH FR (weekdays);
SA SU (weekends)
MO TU WE TH FR SA (workdays only);
If you wish to switch light automatically
every day of the week at 20:10 (8:10pm)
and OFF at 23:06 (11:06pm).
STEP 1
Press the PROG button G and release.
The colon in the
centre will flash
The first time can be entered:
STEP 2
Press DAY button D until required day or
combination of days is displayed. In the
above case, press until ALL THE DAYS
appear on the top.
STEP 3
Press HR button E until 20 shows:
STEP 4
Press MIN button F until 10 minutes
are set:
STEP 5
Press PROG button G so that the
f
irst OFF time can be
entered:
STEP 6
Press HR button E until 23 shows:
STEP 7
Press MIN button F until 06 minutes
are set:
STEP 8
Up to 6 ON and 6 OFF programmes are
available and it is not necessary to use
them all. Press TIME button C to revert
back to clock.
If you wish to have a second programme
which switches your light on at 18:00
hours (6.00pm) and off at 22.30 hours
(10.30pm) every saturday and sunday
only.
STEP 1
Press PROG button G and previous ON
setting will appear. Keep pressing PROG
G until you have stepped through all the
previous ON/OFF settings and until you
come to the first display, which has 4
dashes:
STEP 2
Press DAY button D until only SA
and SU appear:
STEP 3 & 4
Press HR and MIN buttons E and F to
set required ON time (zeros must be
entered):
STEP 5
Press PROG button G to set OFF time:
STEP 6
Press DAY button D until both SA and
SU appear as above:
STEP 7
P
ress HR and MIN buttons E and F to
set required off time:
STEP 8
Press TIME C to revert back to CLOCK.
I
MPORTANT NOTE:
E
nsure the day(s) selected in the
programme ON mode matches day(s)
s
elected into the programme OFF mode.
Once programming is completed, the
lamp can be switched on and off at
varying times on a daily basis if
RANDOM FUNCTION is selected.
Simply press DAY D and HR E buttons
simultaneously. The word TIMER will
flash to show RANDOM mode is
activated. To cancel RANDOM, press
DAY D and HR E simultaneously again
and the word TIMER will disappear.
NOTE: The random feature works by
randomly shifting the ON/OFF times of
your set programmes between 2 and 30
minutes at each operation.
Press PROG G and on each occasion all
previously set ON and OFF times will be
displayed. Any alterations can be made
by pressing button D, E and F as
appropriate. Blank ON/OFF times will
have 4 dashes instead of numbers. New
programmes can be entered by following
steps 1 to 8 in example 1.
During those occasions when you are at
home early and you do not want your
security light switch to operate as
programmed, slide switch L so that MAN
shows for manual only operation. The
pre-set programmes are still stored. The
switch can operate only via push switch
H. The red neon K will flash.To recall
automatic programme (i.e. to activate
switch to pre-set programmes) slide
OVERRIDE switch L so that AUTO
shows. Neon light K will come ON if
programme is on and OFF if programme
is off.
When all settings have been completed,
close the front cover plate until it clicks
into position, concealing the operating
controls. The room light(s) can be turned
ON and OFF by simply pressing the top
front cover once, or by operating the
switch at the other end of a 2-way circuit.
PROGRAMMING LIGHT SWITCH
SETTING A PROGRAMME
REVIEWING SET
PROGRAMMES
MANUAL ON/OFF OPERATION
RANDOM FUNCTION
AUTOMATIC OR MANUAL
CONTROL - OVERRIDE SWITCH
EXAMPLE 1
TIMER _ _ : _ _
ON
SA SU
TIMER _ _ : _ _
ON
SA SU
TIMER 18 : 00
ON
S
A SU
T
IMER 22:30
O
FF
MO TU WE TH FR SA SU
TIMER 20 : _ _
ON
MO TU WE TH FR SA SU
TIMER 20 : 10
ON
M
O TU WE TH FR SA SU
T
IMER - - : - -
O
FF
MO TU WE TH FR SA SU
T
IMER 23 : 06
OFF
W
E
15.15
MO TU WE TH FR SA SU
TIMER _ _ : _ _
ON
EXAMPLE 2
WIRING INSTALLATION FOR
5 & 3 WIRE ARRANGEMENT
3 Wires in both switches
Timer installed at live
wire end only
Diagram 3 - Before
Diagram 5 - Before
Diagram 4 - After
Diagram 6 - After
Diagram 7 - After
YELLOW & GREEN EARTHS MUST REMAIN
CONNECTED TO METAL BOX
5 & 3 wire arrangement
Yellow & Green earths must
remain connected to
metal box
Light switch timer at 3 wire end
Yellow & Green earths must
remain connected to
metal box
C
Light switch timer at 5 wire end
Yellow & Green earths must
remain connected to
metal box
1. Ensure light fitting(s) being controlled
have bulb(s) fitted, otherwise light switch
will not function.
2. After installation is complete, reconnect
power at the mains (remembering to
replace fuse if removed for safety
reasons). The red neon K and the L.C.D.
display B will now be flashing. (Allow
internal battery to charge for 45 minutes).
SETTING PRESENT
D
AY & TIME
M
O TU WE TH FR SA SU
TIMER 23 : - -
OFF
 Loading...