EasyManua.ls Logo

Kurt KINETIC ROCK AND ROLL SMART 2 User Manual

Kurt KINETIC ROCK AND ROLL SMART 2
12 pages
To Next Page IconTo Next Page
Page #1 background imageLoading...
Page #1 background image
ROCK AND ROLL | SMART 2
MODEL
T-2810
©2018 KINETIC BY KURT ALL RIGHTS RESERVED
FLYWHEEL
QUICK RELEASE
LEVER
LOCK RING
NON-DRIVE SIDE
CONE CUP
DRIVE SIDE
CONE CUP
LEG
BOLT
RESISTANCE UNIT
LEFT
TENSIONING
KNOB
LEFT
LEG EXTENDER
RIGHT
LEG EXTENDER
RIGHT
TENSIONING
KNOB
ROLLER TENSION KNOB
TRAINER
TENSION BOLT
Riser ring, bike and Smartphone not included with trainer.
Newest user manual available at:
kurtkinetic.com/support
INRIDE SENSOR
Download
the Kinetic
Fit app and
activate your
free trial
subscription
Today
www.kinetic.fit
Supported ANT+ Device Profiles:
T-2810_RockandRoll_Smart2.indd 1 6/13/18 1:24 PM
Question and Answer IconNeed help?

Do you have a question about the Kurt KINETIC ROCK AND ROLL SMART 2 and is the answer not in the manual?

Kurt KINETIC ROCK AND ROLL SMART 2 Specifications

General IconGeneral
TypeSmart Trainer
ResistanceElectromagnetic
CompatibilityZwift, TrainerRoad
ConnectivityANT+, Bluetooth
Axle Compatibility142x12mm, 148x12mm
MaterialSteel
Weight Capacity300 lbs (including bike and rider)

Summary

Getting Started

Training App Integration

Connects trainers to apps for speed, cadence, and power data.

Third-Party App Training

Use trainers with other popular training applications.

In the Box

Assembly Guide

Frame Assembly Steps

Attach leg extensions to the main frame.

Resistance Unit Mounting

Secure the resistance unit to the trainer frame.

Tensioning Knob Assembly

Assemble the roller tensioning knob mechanism.

Final Knob Tightening

Thread and tighten the tensioning knob for operation.

Mounting the Bike

Initial Bike Setup

Loosen knobs and center the bike for mounting.

Wheel Centering on Roller

Position and center the bike wheel on the roller.

Final Bike Securing

Tighten knobs and lock ring to secure the bike.

Roller Tension Adjustment

Adjust roller tension for optimal tire contact.

Removing the Bike

Detach Roller from Tire

Loosen adjustment knob to move roller away from tire.

Release Quick Release

Reduce axle tension and disengage quick release.

Bike Removal Procedure

Stabilize bike and remove it from the trainer.

Safety Warnings

Skewer and Cone Recommendations

Use the included T-740 skewer for safe bike mounting.

General Operational Safety

Avoid over-tightening, hot parts, and ensure safe clearances.

Bike Mounting Solutions

Available Accessories

Trainer Components

Frame Parts (T-2301, T-2302, T-2303)

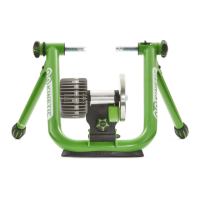
Identification of frame and leg extender components.

Resistance Unit (T-699C)

The main resistance-generating unit.

Skewer and Cone Cups (T-740, T-2111, T-2103)

Components for bike attachment and centering.

Other Hardware Parts

Identification of various bolts, knobs, and springs.

Register Your Trainer

Warranty Information

Warranty Claims and Parts

Procedures for reporting issues and obtaining replacement parts.

Warranty Registration

Steps to complete online warranty registration.

Crash Replacement Policy

Trainer Care and Maintenance

Product Certifications