E-mail
To use E-mail (@ezweb.ne.jp), subscription to LTE NET is required.
If you did not subscribe it when you purchased the product, contact an au shop or Customer Service Center.
Your E-mail address is determined automatically after initial setting. You can change the E-mail address later.
■
Initial settings
* You cannot make initial settings in Wi-Fi
®
communication.
1 2 3
*1 If a description screen for the E-mail function
is displayed, follow the on-screen instructions.
Home screen
→
[E-mail] Check your E-mail
address
→
[
閉じる
(Close)]
Check the contents,
[
同意する
(Agree)]
→
[
完了
(Done)]*
1
■
Checking your E-mail address
1
2 3 4
Home screen
→
[E-mail] [ ] [E-mail information] Your E-mail address is
displayed.
■
Changing your E-mail address
1 2 3 4 5
Home screen
→
[E-mail] [ ]
→
[Change
Address/Setting Filter]
[E
メールアドレスの変更
へ
(To Change E-mail
address)]
Enter the security code
→
[
送信
(Send)]
Check the contents,
then [
承諾する
(I accept)]
6 7 8
Enter E-mail address
→
[
送信
(Send)]
[OK] [
閉じる
(Close)]
Basic Manual App
■
Download "Basic Manual app"
■
Use "Basic Manual app"
1 2 1 2
Apps menu
→
[
サ
ポ ート
(Support)]
→
[Basic Manual]
[UPDATE] Apps menu
→
[
サポー
ト
(Support)]
→
[Basic
Manual]
* If a instruction
screen (how to use
this application) is
displayed, follow the
on-screen instructions.
The front cover of
Basic Manual is
displayed.
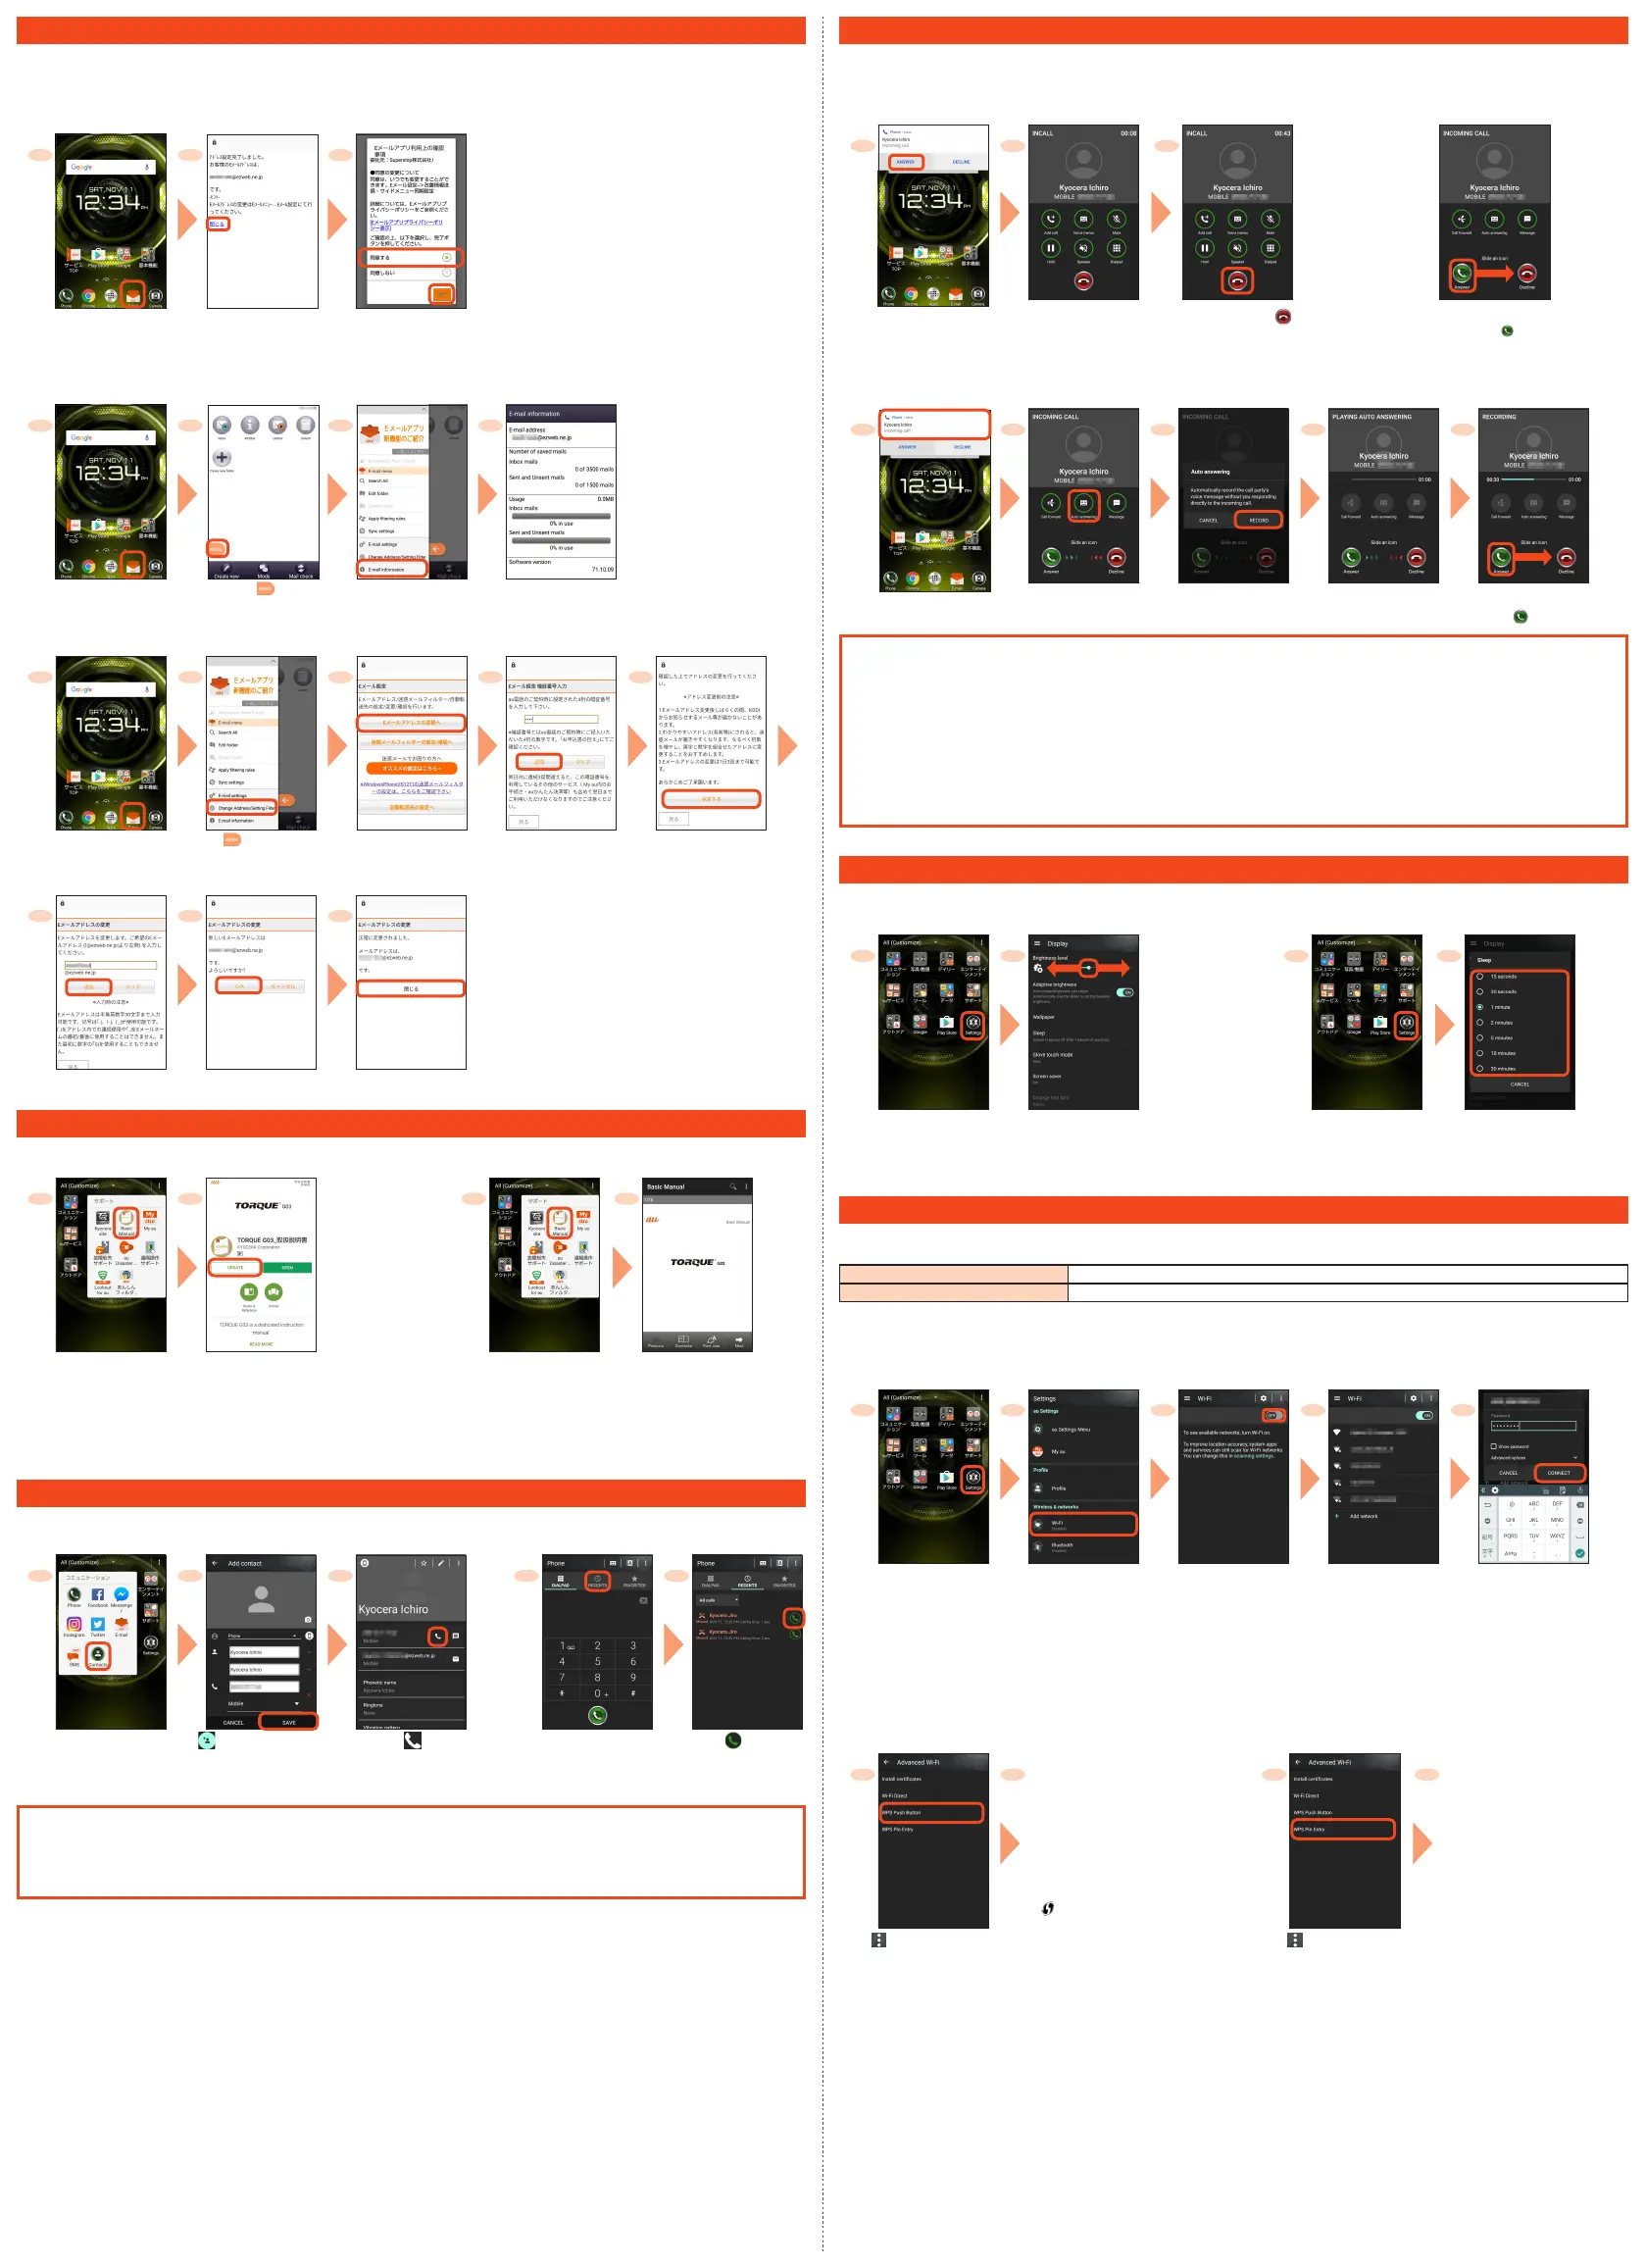
Making a Call
■
Adding new contact and making a call
■
Making a call from the call history
1 2 3 1 2
Apps menu
→
[
コミュニ ケ ー ション
(Communication)]
→
[Contacts]
[ ]
→
Enter necessary
items
→
[SAVE]
[ ]
Home screen
→
[Phone]
→
Tap "RECENTS" tab
Tap " " of a party
to call
Checking your own phone number (Profile)
Operate as follow to check your own phone number.
Apps menu
→
[Settings]
→
[Profile]
→
Profile screen appears.
Receiving a Call
You can receive a call in the following steps.
■
Calling
■
Receiving the screen in sleep mode
or while the start screen is displayed
1 2 3
Receiving screen
→
[ANSWER]
Calling starts.
To end the call, [
]
Follow the on-screen instructions.
* To answer the call, slide " " right.
■
Answering with Auto answering
Answer by the answering memo message and record a message of the party when you cannot answer calls.
1 2 3 4 5
Receiving screen
→
Tap
the operation panel
[Auto answering] [RECORD] The caller hears
the guidance.
To answer the call, slide
[
] right.
Answering with SMS
Reject an incoming call and answer with SMS.
Operate as follow to answer with SMS.
Receiving screen
→
Tap the operation panel
→
[Message]
→
Select a message
→
[SEND]
→
SMS message is sent.
Forwarding an incoming call without answering
Forward an incoming call to the forwarding phone number or remote operation of voice mail service.
Forward the incoming call in the following steps.
Receiving screen
→
Tap the operation panel
→
[Call forward]
→
[FORWARD]
→
The incoming call is forwarded.
Setting Display
Describes how to set brightness level and backlight time.
■
Adjusting the screen brightness level
■
Increasing the backlight time of the screen
1 2 1 2
Apps menu
→
[Settings]
→
[Display]
Slide the indicator of
"Brightness level" left/right.
* To make brighter, slide the
indicator right. To make
darker, slide the indicator left.
Apps menu
→
[Settings]
→
[Display]
[Sleep]
→
Select
the lighting time
Setting Wi-Fi
®
Use your home Wireless LAN (Wi-Fi
®
) or public wireless LAN to connect to the Internet.
Main settings are as follows.
Select Wi-Fi
®
network for connection Search for and connect to an available Wi-Fi
®
network.
WPS system Use for registration of access point compatible with Wi-Fi Protected Setup™ with WPS mark.
* If you turn on wireless LAN (Wi-Fi
®
) function, battery consumption increases. You are recommended to turn wireless LAN (Wi-Fi
®
) function to OFF
when not using wireless LAN (Wi-Fi
®
) function.
■
Selecting and Connecting
to a Wi-Fi
®
Network
1 2 3 4 5
Apps menu
→
[Settings] [Wi-Fi] [OFF]
* Indication changes to
"ON".
Available Wi-Fi
®
networks
are detected automatically
and their SSIDs appear in
the Wi-Fi
®
networks.
Select the Wi-Fi
®
network to connect to*
1
→
[CONNECT]*
2
*1 If the Wi-Fi
®
network you want to connect to cannot be detected, tap "Add network" and add the network manually.
*2 To connect to a protected Wi-Fi
®
network, enter the password (security key) and tap "CONNECT". The password (security key)
is set with the Wi-Fi
®
network. For details, contact with the network administrator.
■
Using a WPS System Access Point
WPS button WPS Pin Entry
5 6
Press the Wi-Fi Protected
Setup button* on the Wi-
Fi router to set the access
point to WPS mode, and
the product automatically
searches for and registers
an access point.
* May be indicated as "WPS"
or as a symbol such as
"
".
5 6
Enter displayed PIN code for
access point, then registration
starts.
[ ]
→
[Advanced]
→
[WPS Push Button]
[ ]
→
[Advanced]
→
[WPS Pin Entry]
 Loading...