This document outlines the "Inspection Device for Immersion Suits 70168," a service manual for the air-pressure test and repair of immersion suits, manufactured by LALIZAS. The primary function of this device is to facilitate the inspection and repair of immersion suits, ensuring their integrity and functionality for life-saving purposes.
Function Description
The Inspection Device for Immersion Suits 70168 is a comprehensive kit designed to perform air-pressure tests and subsequent repairs on immersion suits. The air-pressure test identifies leaks in the suit, while the repair procedures address rips, tears, punctures, and issues with seams and closures. The overall goal is to maintain the safety and reliability of immersion suits, which are critical personal protective equipment in marine environments.
The process begins with a visual inspection of the immersion suit for any existing damages. Following this, a specialized face fixture is installed in the suit's hood area to create an airtight seal. Air is then introduced into the suit using a foot pump, and a pressure gauge monitors the internal pressure. Soapy water is applied to the suit's seams and closures to detect air leaks, which manifest as bubbles. Once leaks are identified and marked, the suit is prepared for repair. The repair process involves applying a specialized glue to the damaged areas, with specific instructions for drying times and reapplication. Finally, the service date and type of service are marked on the immersion suit, ensuring proper record-keeping and compliance with safety standards.
Important Technical Specifications
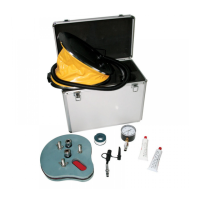
The aluminum kit includes several key components:
- Face fixture (two parts): This component is crucial for creating an airtight seal around the hood of the immersion suit during the air-pressure test. It consists of two parts that are assembled around the suit's hood, with bolts and joints securing them. The design ensures that the zipper head of the suit passes through a designated hole, and the hood fabric is stretched to prevent folds, which could compromise the seal.
- Pressure gauge (0-6kPa): This gauge is used to measure the internal pressure of the immersion suit during the air-test. The recommended pressure range for the air-test is 0.7 to 1.4 kPa (0.1 to 0.2 psi), in accordance with MSC/Circ.1114. The gauge is inserted into a face fixture socket and secured to ensure an accurate reading.
- Foot pump (with multi-valve adaptor): The foot pump is used to inflate the immersion suit with air. It comes with a multi-valve adaptor that adjusts to the connector on the face fixture, ensuring a secure connection for efficient inflation.
- Glue and applicator (two pieces): These are essential for repairing identified leaks, rips, tears, and punctures. The applicator helps in precise application of the glue to the damaged areas.
Usage Features
The device is designed for ease of use, with a step-by-step instruction process:
- Preparation: The immersion suit is laid on a work table and checked for existing damages.
- Face Fixture Installation:
- Part 1 of the face fixture is placed inside the immersion suit hood area, and the suit is zipped up. The hood fabric must be stretched in the direction of arrows to eliminate folds.
- Part 2 of the face fixture is placed over Part 1, aligning its holes with the bolts and joints.
- An o-ring gasket is installed to enhance the seal.
- Butterfly nuts are tightened to eliminate leakage around the face seal.
- Pressure Gauge and Pump Connection:
- The pressure gauge is inserted into the face fixture socket, ensuring a secure connection. The operational condition of the gauge (dial surface and pointer) should be checked.
- The connector for the foot pump is installed by pressing down the proper joint.
- The multi-valve adaptor is adjusted on the connector of the face fixture.
- Air-Test Procedure:
- Air is provided into the suit using the foot pump, maintaining pressure between 0.7 and 1.4 kPa (0.1 to 0.2 psi). It is noted that some bubbles may appear at the zipper slides and the zipper toothed part in the face fixture, which is considered normal.
- Soapy water solution is sprinkled along the seams and closures of the immersion suit.
- The suit is carefully checked for bubbles, which indicate leaking areas. These areas are then marked.
Maintenance Features
The manual also provides detailed instructions for repairing the immersion suit, which can be considered a form of maintenance to extend the suit's lifespan:
- Repair Procedure (General):
- After the air-test, the device is removed, and the suit is thoroughly cleaned with fresh water and dried, ensuring the marks for leaking areas remain visible.
- Repair of Seams and Closures:
- An applicator is adapted onto the glue tube.
- A gentle amount of glue is applied to the marked leaking areas.
- The glue is allowed to dry for 8-10 minutes.
- A second layer of glue is applied to the damaged area.
- The suit is then left to dry for 8 hours.
- Repair of Rips, Tears, and Punctures:
- Glue is applied to both sides of the damaged area using the glue tube and applicator.
- The glue is allowed to dry for 8-10 minutes.
- A second layer of glue is applied to both sides of the damaged area.
- The two sides of the damaged area are pressed together for 2 minutes.
- The immersion suit is left to dry for 8 hours.
- Marking Service Date:
- The service date (Air Pressure Test) and the type of service (e.g., "Service after X years") are marked on the immersion suit. If the suit has a Service Table, the date is marked there; otherwise, it is marked on an indicated area of the suit. This ensures proper documentation of maintenance and compliance with safety regulations.
The device and its associated procedures are designed to be user-friendly, allowing for effective and reliable inspection and repair of immersion suits, thereby contributing to the safety of individuals in maritime operations.