Do you have a question about the Larry vs Harry Bullitt and is the answer not in the manual?
Lists all necessary tools for the entire Bullitt bicycle assembly process.
Specifies the tools needed for installing the front fork and headset.
Lists the front fork and headset components for assembly.
Lists the tools required for installing the steering rod, headset, and easy-up.
Identifies the steering rod, headset, and easy-up components for installation.
Specifies the tool required for mounting the dropouts.
Lists the dropout components for mounting onto the frame.
Lists the tools needed for installing mudguards and front reflectors.
Identifies the rear mudguard, front mudguard, and front reflector components.
Lists the tools required for mounting the front and rear wheels.
Identifies the front and rear wheel components for mounting.
Specifies the tools needed for mounting the steering arm.
Lists the steering arm and ball joint components for installation.
Lists the tool required for installing the bottom bracket and crankset.
Identifies the bottom bracket and crankset components for installation.
Lists the tools needed for mounting the pedals.
Identifies the left and right pedal components for installation.
Specifies the tool required for installing the chain or Gates belt.
Lists the chain or Gates belt and frame block components.
Lists the tools required for mounting the cockpit, brakes, and shifter.
Identifies handlebar, stem, brakes, shifter/cable, and bell components.
Illustrates the correct routing for brake and shifter cables.
Lists the tools needed for mounting the seatpost, clamp, and rear reflector.
Identifies the saddle, seatpost, QR clamp, and rear reflector components.
Lists the tools required for checking or installing the kickstand.
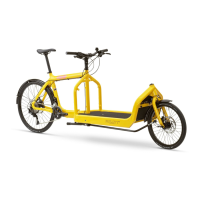
| Frame Material | Aluminum |
|---|---|
| Weight | 24 kg |
| Brakes | Hydraulic disc brakes |
| Wheel Size | 20 inches (front), 26 inches (rear) |
| Tires | Schwalbe Marathon |
| Cargo Capacity | Up to 100 kg (including rider) |