This document is an installation and operating manual for Encore by Wascomat dryers, manufactured by Haier exclusively for Laundrylux. It covers both gas and electric models, providing essential information for safe and proper installation, operation, and maintenance.
Function Description
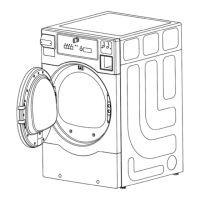
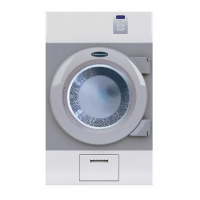
The Encore by Wascomat dryer is designed for commercial use, specifically for drying fabrics. It operates by drawing in room air, heating it, passing it through a tumbler containing the wet fabrics, and then exhausting the moist air to the outdoors. The manual emphasizes that the dryer should only be used for its intended purpose of drying fabrics and highlights the importance of proper installation and maintenance to ensure efficient, safe, and trouble-free operation.
Important Technical Specifications
The manual provides detailed technical data for both gas and electric models.
General Specifications (Common to both Gas and Electric):
- Maximum Capacity (Dry): 22 lb (10 kg)
- Tumbler Diameter: 26 in (66 cm)
- Tumbler Depth: 20.8 in (53 cm)
- Tumbler Volume: 7.7 cu ft (0.22 cu m)
- Tumbler/Drive Motor: 1/3 hp (0.25 kW)
- Blower/Fan Motor: Blower driven by tumbler motor
- Door Opening (Diameter): 22.44 in (57 cm)
- Door Sill Height: 12.6 in (32 cm)
- Airflow: 192 cfm (326.21 cm/h)
Gas Machine Specifics:
- Voltage Available: 120/240V 1Ø 60 Hz
- Approximate Net Weight: 158.7 lb (72 kg)
- Approximate Shipping Weight: 176 lb (80 kg)
- Heat Input: 19000 Btu/hr (4791.12 kCal/hr)
- Exhaust Connection: 4 in (10.16 cm)
- Natural Gas Supply: 4.5 - 10.5 in-WC
- Natural Gas Manifold: 3.0 in-WC
- L.P. Supply Pressure: 11 in-WC
- L.P. Manifold Pressure: 11 - 14 in-WC
- Inlet Pipe Connection: 3/8" M.N.P.T.
- Nominal Heating Value (Natural Gas): 1000 Btu/ft³
- Nominal Heating Value (Liquid Propane): 2500 Btu/ft³
- Orifice Size (Natural Gas): 44 DMS (2.2 mm)
- Orifice Size (Liquid Propane): 55 DMS (1.3 mm)
- Orifice Injector Quantity: 1
- Burner Pressure (Natural Gas): 3 In-WC
- Burner Pressure (Liquid Propane): 10.5 In-WC
Electric Machine Specifics:
- Voltage Available: 120/240V 1Ø 60 Hz, 120/208V 3Ø 60 Hz
- Approximate Net Weight: 154 lb (69.85 kg)
- Approximate Shipping Weight: 172 lb (78.02 kg)
- Exhaust Connection: 4 in (10.16 cm)
- Heat Input: 17460 Btu/hr (4402.79 kcal/hr)
- Approximate Amp Draw (120/240V 1Ø): 24 A (30 A circuit breaker)
- Approximate Amp Draw (120/208V 3Ø): 23 A (30 A circuit breaker)
Installation Requirements:
- Location: Must be on a sound, level floor, capable of supporting its weight. Carpeting must be removed from the dryer's area. Adequate clearance for air openings in the cabinet is required. Must not be exposed to water and/or weather. Dryers in residential garages must be elevated 18 inches (45.72 cm) above the floor. Ambient temperature must be between 40°F (4°C) and 130°F (54°C).
- Clearances (Closet/Alcove): Sides 1", Rear 3", Top 1", Front 3". Closet doors must be louvered or ventilated with at least 60 sq. inches of open area.
- Enclosure (Commercial): Bulkheads and partitions made of noncombustible material are recommended. 36 inches (91 cm) clearance for door opening. Minimum overhead clearance of 6 inches (15.24 cm). Minimum 12 inches (30.5 cm) from nearest obstruction (24 inches/61 cm recommended).
- Fresh Air Supply: Unrestricted air entrance from outdoors of 26 in² (168 cm²) per dryer (based on 1 in² per 1,000 Btu). HVAC systems are not acceptable for makeup air.
- Exhaust Ductwork: Must be smooth-walled metal ducting, installed directly to the outdoors. No screens, louvers, or caps on the outside opening. Maximum horizontal venting length: 20 feet (6 meters) with 4-inch (10 cm) diameter, no more than 1 elbow. Maximum vertical venting length: 12 feet (3.5 meters) with 4-inch (10 cm) diameter, no more than 3 elbows. Backdraft dampers are required in shared exhaust ducts. Exhaust back pressure must not exceed 0.6 in WC (1.5 mb).
- Electrical: Separate branch circuit for each dryer. Must match data label voltage. Grounding required per local/national codes. Electric heated models require a suitable line cord provided by the installer; bonding jumper wire must be removed for four-wire line cord connection.
- Gas: Gas installation and adjustment by qualified, licensed personnel. Individual gas supply lines must have a manual shutoff valve. Dryer must be disconnected from gas supply during pressure testing. Undersized piping can cause ignition problems. A 1/8 inch NPT plugged tapping for test gauge connection must be installed upstream of the gas supply.
Usage Features
- Safety First: Emphasizes reading all instructions and warnings before use.
- Door Safety: Machine must stop when the door is opened during operation.
- Lint Screen: Must be cleaned before or after each load.
- Cool Down Cycle: Recommended to reduce fabric temperature before removal.
- Gas Conversion: Instructions for converting from natural gas to propane gas are provided, to be performed by a qualified technician. This involves replacing the burner orifice and adjusting the cover dial.
- Coin-Operated Models: Instructions for installing coin meters, including connecting harnesses and securing the faceplate.
- Non-Metered Models: Instructions for installing a blocking plate in the coin vault.
Maintenance Features
The manual outlines a comprehensive preventive maintenance schedule:
Daily:
- Clean the lint screen after each load.
Weekly:
- Clean lint accumulation from the lint chamber and temperature sensor area.
- Clean the door gasket.
- Use a soft wash cloth and mild detergent to clean the door.
Every Third Month:
- Disconnect power.
- Remove lint from the gas valve burner area with a dusting brush or vacuum cleaner attachment.
- Vacuum makeup air inlet holes.
- Clean lint in the lint compartment (after removing the lint filter).
- Clean any lint accumulation in and around the motor(s) casing opening.
- Note: Avoid cleaning and/or touching the ignitor/flame-probe assembly to prevent damage.
- Inspect and remove lint accumulation from external exhaust ductwork and the dryer's internal exhaust ducting.
- Check backdraft dampers in the exhaust ductwork for lint accumulation and proper function.
- Ensure combustion and ventilation air flow is not obstructed.
- Clean the dryer cabinet with a product intended for appliance cleaning, avoiding harsh abrasives.
- Inspect bolts, nuts, screws, setscrews, grounding connections, and nonpermanent gas connections (unions, shutoff valves, and orifices).
- Examine belts and replace cracked or seriously frayed ones.
- Complete an operational check of controls and valves.
- Complete an operational check of all safety devices (lint door switch, door switch).
The manual stresses that failure to follow safety warnings and proper installation/maintenance procedures can lead to serious injury, death, or property damage, and may void the manufacturer's warranty. It also provides contact information for Laundrylux for sales, spare parts, and technical support.