PRIMERS
AnybrandofprimermaybeusedWhenus
ingfinegrainedballpowderit’sbest touse
aprimerwithacoveredflashholetoprevent
thepowderfromenteringtheprimerThisis
notdangerousbutmayuponfiringleakgas
aroundtheprimerItcoulddrivethecaseinto
the chamber and disable the gun until the
shellisremovedwithacleaningrod
CAUTION To reduce the chance of mass
detonation of primers in the primer feed, use
only primers that have a covered flash hole.
POWDER
Afterdeterminingtheamountofshotyoude
siretouseselectthepowdertypeandproper
powder and shot bushing from the charge
tableLoads listedonthecharge table have
beencompiledfromloaddatasuppliedbythe
powdermanufacturersIthasbeencondensed
toasimplifiedformforusewithyourLoad
AllIIOnlyloadsthatproduceuniformresults
withavarietyofcomponentsarelisted
CASES
Your Lee LoadAll II will load all types of
cases with ease However cases made for
trap and skeet shooting are designed for
reloadingand willreloadmore timesbefore
wearingoutCaseswithsplitendscrackedor
damagedbrassandholesburnedintheside
shouldbe discardedHigh brasscaseorlow
brasscaserefersonlytothebrasslengthon
the outside of the case This doesnot have
anybearingonthestrengthofthecaseorthe
loadit willaccept Thebrasslength isonly
a selling feature designed to impress the
purchaserwiththeimpliedextrapowderThe
importantconsiderationin caseselection is
thetypeofbasewadCaseswithapaperbase
wadrequireslightlymorepowderforthesame
velocityLesspowdermust beusedincases
withplasticbasewadornobasewadsuchas
RemingtonRXPWinchesterAAWinchester
Compression Formed or Federal Champion
IIBesureyoucanselectyourloaddatafrom
thepropercolumnonthechargetable
SHOT
All of the current manufacturers of shot
supplygoodqualityshotSelectionbylowest
priceissuggested
WADS
Your Lee LoadAll II is designed to load
plastic wads only preferably the one piece
varietyWhenusing thesenowadpressure
is required and if applied will quickly
neutralizeitselfCrimpingtheshellinreality
appliesthewadpressureTheimportantand
basicdierence in theonepiecewad is the
lengthofthewadandtheamountofspaceit
occupieswithintheshellItisimportantthat
theshellbecompletelyfilledtomakeagood
crimp Once the weightof shot is selected
the only variable volume component is the
wadThisinformationissuppliedbythewad
manufacturerusuallyprinted onthebag or
cartontheyarepackagedinThecorrectwads
fortrapandskeetloadsarereadilyavailable
becausetheyarethecasesmostoftenloaded
Wad types are usually listed on load data
suppliedbypowdermanufacturersSeeyour
localsportinggoodsdealerorwrite directly
tothepowdermanufacturerforacopyofthe
latestloaddata
Generally wads will come in two basic
lengths long and short A supply of each
size will take care of of your loading
Sometimes it may be necessary to slip a
cardboard wad of a smaller gauge to take
up excess space Flake type powder will
compress more than the ball or granular
powderChangingpowdertypemaymakea
dierenceinthefinalcrimp
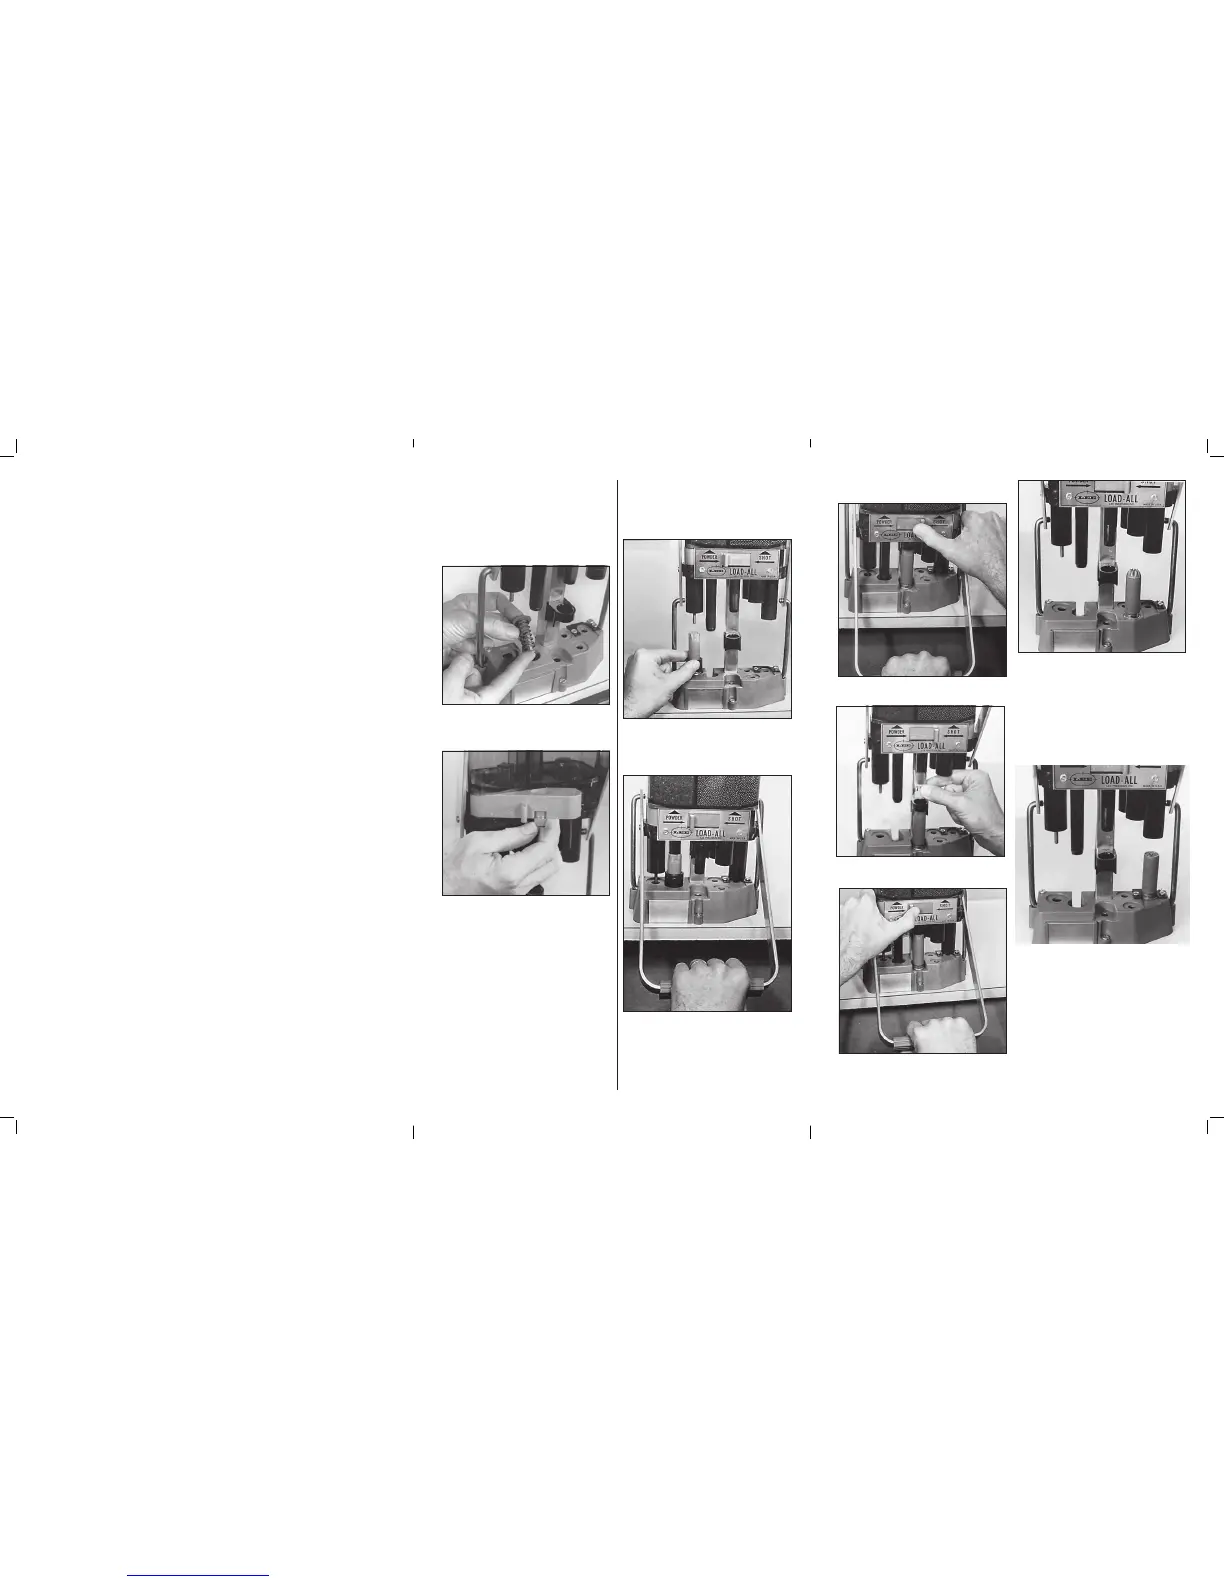
STATION 3 Slip the shell into the wad
guide at STATION 3.
STATION 3a
Lower the handle and slide
charge bar to the right. This adds the powder.
STATION 3b Raise handle, insert proper
wad and lower the handle until it stops.
STATION 3c Slide the charge bar to the
left to add the shot. Raise the handle.
STATION 4 Place the shell under the
proper crimp starter. Keep an inward fold of
the shell mouth toward the front for proper
alignment with the segmented starter. De-
press the handle to a full stop. Some shells
may require a two-second pause to set the
plastic.
Note The 8-segment crimp starter is in
the front on the 12 GAUGE only. The other
gauges have the 6-segment starter in the
front. Be sure you select the correct one.
STATION 5 Immediately move the shell
into the shell holder at STATION 5 and com-
plete the crimp. You should have a perfectly
crimped shell with a nice, tapered end.
IMPORTANT A good crimp can only be
obtained if the wad is the correct length.
After the shot is added, there should be
about
⁄ inch of shell above the shot on a
12 gauge; about
⁄ inch for the 20 gauge;
and just slightly more for the 16 gauge. If
the crimp is too deep with a hole in the cen-
ter, use a longer wad. Mashed in crimps or
crushed cases indicate the wad should be
shorter.
BEFORE YOU START
RELOADING
1
Mount your Lee Load All II to a sturdy
bench or table with the three screws
supplied. See
HELPFUL HINTS
for por-
table mounting.
Mount press no more than ½” from edge of
bench for handle clearance.
2
Install the primer punch, spring and
primer guide into
STATION 2.
3
Remove two screws holding the
nameplate. Remove charge bar and
install correct shot bushing and
powder bushing as shown on the
charge table. Reassemble, being
careful to not overtighten the screws
.
CAUTION Recheck the bushing against
the load data. Too much shot or powder will
cause dangerous pressures.
4
Slide the charge bar to the left and fill
the shot and powder hoppers. Note the
powder hopper is the smaller one on
the left, above the word
POWDER on the
nameplate
.
5
Sort cases as to brand and type and
discard the defective ones. Because in-
terior length differs between brands and
types, they require different length wads.
It’s best to load one type at a time
.
NOW YOU CAN
BEGIN RELOADING
Your Lee Load-All II is factory set
and requires no adjustment.
STATION 1 Slip the sizing die,
grooved end up, over the shell. Place
the shell in STATION 1 and pull down
the handle. This will full length size and
deprime the shell.
STATION 2 Place a primer in the
priming pocket at STATION 2. Move the
shell onto STATION 2; pull down the
handle. The sizing die will automatically
be pushed off at this station. Remove it
completely from the shell.
CONVERTING TO ANOTHER GAUGE
The Lee LoadAll II is easily and economically
convertedtoanothergauge
12 GAUGE Order 90070
16 GAUGE Order 90071
20 GAUGE Order 90072
DISASSEMBLY AND CONVERSION
Springthealuminumhandlefreeofthepivot
pins and slide the hopper assembly o the
squarecolumnHoldyourhandoverthepow
derhopperwhileemptyingtheshotPourthe
powderbackintoitsoriginalcontainer
Removethenameplateandhopperandinstall
ontothenewcarrier
Replacethe wadguideand gaugeuse
thesamewadguide
Replacetheshellholder
Reassembletothecolumnandhandle
Be sure to install the correct shot and
powderbushings
 Loading...