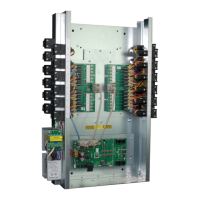
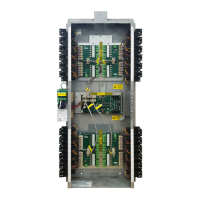
14
Load Binding to Groups 1–8 (Smartwire)
Smartwire provides a quick and easy way to assign loads (relays) to groups, using the buttons on the panel. If programming from the
panel, Smartwire applies only to groups 1–8. Once assigned to the group, pressing the group button to turn that group ON or OFF will
turn the associated loads ON or OFF.
NOTE: If using the LMCT-100 to program the panel, you can use Smartwire with groups 1–99.
Keep in mind that if panels are networked together, then once a load is assigned to a group, turning ON that group in any panel will turn
ON the associate loads for that group number, even if it is a different panel.
To program using Smartwire:
1. Press and hold a group button for at least five seconds, until the LED next to the group button begins blinking. At this point, all of
the Relay Override LEDs will turn OFF (unless the relay is already bound to the group you are programming, in which case it will
blink).
2. Press the buttons for each load that you want bound to that group, so that their LEDs blink. If a load is currently bound to the group
and you do not want it part of the group, press the button to turn the LED OFF.
3. Press and release the Group button to exit Smartwire mode. At this point, any Relay Override LEDs that were ON previous to
entering Smartwire mode will turn back ON.
4. To test your programming, press the group button to turn it ON. The relays associated with that group will turn ON. You can turn
the group back OFF, by pressing the button again.
Push n’ Learn
You can bind a load to specific controllers such as switches or sensors using Push n’ Learn (PnL). The important distinction between
PnL and Smartwire is that with Smartwire, you are connecting individual loads to a group rather than binding individual loads to
controllers..
PnL vs. Groups
It is possible to assign a controller to more than one load using PnL. In this manner, using PnL is similar to using groups because you
can control multiple loads at the same time. The important difference between using PnL and assigning groups is that groups offer
more functionality, such as schedules and dark/light, whereas PnL can only assign controllers to loads.
Programming the LMCP Using PnL
1. There are three different methods you can use to enter PnL mode:
• Press and hold the Config button on any remote DLM device for at least three seconds, until the red LED on the unit begins
to blink. The location of this button will vary,depending on the device. On many devices (such as switches and occupancy
sensors), you will need a small pointed tool to push the button.
• Press and hold the Panel Config button on the LMPI board of the LMCP for at least three seconds, until the red LED on the unit
begins to blink.
• Use the LMCT-100. Select the LOAD CONFIG (PnL) menu, to enter PnL mode.
No matter which method you use, once you enter PnL mode, the red LED on all DLM devices connected in the network will blink,
and you can assign any DLM controller to a load on the panel.
2. When you first enter PnL mode, the Status LEDs for all loads except Load 1 will turn off. The Load 1 LED remains active,
indicating it is the currently programmable load. At this point, the method of programming depends on whether you are using the
LMCT-100.
a. If you are not using the LMCT-100, press the Config button on the LMCP or any connected DLM device. Each time you press
the Config button, the panel will cycle to the next load. The Status LED for a load turns ON when that load is selected (only one
load LED will be on at a time). When you reach the highest number load, it will cycle back to load 1. You can also jump directly
to a specific load by pressing the Override button for that load on the LMCP, LMRC, LMPL, or LMRC. Once you select the
desired load, you can bind the specific controller to that load. For a switch, you do this by pressing the desired button on that
switch to turn it on. For an occupancy sensor, you use the display and navigation buttons on the sensor to bind that load to the
sensor.
b. If you are using the LMCT-100 then you select the load on the LMCT. It starts by default on load 1. To choose another load,
select NEXT, use the left and right arrow buttons to select the desired load, then point the LMCT at the IR sensor and press
Select. The screen for that load’s settings opens. On this screen, you can bind a specific controller to that load. For a switch,
you do this by pressing the desired button on that switch to turn it on. For an occupancy sensor, you point the LMCT-100 at the
sensor and select BIND. For more details on programming PnL from the LMCT-100, see the LMCT-100 User Guide.
3. To exit PnL, hold the Config button for 3 seconds, until the LED stops blinking. Or if using the LMCT-100, select EXIT.
If you have one or more DLM Room controllers connected to the LMCP, then as when you cycle through the loads by pressing the
Config button, once the last relay is reached on the LMCP, the sequence advances to the Room Controller with the highest serial
number and cycles through the loads on that controller in order.
A primary difference in operation of the LMCP compared to a DLM Room Controller is that by default, while in load configuration mode,
the panel relays do not turn on and off in sequence as the Config button is pressed. Only the LED associated with the relay turns on On
a DLM Room Controller, the load itself will turn on and off.
NOTE: It is possible to change the LMCP so that the relays turn on and off in PnL, just like a room controller. This is done by setting Dip
switch #7 on the LMPI board to the ON position.
 Loading...