Do you have a question about the Lenovo ThinkSmart Hub 500 and is the answer not in the manual?
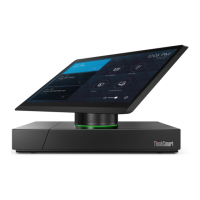
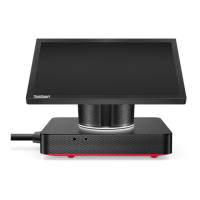
Provides a view of the front of the meeting console, highlighting internal microphones and motion sensor.
Details the ports and indicators on the right and left sides of the meeting console, including various connectors.
Explains the location and purpose of the machine type and model label for support and service identification.
Details the power supply specifications, including wattage and type.
Lists the type of storage drives used in the meeting console.
Lists the video input and output features of the meeting console.
Lists the audio input and output features of the meeting console.
Lists the various input and output connectors available on the console.
Lists the network connectivity features, such as Ethernet and Wi-Fi.
Provides the physical dimensions of the meeting console in millimeters and inches.
Specifies the weight of the meeting console in kilograms and pounds.
Explains how to secure the meeting console to a desk or fixture using a Kensington-style cable lock.
Provides essential precautions and notes before starting any hardware replacement procedure.
Details precautions to avoid damage from static electricity when handling internal components.
Explains the difference between Field Replaceable Units (FRUs) and Customer Replaceable Units (CRUs).
Outlines critical instructions and warnings that must be followed before replacing any FRU.
Provides guidance on how to locate FRUs and whom to contact for service support.
Step-by-step instructions for removing and replacing the cable management door on the console.
Instructions for removing and installing the internal microphones of the meeting console.
Provides instructions and cautions for safely removing the system cover to access internal components.
Step-by-step instructions for removing and installing the video capture card.
Instructions for removing and replacing the Skype board.
Instructions for removing and installing the Wi-Fi card.
Step-by-step guide for removing and replacing the system fan.
Instructions for removing and installing the heat sink.
Instructions for replacing the coin-cell battery, including disposal and function.
Step-by-step guide for removing and installing the microprocessor.
Instructions for removing and installing the system board.
Step-by-step instructions for removing and installing a memory module.
Instructions for removing and installing the M.2 solid-state drive.
Instructions for removing and installing the LED board.
Instructions for removing and replacing the hinge pipe.
Step-by-step instructions for removing and replacing the internal speakers.
Instructions for removing and installing the infrared board.
Instructions for removing and replacing the Wi-Fi antennas.
Final steps to ensure all components are reassembled correctly and cables are connected after replacement.
| Panel type | WVA |
|---|---|
| Screen shape | Flat |
| LED backlight | Yes |
| Display surface | Matt |
| Display diagonal | 11.6 \ |
| Touch technology | Multi-touch |
| Display brightness | 300 cd/m² |
| Native aspect ratio | 16:9 |
| Detachable display | No |
| Bus type | DMI3 |
| Tjunction | 80 °C |
| Processor cache | 6 MB |
| Processor cores | 4 |
| Processor model | i5-7500T |
| System bus rate | 8 GT/s |
| Processor family | Intel® Core™ i5 |
| Processor socket | LGA 1151 (Socket H4) |
| Processor codename | Kaby Lake |
| Number of QPI links | 0 |
| Processor frequency | 2.7 GHz |
| Processor cache type | Smart Cache |
| Processor lithography | 14 nm |
| Processor manufacturer | Intel |
| PCI Express slots version | 3.0 |
| Processor boost frequency | 3.3 GHz |
| Processor operating modes | 64-bit |
| PCI Express configurations | 2x8, 1x8+2x4 |
| Thermal Design Power (TDP) | 35 W |
| Configurable TDP-down frequency | 1.7 GHz |
| Maximum number of PCI Express lanes | 16 |
| Memory types supported by processor | DDR3L-SDRAM, DDR4-SDRAM |
| Memory voltage supported by processor | 1.35 V |
| Memory channels supported by processor | Dual |
| Memory clock speeds supported by processor | 1333, 1600, 2133, 2400 MHz |
| Maximum internal memory supported by processor | 64 GB |
| Product type | All-in-One PC |
| Motherboard chipset | Intel® Q270 |
| Memory slots | 2 |
| Internal memory | 8 GB |
| Memory slots type | SO-DIMM |
| Memory clock speed | 2400 MHz |
| Memory form factor | DIMM/SO-DIMM |
| Internal memory type | DDR4-SDRAM |
| Memory layout (slots x size) | 2 x 4 GB |
| SSD capacity | The Solid State Drive's storage capacity in Gigabytes. |
| Storage media | SSD |
| SSD form factor | M.2 |
| Total storage capacity | 128 GB |
| Compatible memory cards | - |
| Number of SSDs installed | 1 |
| On-board graphics card ID | 0x5912 |
| Discrete graphics card model | Not available |
| On-board graphics card model | Intel® HD Graphics 630 |
| On-board graphics card family | Intel® HD Graphics |
| On-board graphics card OpenGL version | 4.4 |
| On-board graphics card base frequency | 350 MHz |
| On-board graphics card DirectX version | 12.0 |
| On-board graphics card dynamic frequency (max) | 1100 MHz |
| Number of displays supported (on-board graphics) | 3 |
| RMS rated power | 8 W |
| Antenna type | 2x2 |
| Wi-Fi standards | 802.11a, 802.11b, 802.11g, Wi-Fi 4 (802.11n), Wi-Fi 5 (802.11ac) |
| Bluetooth version | 4.2 |
| Top Wi-Fi standard | Wi-Fi 5 (802.11ac) |
| WLAN controller model | Intel Dual Band Wireless-AC 8265 |
| Ethernet LAN data rates | 10, 100, 1000 Mbit/s |
| USB 2.0 ports quantity | USB 2.0 ports have a data transmission speed of 480 Mbps, and are backwards compatible with USB 1.1 ports. You can connect all kinds of peripheral devices to them. |
| Product color | Black |
| Operating system installed | Windows 10 IoT Enterprise |
| AC adapter power | 90 W |
| AC adapter frequency | 50/60 Hz |
| AC adapter input voltage | 100 - 240 V |
| Certification | GREENGUARD, WEEE, ErP Lot 26 |
| Sustainability certificates | RoHS |
| Cables included | AC |
| Scalability | 1S |
| Processor ARK ID | 97121 |
| Processor package size | 37.5 x 37.5 mm |
| Supported instruction sets | AVX 2.0 |
| Thermal solution specification | PCG 2015A |
| Intel Identity Protection Technology version | 1.00 |
| Depth (with stand) | 193.25 mm |
|---|---|
| Width (with stand) | 278.9 mm |
| Height (with stand) | 178.45 mm |
| Weight (with stand) | 2500 g |