STEP 1
STEP 5
ASSEMBLE MOUNTING BRACKETS TO FLOOR BOX
MOUNT COVER PLATE
NOTE: Use screw cap when not in use.
IMPORTANT NOTE: Oval adjustment hole on bracket MUST be mounted to floor box.
Remove desired knockouts in floor box before mounting.
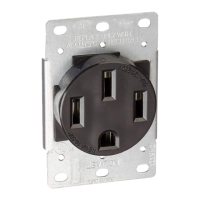
SINGLE RECEPTACLE - Mount brackets on ENDS of floor box in the "UP" position.
BARE FLOOR CARPET
DUPLEX RECEPTACLE - Mount brackets on SIDES of floor box in the "DOWN" position.
STEP 2
CUT CARPET (if applicable), and FLOOR
A) Cut a 4" x 2-¾" hole in carpet in desired
location.
CAUTION:
Do not cut carpet opening larger than
recommended dimensions. A larger opening
may compromise the integrity of the seal.
A) Place floor cut out template on floor in
desired location and trace.
B) Cut mounting area for floor box.
NOTE: Remove debris and clean
floor surfaces before mounting.
B) Place floor cut out
template (centered)
and trace.
C) Cut mounting
area for floor
box.
STEP 3
MOUNT FLOOR BOX, RECEPTACLE AND SHELL
Carefully cut template along dotted line
B) Pull conductors. Wire and mount
receptacle.
C) Place plastic shell
over receptacle.
A) Mount box.
* Use sealing
compound
under brackets
STEP 4
SEAL DEVICE ACCORDING TO APPLICATION
BARE FLOORBARE FLOOR CARPETCARPET
Sealing compound
• Apply sealing compound
• Add O-seal washers to cover plate screws
• Place gasket
• Apply sealing compound (2 places)
• Add O-seal washers to cover plate screws
Note: Gasket is not required for carpet
installations.
Sealing compound
O-seal
washer
O-seal
washer
Gasket Carpet
• Apply an all purpose silicone lubricant to O-ring before assembly
PK-93600-10-00-0E
Floor Cut Out
Template