Do you have a question about the Lighthouse SOLAIR 1100LD and is the answer not in the manual?
General safety warnings and precautions for operating the particle counter.
Information about the Class 1 laser product and potential radiation exposure risks.
Warnings about connecting to multiple ports simultaneously and proper connection procedures.
Guidance on preventing damage from electrostatic discharge (ESD) during handling.
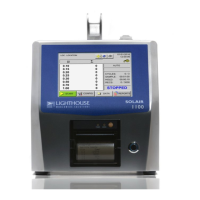
General description of the SOLAIR 1100LD particle counter and its features.
Detailed technical specifications of the SOLAIR 1100LD model.
Steps for inspecting the instrument upon receipt and verifying package contents.
Procedures for returning the unit for service or calibration, including proper packing.
List and description of optional and standard accessories available for the SOLAIR 1100LD.
Instructions for physically installing the SOLAIR 1100LD on location and installing optional batteries.
Step-by-step guide on how to safely remove and replace the instrument's batteries.
Instructions for connecting the isokinetic sample probe to the instrument's inlet.
Guide on how to load thermal paper into the instrument's optional printer.
How to connect the SOLAIR 1100LD to external systems for data retrieval.
Detailed steps for safely replacing the instrument's fuses.
Information on connecting and configuring 4-20mA analog sensors to the SOLAIR.
Step-by-step guide for setting up analog channels, including type, min/max values, and units.
Details on the PIC connector for external peripheral devices and its pinout.
How to use report parameters to meet specific cleanroom classification requirements.
Outlines essential requirements for various reports like Fed Std ft3, ISO 14644-1, and EU GMP.
Instructions for configuring the instrument's Ethernet settings for network connectivity.
Using Lantronix DeviceInstaller for configuring Ethernet IP Address and subnet.
Explanation of DOS commands for advanced instrument configuration and troubleshooting.
Necessary equipment and software for setting up the instrument on a network.
Steps for configuring the instrument's Ethernet port using Cat5 cables.
Detailed instructions for programming the instrument's interface via Windows Telnet.
Overview of available communication modes for the SOLAIR 1100LD.
Identifies the rear connectors for communication: Ethernet, RS485, USB.
Details on using the Ethernet port for MODBUS TCP/IP communication.
Pinout information for the RJ-45 connector used for RS232/RS485 communication.
Information on using RS485 and RS232 for instrument communication.
Overview of USB port communication and steps to connect to a PC.
How to use a USB flash drive for saving reports and data.
Initial steps for powering on and preparing the SOLAIR for operation.
Explanation of the touch screen interface, menu structure, and navigation.
Description of the main display screen, showing instrument status and indicators.
How to select, change, and manage measurement locations on the instrument.
Explains how to access and use zoomed data views and display options.
Overview of the configuration screen and its main sections: Data Setup and Device Setup.
Setting up sample parameters like cycles, delay, hold, and sample time.
Explanation of count modes, Geiger counter mode, particle display, and alarm settings.
Procedures for clearing buffer, setting clock, managing options, language, COMM address, and output.
How to configure and print reports, including sample printouts and report requirements.
Information on battery status indicators and power shutdown behavior.
Overview of programming the SOLAIR using MODBUS and instrument communication ports.
Details on using RS485, RS232, and USB for instrument communication.
Step-by-step guide for connecting the instrument to a PC using the USB port.
Steps for configuring the instrument using the MODBUS protocol.
How to set the instrument's clock and change default parameters.
Explanation of action commands for manual and automatic counting modes.
General information about routine maintenance and safety precautions.
Instructions for cleaning the instrument and recommendation for annual calibration.
Procedure to check for zero counts and steps for troubleshooting test failures.
A table listing the default configuration settings for the instrument.
Required communication settings for MODBUS protocol.
List of MODBUS commands supported by the instrument.
Detailed description of registers related to sensor settings.
Information on registers storing particle and analog data.
Explanation of data status bytes, alarm flags, and enable registers.
Registers used for setting alarm threshold values for particle channels.
List of necessary hardware and software for real-time data acquisition.
Steps to read flow and laser current data in real-time via USB.
Details on the scope and limitations of the product warranty.
Information on the warranty coverage for repairs performed after the initial period.
| Light Source | Laser Diode |
|---|---|
| Weight | 1.5 kg (3.3 lbs) |
| Response Time | 1 second |
| Counting Efficiency | 50% at 0.3 μm |
| Concentration Limit | 4, 000, 000 particles/ft³ |
| Data Storage | 1000 samples |
| Communication | Ethernet, USB |
| Power | 100 – 240 VAC, 50 – 60 Hz |
| Accuracy | ±10% |
| Resolution | 0.1 μm |
| Operating Temperature | 10 - 40 °C |
| Operating Humidity | Non-condensing |
| Power Supply | 100 - 240 VAC, 50/60 Hz |
| Particle Size Range | 0.3 - 10 μm |
| Size Channels | 6 |