Charge and Sync a Relay G10T Wireless Transmitter
The Line 6 Relay G10T wireless transmitter is the perfect accessory to
go with your wireless-ready Spider V amp—making it easier than ever to
take your performance wireless.* The G10T will automatically charge and
pair itself with your amp. You get up to 8 hours of playing per charge, with
up to 200 hours of standby time. Simply plug the transmitter into your
guitar and start playing.
• Compatible with Spider V 60, 120, 240, and 240HC
• 1/4" transmitter works with nearly all guitar types
• Just plug and play—no complicated setup required
To Charge and Sync the Relay G10T:
1. Insert the Relay G10T transmitter into the INPUT JACK. Spider V will
nd and select the best available operating channel, as well as
charge the transmitter.
2. After a few seconds a check mark will appear on screen to show
the transmitter is ready to use. Remove your Relay G10T transmitter
and plug it into your guitar.
3. The battery life is also indicated on the Home Screen when the
Relay G10T transmitter is detected. When showing 3 bars, the
battery is full.
4. Your Spider V amplier must be plugged in and powered on in
order to charge the transmitter.
In the event that you want to charge your transmitter while still using your
Spider V, a Relay G10T USB Charging Cable is also available on the Line
6 shop (https://shop.line6.com).
Using Other Compatible Line 6 Relay Guitar Wireless Transmitters:
Any Relay wireless using RF2 can be used with wireless-ready Spider V
amps. This includes Relay G30, G50, and G90 transmitter packs, as well
as Line 6 XDV Series Wireless Microphones. For these transmitters,
set your wireless channel manually by using the Global Settings menu
(see the “Global Settings Options” table later in this document).
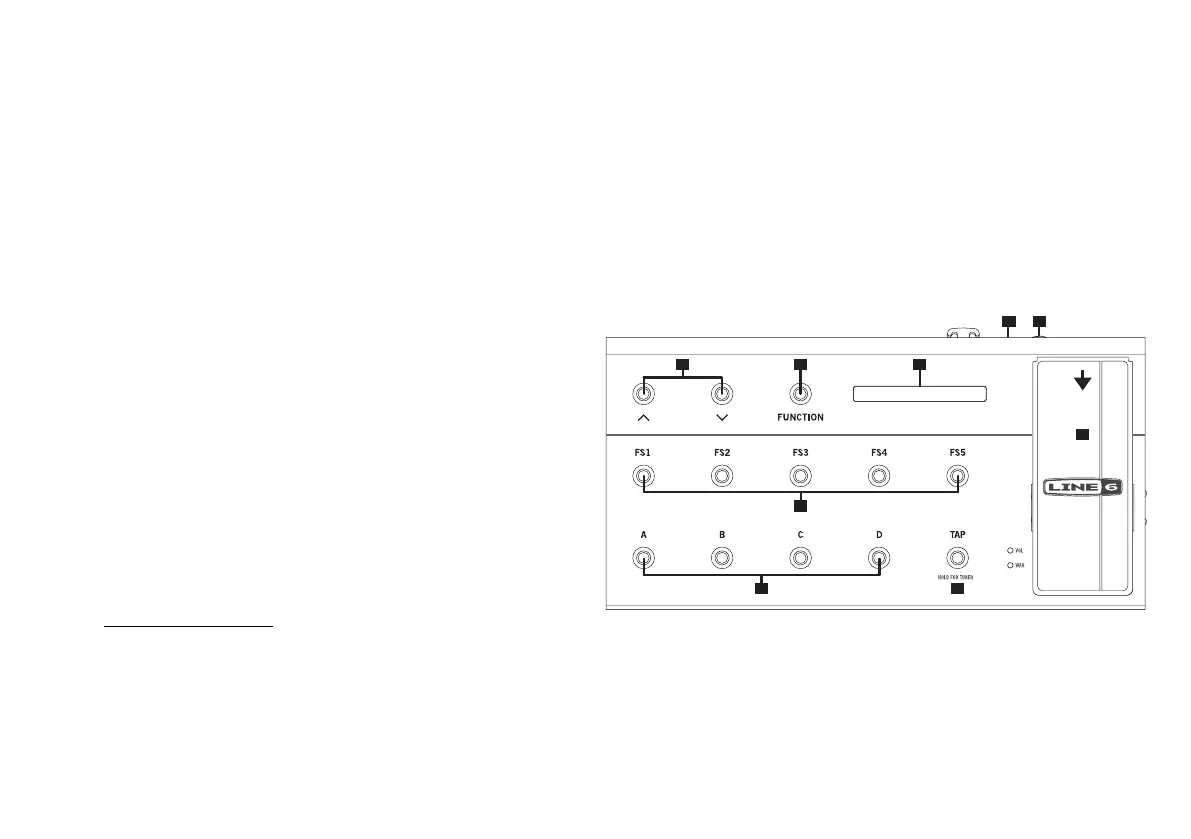
Using a Foot Controller with Spider V
Plug in a compatible Line 6 FBV Controller into the FBV PEDAL port on
the back of your Spider V amplier.
FBV 3
The Line 6 FBV 3 is a next-generation foot controller that gives you total
hands-free control of supported Line 6 amps and eects. Save and recall
your favorite presets and much more. It’s the ultimate tool for performing
guitarists. After all, you should focus on your performance, without being
tied to the knobs on your amp. With FBV 3, you can change presets,
bypass/enable eects, use the looping function, and control volume and
wah eects.
6
7
3 54
1 2
8
109
FBV 3 Controller
1. Start by connecting your FBV 3 to the FBV PEDAL jack on Spider
V. Once connected, it will power up, display the name of the current
preset, and light up the switches accordingly.
2 A dedicated expression pedal, such as the Line 6 EX-1, can be
connected to the EXP jack, and becomes a dedicated volume
pedal when used with Spider V.
 Loading...