The LINE SITE LSL-210 is a versatile rotary laser designed for general construction, site preparation, vertical alignment, squaring, and other leveling applications. It automatically self-levels in both horizontal and vertical modes and can also be used for manual grade adjustments.
Function Description:
The LSL-210 is equipped with a red semiconductor diode with a wavelength of 635nm. The laser module rotates freely to form a laser-scanning surface. When set upright, it emits a 360-degree horizontal scanning surface and a plumb dot. When set horizontally, it forms a 360-degree plumb scanning surface and a plumb dot.
Important Technical Specifications:
- Leveling Accuracy (H/V): ±2.4mm at 30m / ±3mm at 30m
- Leveling Range: ±5°
- Working Range with Receiver (Diameter): 650m (depending on working environment)
- Visible Working Range: 40m (depending on working environment)
- Spinning Speed: 0, 60, 120, 300, 600 r.p.m
- Directional-Scanning Angle: 0°, 10°, 45°, 90°, 180°
- Slope-adjusting Range: ±5° (Bi-directional)
- Light Source: Laser Diode, Class 2 (IEC60825-1,2014) wavelength: 635-650nm
- Remote Controlling Distance: Approximately 30m
- Working Temperature: -5°C to +50°C
- Storage Temperature: -15°C to +60°C
- RL Power Supply: DC 4.8-6V (4 section of NI-MH rechargeable batteries) / 4 Cell Alkaline battery
- RL Charging Time: No less than 5 hours (Do not charge Alkaline battery)
- Hours in Continuous Use: Approximately 34 hours (Rechargeable) / 25 hours (Alkaline)
- RL IP (Ingress Protection): IP 65
- Dimension: 220mm x 220mm x 210mm
- Weight: 3.1kg
- Remote IP: IP 54
- Remote Power Supply: 2AA
- Laser Detector Precision: Rough Band: 3mm / Precise Band: 1mm
- Laser Detector IP: IP55
- Laser Detector Power Supply: 9V
Usage Features:
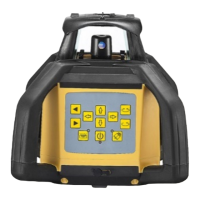
Main Body Components:
- Laser Rotary Module: Emits the laser beam.
- Top Cover: Protects the internal components.
- Window Glass: Allows the laser beam to pass through.
- Main Housing: Encloses the device.
- Rubber Handle: For easy carrying and grip.
- AC/DC Charging Port: For connecting the charger.
- Rechargeable Battery Pack with 5/8 tripod thread: Provides power and allows mounting on a tripod.
Main Panel Controls:
- On/Off Button (1): Controls the power state.
- Power Indicator (2): Lights up when the instrument is starting up; off when shutting down. Blinks if battery voltage is insufficient.
- Mode Indicator (3): On when leveling manually. Blinks and alarms if the instrument's slope is out of range (exceeds ±5°).
- Anti-shocking Mode (4): Key for automatic drift system model, warns of misaligned device.
- Tilt Shock Alert Indicator (5): Blinks slowly in Automatic Drift System mode. Twinkles quickly if the laser level will not level.
- Rotating Speed Selection (6): Adjusts the spinning speed (0-60-120-300-600 RPM).
- Scanning Mode (7): Controls directional scanning angle (0°-10°-45°-90°-180°).
- Manual Button (8): Toggles between manual and automatic leveling modes.
- Spot Spinning, Anti-clockwise (9): Moves the laser module counter-clockwise for stepping spinning or directional scanning.
- Spot Spinning, Clockwise (10): Moves the laser module clockwise for stepping spinning or directional scanning.
- Manual Slope in X-axis (11): Adjusts the slope of the X-axis in manual mode.
- Manual Slope in Y-axis (12): Adjusts the slope of the Y-axis in manual mode.
Directions:
- Battery: A Ni-MH rechargeable battery pack is pre-installed. 4x Alkaline (Size C) batteries are also included.
- Instrument Placement:
- Horizontal Scanning: Place on a tripod or stable flat surface, or hang on a wall. Set upright, keeping the slope within -5° to +5°.
- Vertical Scanning: Lay on a flat surface, keeping the slope within -5° to +5°.
- Operations:
- Power: Press ON/OFF to activate automatic leveling. If the power indicator lights, batteries are insufficient and need charging. Press ON/OFF again to switch off.
- Leveling: Press ON/OFF. The laser beam will wink during automatic leveling. Once leveled, the module rotates at 600 r.p.m. If the instrument is improperly placed or the slope exceeds ±5°, the mode indicator and laser beam will wink, indicating the need for proper placement.
- Spinning:
- Continuous Spinning: Use the "Rotational speed adjustment" key to cycle through speeds: 0-60-120-300-600-0 RPM.
- Stepping Spinning: Set speed to 0 RPM to stop spinning. Use "Right-spinning" for clockwise step-move and "Left-spinning" for counter-clockwise step-move.
- Directional Scanning: Set speed to 0 RPM to stop spinning. Press "Directional scanning" to activate, cycling through angles: 0°-10°-45°-90°-180°-0°. Use "Left-spinning" or "Right-spinning" to change scanning direction.
- Slope Adjustment:
- When upright for horizontal scanning, X-axis and Y-axis slopes can be set.
- Press "Manual/Automatic" to enter manual leveling mode.
- X-axis Slope: Aim the X1-beam in the desired slope direction and use the arrow keys to move the laser beam up or down.
- Y-axis Slope: Adjust similarly.
- Quit Slope Adjustment: Press "Manual/Automatic" again. The mode indicator will turn off, and the instrument will self-level.
Accuracy Checking:
- Horizontal-surface Checking:
- Place the instrument 50m from a wall (or scale plate). Adjust the base to aim the X1-beam at the wall.
- Use a laser detector to measure h1 of the X1-beam.
- Loosen the tripod screw, rotate the instrument 180°, and measure h2 of the X2-beam. The D-value between h1 and h2 should be less than 10mm.
- Check the Y-beam in the same way.
- Horizontal Line Checking:
- Place the instrument between two walls (or scale plates) 30m apart.
- Set the instrument horizontally and adjust it.
- Switch on the power and measure the middle point of the laser beam on the wall (or scale plate).
Maintenance Features:
- Battery Charging: When the voltage indicator lights, charge immediately. Connect the charger to AC and insert the plug into the port at the bottom. A red indicator means charging; a green indicator means charging is complete.
- Charging Notes:
- Standard rechargeable batteries fully charge within 7 hours.
- Charger requirements: Frequency: 50-60HZ; Voltage: 85-265V.
- Charging and using can occur simultaneously.
- For long-term storage or disuse, remove batteries (dry or rechargeable).
- New or long-unused rechargeable batteries require three charge/discharge cycles to reach full capacity.
- General Caution: Do not expose eyes to the laser beam (Laser Class 2 Standard). Do not dismantle the instrument; seek repair from a dealer or supplier. Ensure the instrument is securely fixed to the tripod and leg clamps are fastened to prevent falling. Be aware of sharp tripod shoes. Avoid directing the laser at eye level of drivers/pedestrians or highly reflective surfaces. Remove batteries before disposal to prevent laser emission.
Remote Control:
- Uses infrared technology.
- Aim the remote's infrared aperture at the instrument.
- Available distance: 20M indoors; 15M outdoors.
- The keypad has 9 keys. The indicator on the remote blinks when a signal is sent.
- Remote functions include SPEED, SLOPE, and SCAN, along with directional arrow keys for fine adjustments.
Item Checklist (LSL-210):
- Rotary Laser level
- Hard carry case
- Rechargeable battery pack
- 4 x C cell alkaline batteries
- 4 x C cell - battery holder
- Remote Control
- Laser receiver with clamp
- Laser target
- Wall / Ceiling Mount
- Red safety glasses
- Rechargeable Battery Charger
- User manual