EasyManua.ls Logo

LINSY HOME LH618E4 - User Manual

LINSY HOME LH618E4
28 pages
Print Icon
To Next Page IconTo Next Page
Loading...
LH618E4
ASSEMBLY INSTRUCTIONS - please keep for future reference.
IMPORTANT - please read these instructions before assembly.
Question and Answer IconNeed help?

Do you have a question about the LINSY HOME LH618E4 and is the answer not in the manual?

Summary

Safety And Care Advice

General Care and Maintenance

Guidance on cleaning, maintenance, and avoiding damage from chemicals or spills for product longevity.

Assembly Instructions

Step 1: Base Assembly and Fitting Attachment

Attaching hardware and fittings to the base panel for initial assembly stages.

Step 2: Drawer Slide Installation

Securing drawer slides to the side panels, ensuring correct alignment for smooth operation.

Step 3: Main Frame Construction

Connecting side panels and back supports to form the primary structure of the unit.

Step 4: Attaching Horizontal Supports

Fastening horizontal support beams to the main frame using screws and the provided Allen key.

Step 5: Mounting Drawer Slides on Inner Panels

Attaching the corresponding drawer slides to the internal panels of the unit.

Step 6: Drawer Slide Installation Continuation

Continuing the process of attaching drawer slides to the internal panels.

Step 7: Connecting Base Structure Panels

Joining the bottom panel with side panels, using dowels and screws for stability.

Step 8: Installing Internal Vertical Dividers

Securing internal vertical dividers to the base and top panels for compartmentalization.

Step 9: Securing Top Panel Supports

Fastening support beams to the top panel assembly using screws and Allen key.

Step 10: Attaching Top Frame Supports

Securing additional support beams to reinforce the top section of the unit.

Step 11: Assembling Base Frame Components

Connecting base support pieces using screws and dowels to build the foundation.

Step 12: Base Structure Assembly Continuation

Continuing the assembly of the base structure by joining panels together.

Step 13: Attaching Main Frame Cross Supports

Securing cross supports and dowels to the main frame panels for structural integrity.

Step 14: Preparing Drawer Fronts and Slides

Attaching drawer slide components to the drawer front panels using screws.

Step 15: Connecting Drawer Side Panels

Joining drawer side panels to the drawer bases using dowels for drawer construction.

Step 16: Installing Main Back Panels

Positioning and installing the main back panels onto the assembled unit.

Step 17: Securing Back Panels

Fastening the back panels securely to the unit using screws.

Step 19: Attaching Drawer Hardware

Installing drawer handles and feet onto the drawer fronts using screws.

Step 20: Inserting Assembled Drawers

Sliding the completed drawers into their designated slots within the dresser.

Step 21: Installing Back Panel Fasteners

Installing back panel buckles onto the unit using self-tapping screws.

Step 22: Optional Accessory Installation

Guidance on installing optional accessories as per user preference.

Overview

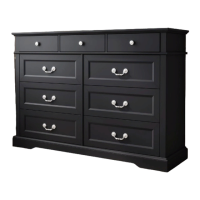
This document provides assembly instructions and care advice for a Linsy Home dresser, model LH618E4. The dresser is a piece of furniture designed for storage, featuring multiple drawers.

Function Description:

The Linsy Home LH618E4 is a multi-drawer dresser intended for domestic use, primarily for storing clothing, linens, or other household items. Its design suggests a classic or traditional aesthetic, suitable for various bedroom or living spaces. The dresser features a flat top surface that can be used for displaying decorative items, lamps, or other personal belongings. The primary function is to provide organized storage through its numerous drawers, helping to keep living spaces tidy and clutter-free. The assembly process involves constructing the main frame, installing drawer slides, and then assembling and inserting the drawers. The inclusion of an anti-tip accessory (J and L parts) indicates a focus on safety, preventing the dresser from tipping over, which is crucial for households with children or pets.

Important Technical Specifications (Derived from Components and Assembly Steps):

  • Overall Structure: The dresser is constructed from multiple wooden or particle board panels, indicated by the numbered components (1-28).
  • Drawer System: The dresser features a combination of three smaller drawers and six larger drawers, as suggested by the "x3" and "x6" notations for drawer components (e.g., 23 x6, 18 x3).
  • Drawer Slides: The assembly uses metal drawer slides (F parts), which are typically L-300mm in length, ensuring smooth operation of the drawers.
  • Fasteners: A variety of fasteners are used for assembly:
    • Cam Locks (B): Ø15*11.5mm, used for connecting panels securely.
    • Cam Dowels (C): Ø8*30mm, used in conjunction with cam locks.
    • Wood Dowels (D): L=28mm, for alignment and structural integrity.
    • Screws (E): Ø4x28mm, for attaching drawer slides and other components.
    • Screws (G): M4x42mm, likely for securing back panels or larger structural elements.
    • Long Bolts (M): Ø6*48mm, used for attaching handles or specific structural connections.
    • Small Screws (H): M4x20mm, for attaching handles.
    • Self-tapping Screws (I): Used for attaching the back panel buckle.
  • Handles (Q): Six handles are provided, indicating the number of visible drawers.
  • Anti-tip Kit (J, L): Includes a strap (J) and wall plugs (L) for securing the dresser to a wall, enhancing safety.
  • Tools: An Allen key (N) and a screwdriver (R) are included for assembly.
  • Dimensions (Inferred): While specific overall dimensions are not provided, the component sizes and the number of drawers suggest a substantial piece of furniture, likely a wide dresser with multiple columns of drawers. The drawer slide length (300mm) gives an indication of the drawer depth.

Usage Features:

  • Ample Storage: With nine drawers (three smaller, six larger), the dresser offers significant storage capacity for various items.
  • Smooth Drawer Operation: The use of metal drawer slides (F) is designed to ensure that drawers open and close smoothly and easily.
  • Stable Design: The assembly instructions emphasize correct screw usage to prevent damage, implying a robust design when properly assembled.
  • Safety First: The inclusion of an anti-tip kit (J, L) highlights a commitment to user safety, particularly important in homes with children. Users have the option to install this accessory based on their needs.
  • Easy Assembly (with assistance): The instructions state that "The assembly will be easier with 2 people," suggesting that while it can be assembled by one person, two people will make the process more efficient and manageable.

Maintenance Features:

  • Easy Cleaning: The product can be cleaned with a damp cloth and mild detergent. This suggests a surface that is resistant to common household cleaning agents, provided they are not abrasive or harsh.
  • Avoid Harsh Chemicals: Users are explicitly warned against using bleach, abrasive cleaners, acetone (nail varnish remover), ammonia, or sodium hydroxide (caustic soda, drain, and oven cleaners). This indicates that the surface finish is sensitive to strong chemicals and could be damaged by them.
  • Prompt Spill Cleanup: Spills should not be allowed to remain on the surface for a long time, suggesting that the material, while somewhat resistant, is not entirely impervious to moisture or staining if left unattended.
  • Rinse Irritating Liquids: If exposed to irritating liquids, the surface should be thoroughly rinsed with clean water, further emphasizing the need for gentle care.
  • Surface Protection: The recommendation to use mats to protect surfaces from moisture and heat implies that direct exposure to these elements could cause damage or discoloration.
  • Regular Screw Check: Users are advised to regularly check for missing screws, which is a good practice for maintaining the structural integrity and safety of any assembled furniture.
  • Responsible Disposal: The product should not be discarded with household waste but taken to a local authority waste disposal center, indicating that it may contain materials that require special disposal or recycling.

In summary, the Linsy Home LH618E4 dresser is a practical and aesthetically pleasing storage solution designed for home use, with a strong emphasis on assembly quality, user safety, and straightforward maintenance.

LINSY HOME LH618E4 Specifications

General IconGeneral
BrandLINSY HOME
ModelLH618E4
CategoryIndoor Furnishing
LanguageEnglish

Related product manuals