Do you have a question about the Linxup AT3 and is the answer not in the manual?
Name your tracker based on the naming convention used for vehicles.
Enter optional tracker information like group, VIN, odometer, or notes.
Connect the tracker to a constant power source on non-powered equipment.
Connect the tracker to ignition and constant power for powered equipment.
Install with a clear line of sight to the sky for the best GPS signal.
Vertical installation may result in a weak GPS signal.
Installing under an asset may result in a limited GPS signal.
This document is a Quick Start Guide for the Linxup Asset Tracker (AT3), providing instructions for account and device activation, as well as installation guidelines for the wired asset tracker.
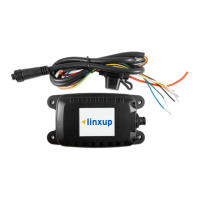
The Linxup Asset Tracker (AT3) is a GPS tracking device designed to monitor vehicles and equipment. Its primary function is to provide real-time location data, allowing users to track their assets, monitor reports, and set alerts through a customer portal. The device is a wired asset tracker that includes an internal rechargeable battery, ensuring continuous operation even if the primary power source is interrupted.
To begin using the AT3, users must first activate their account and device. This process starts by accessing the Linxup activation page through a web browser. New customers are required to complete a registration form, providing an activation code (found on the device or in the confirmation email), an email address, and creating a secure password. They must also agree to the terms and conditions. Existing customers can log in to add new units.
Once the account is activated, device activation follows. If the activation code was entered during the initial account setup, it will auto-populate. Otherwise, users will need to manually enter the 6-digit activation code displayed on the device. A crucial step in device activation is naming the tracker. Users are encouraged to use a clear naming convention that helps them easily identify their assets, such as "Blue Truck," "Van ##," "Sophie's Car," "Ford F150," or "Tractor ###." This customization aids in managing multiple vehicles or equipment within the customer portal. Optional information, such as group, VIN, odometer, camera details, and notes, can also be added for each tracker. If multiple trackers are being added and grouped, it is recommended to complete the group setup before activating the remaining devices. Upon successful activation of the first device, users can choose to activate more trackers or complete the process and begin using their system.
The AT3 is a wired device, and proper installation is critical for its functionality. The device contains an internal rechargeable battery, which may not be fully charged upon receipt. To ensure activation, the device should either be charged for a minimum of four hours or wired to an appropriate power source during installation.
Installation instructions vary slightly depending on whether the asset is non-powered or powered.
After installation, it is essential to allow 5-10 minutes for the Linxup asset tracker to power up and acquire cellular and GPS signals. For proper GPS signal reception, the asset must be outdoors and not in a covered area. The presence of an LED confirmation of power indicates that the installation is complete.
The effectiveness of the AT3's GPS tracking is highly dependent on its installation position.
The AT3 is not designed for optimal performance in certain environments:
Performance and results will vary significantly if the device is used in these suboptimal environments. For any assistance or questions, users are directed to contact Linxup support via phone or email.
| Battery | Rechargeable Lithium-Ion |
|---|---|
| Connectivity | 4G LTE |
| GPS Accuracy | 2.5 meters |
| Device Type | Asset Tracker |
| Input Voltage | 12-24V DC |
| Data Storage | Cloud-based |
| Real-time Tracking | Yes |
| Geofencing | Yes |
| Battery Life | Up to 2 weeks |
| Water Resistance | IP67 |
| GPS Technology | GPS, GLONASS |
| Alerts | Low Battery |