The Lion Precision LRD6300 and LRD6300C are capacitive label sensors designed for accurate and fast label edge detection in various applications such as registration, counting, and splice detection. These sensors utilize capacitive technology, which is highlighted as the fastest and most accurate method available for edge detection. The LRD6300 model features an integral cable, while the LRD6300C model is equipped with an M12 connector for connectivity.
Function Description:
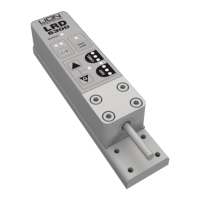
The primary function of the LRD6300 series sensors is to detect the edges of labels on a web. This is achieved by sensing changes in capacitance as labels and gaps pass through the sensor's slot. The sensor provides an output signal based on whether a label or a gap is present, allowing for precise control in labeling machinery. The device includes a light bar display that visually indicates the presence of a label or a gap, making setup and monitoring intuitive.
Important Technical Specifications:
- Power Supply: The sensor operates on a 12-24VDC power supply, which is reverse polarity protected.
- Current Consumption: It draws a maximum of 80mA.
- Response Time: The response time is a rapid 20µs maximum, ensuring quick detection.
- Switching Frequency: The maximum switching frequency is 10kHz.
- Output Current: The output can handle a maximum of 150mA (sinking or sourcing) and is overload protected.
- Switching Output: The output type can be either PNP or NPN, with options for dark or light switching.
- Operating Temperature: The sensor is designed to operate within a temperature range of 40°F to 140°F (4°C to 60°C).
- Protections: It includes inverse polarity protection for the supply and short circuit and overload protection for the switching output.
- Physical Dimensions: The sensor has a slot gap of 0.03" (0.76mm). The overall length is 5.50" (140mm), width is 1.25" (31.8mm), and height is approximately 1.085" (27.6mm) from the base to the top of the sensor body. Mounting is facilitated by four M4x0.7 threaded holes.
Usage Features:
- Mounting and Web Contact: For optimal operation, the web must remain in contact with the base/mounting plate. Labels should pass under the sensor indicator, and small labels should be centered under it.
- Visual Indicators: The sensor features a light bar with gray LABEL and GAP areas. When properly set up, lights in the gray LABEL area illuminate when a label is present, and lights in the gray GAP area illuminate when a gap is present. Rapid flashing of all lights indicates an over-current condition, typically due to a wiring error.
- AutoGap Setup: This feature simplifies sensor calibration. To use AutoGap, first ensure High Gain is off. Remove a label from the web and place the liner-only area in the sensor. Press the "GAP" button for at least one second until the lights begin to move back and forth, then release. This process automatically calibrates the sensor. After AutoGap, users should verify that the light bar moves into the gray GAP area during gaps and into the gray LABEL area during labels. Manual adjustments can be made using arrow keys if needed. If the light bar does not move at least three or four lights, High Gain should be activated.
- Manual Adjustment: During operation, the light bar should extend from the gray LABEL area to the gray GAP area. The up and down arrows allow for fine-tuning of the adjustment. If adjustments reach the end of their range, the last light in the GAP or LABEL area will flash three times when the button is pressed. Note that the light bar may temporarily move towards LABEL when the Up arrow is pressed due to sensor body deflection, but it will return to normal when the button is released.
- Light/Dark Switching: The sensor supports both "Light" and "Dark" switching modes. In "Light" mode, the sensor outputs are active/on during the gap. In "Dark" mode, the sensor outputs are active/on during the label. Switching between modes is done by pressing a dedicated button, and this should not be done while the sensor is running.
- High Gain Mode: This mode is intended for use only when necessary, specifically for very small or thin labels that may not consistently move the light bar between the LABEL and GAP areas. Activating High Gain is done by pressing a button and requires a subsequent AutoGap performance. This mode should not be changed while the sensor is running.
- Metal/Foil Label Setup: For rectangular metallic labels (foil or metalized Mylar), AutoGap setup on a missing label area may not be reliable. In such cases, an actual gap should be placed in the sensor (using the alignment groove), and the "GAP" button held down for AutoGap. Labels should then be moved slowly through the sensor, and manual adjustments used to ensure the light bar is in the LABEL area during labels and GAP area during gaps. If reliable operation is still not achieved, the LRD8200 Ultrasonic Sensor may be required.
Maintenance Features:
- Wiring Reference: The manual provides a detailed wiring diagram for both the LRD6300 and LRD6300C models, including connections for +Vin, NPN Output, PNP Output, and Ground. It also includes a reference for older model LRD sensors' wire colors to facilitate replacement with the LRD6300.
- Safety Warnings: Important warnings include ensuring the sensor body is connected to Ground, avoiding voltages exceeding 30VRMS or 60VDC, and ensuring all power is off during installation. Misuse of the equipment may impair its safety and EMI protections.
- Warranty: The product comes with a two-year warranty, with details available on the manufacturer's website.