4
lci1.com 574-537-8900 Rev: 08.20.20CCD-0003866
Flow Max
™
40V Portable Power Cleaner
Installation and Owner’s Manual
(For Aftermarket Applications)
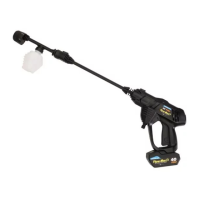
Fig.3
3. To only use the 360-degree nozzle (Fig.4B):
A. Press and hold the lock button (Fig.4B) located on the top
of the handle assembly (Fig.4C) while inserting the nozzle.
B. Release the lock button when the nozzle seats into
the handle assembly.
4. To use the nozzle extension (Fig.5A) with the
360-degree nozzle:
A. Press and hold the lock button (Fig.5B) located on the
top of the handle assembly (Fig.5C) while inserting the
nozzle extension.
B. Release the lock button when the extension seats into
the handle assembly.
B
A
B
A
Fig.4
C. Press and hold the lock button located at the end of the
extension (Fig.6A) while inserting the 360-degree nozzle
(Fig.6B).
D. Release the lock button when the nozzle seats into
the extension.
C
D
A
B
Fig.5
Fig.6
Fig.7
A
B
C
B
A
C
Water Supply Line
Make sure the water supply line particle filter is attached
and free of debris.
1. Unscrew clear plastic lter housing (Fig.7A) from the
water supply line (Fig.7B) lter end cap (Fig.7C).
2. Inspect lter (Fig.7D) for debris. If necessary, remove
lter and clean.
3. Reinsert lter, then reattach lter housing to water
supply line lter end cap.
4. Connect the water supply line (Fig.8A) to the handle
assembly (Fig.8B) by inserting the quick disconnect
tting (Fig.8C) over the water inlet nipple (Fig.8D) until it
seats (Fig.9A).
 Loading...