Rev: 08.18.20 Page 4 CCD-0003685
TI-353
SOLERA
®
POWER AWNING REGAL HEAD
SPEAKER REPLACEMENT
AWNINGS
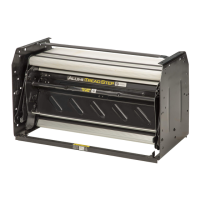
Fig. 5 Fig. 6
Screws
Tabs
Installation
1. Install the new speaker into the speaker bed routing the wires back through the bottom hole in the
speaker bed.
2. Reconnect the speaker wires to the main harness.
3. Place the foam gasket over the speaker.
4. Snap the previously-removed speaker grill cover back in place.
5. Reinstall the front cover to the rear cover and secure with screws.
When cutting the zip tie, hold the outer arm so it doesn't kick open. Pressure from the gas strut can cause
the outer arm to kick open, which could cause personal injury or product damage.
6. Remove the zip tie holding the arm in place.
7. Fully retract and extend awning to ensure proper drive head and motor installation and operation.
As a supplier of components to the RV industry, safety, education and customer satisfaction are our primary concerns. Should you
have any questions, please do not hesitate to contact us at (574) 537-8900 or by email at customerservice@lci1.com. Self-help tips,
technical documents, product videos and a training class schedule are available at lci1.com or by downloading the MyLCI app.
6. Remove the two screws (Fig. 5) on the back of the head cover. Separate the front cover from the back
(Fig. 6). Disconnect speaker.
NOTE: The shell is made of a plastic molding, which consists of plastic tabs (Fig. 6) and notches that snap
together.

 Loading...