Do you have a question about the LisnaWaters LWST and is the answer not in the manual?
Verify all items are present and undamaged upon receipt. Report damages within 48 hours.
Unit must be fitted by a qualified specialist; DIY fitting invalidates warranty.
Ensure the tub is water tested before fitting and all leaks are addressed by the fitter.
Perform a 'dry run' assembly to ensure confidence and understanding before full installation.
List of necessary tools for assembly, including screwdrivers, spanners, and spirit level.
Requires 1-3 bar pressure and over 7.5 litres/min flow for optimal showering.
Recommendation for shower pump installation for gravity fed systems.
Recommended for easier service access and water disconnection.
Requires an ISOLATED FUSED SPUR; connecting to a plug socket is illegal.
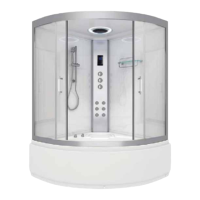
Covers location access, floor requirements, pre-assembly checks, glass safety, and tower prep.
Attaching the thermostatic shower valve to the central tower panel using pre-drilled holes.
Positioning the tub base, adjusting feet for levelness, and connecting the waste.
Securing rear glass panels to the tub and attaching the central tower panel.
Assembling the front frame sections and installing the fixed side glass panels.
Attaching glass retaining clips and fitting the assembled front frame to the unit.
Installing the shower ceiling, monsoon head, ozone unit, and temperature sensor.
Fitting shower door wheel runners and door handles for proper operation.
Installing overhead shower, hand shower, riser bar, and glass shelf.
Connecting the shower valve to water supplies and fitting door seals.
Connect to MAINS ELECTRICITY via an ISOLATED FUSED SPUR; 13A plug is for testing only.
Shower has a pre-fitted RCD; remove if property consumer unit is already RCD protected.
Whirlpool pump requires a separate 13amp power source via an isolated fused spur.
Connect Steam Generator and Electronic Control Unit via data and power transfer cables.
Connect lights, fan, and ozone unit to the Electronic Control Unit using labeled cables.
Position the radio aerial wire for optimal signal reception.
Connect the electronic control panel communication cable carefully to the control unit.
Details operation of dials for output functions, water flow rate, and temperature control.
Allow steam generator to cool for 30 mins before touching; avoid cold water on hot surfaces.
Disconnect power and water supply before any investigations or part replacement.
Supervise children, note single occupancy, beware of slippery surfaces, limit steam use.
Control panel power ON/OFF and automatic locking function for inactivity.
Operate LED lighting modes and activate/set steam generator temperature and duration.
Activate the circulation fan and run the ozone cleaning cycle.
Use arrow buttons for tuning/volume/track skip and M button for mode toggling.
Activate Bluetooth for audio streaming or FM Radio tuning.
Never operate without water; avoid bubble bath products as they damage the pump.
Use START/STOP button and regulator dial to control whirlpool pump power.
Clean after each use, leave doors open to dry, and use silicone sealant in gaps.
Do not use abrasive cleaners (CIF, W9, Bleach) as they damage the tower paint.
Use only products designed for steam infusion; others may cause discoloration.
Essential oils can damage rubbers/plastics; damage from oils is not covered by warranty.
Contact via email for full guarantee details and replacement parts after warranty.
Call Technical Helpline for installation support, FAQs, or replacement parts.
Diagnose cartridge failure due to hard water, age, or debris.
Isolate water supply and ensure pressure is between 1-3 bar before starting.
Instructions for removing the dial cap and loosening the grub screw.
Steps to remove the thermostat head and reverse the process for replacement.
Perform checks every 6 months, including isolating connections and inspecting parts.
Inspect pipes, joints, electrical connections, hoses, door wheels, and fittings.
Manual data is for concept only; user is responsible for safe and acceptable application.
| Brand | LisnaWaters |
|---|---|
| Model | LWST |
| Category | Bathtubs |
| Language | English |