Section 6
Specification
Fingertip Pulse Oximeter Specifications:
Physical Characteristics
Machine:
Dimensions :
62 mm (L) x 34mm (W) x 31mm (D)
Weight approx: 50g
(including 2 x AAA battery)
Classification :
Anti-electric Shock Type:
Internally powered equipment
Anti-electric Shock Degree:Type BF
equipment
EMC:Type B
Mode of operation: Continuous Operation
Enclosure Degree of ingress protection: IP22
IP22
means shell of this product can withstand
the water dropping to the surface when the shell
deviate 15 degree from horizontal surface.
Manufacturer’s Declaration of the EMC
Guidance and manufacturer´s declaration – electromagnetic emission –
for all EQUIPMENT AND SYSTEMS
Guidance and manufacturer's declaration – electromagnetic immunity
–for all EQUIPMENT and SYSTEMS
Guidance and manufacturer´s declaration – electromagnetic emission
The Pulse Oximeter is intended for use in the electromagnetic environment specified below.
The customer or the user of the Pulse Oximeter should assure that it is used in such an environment.
Guidance and manufacturer´s declaration – electromagnetic immunity
The Pulse Oximeter is intended for use in the electromagnetic environment specified below. The
customer or the user of the Pulse Oximetershould assure that it is used in such an environment.
1
2
3
4
5
6
7
Emissions test
RF emissions
CISPR 11
RF emissions
CISPR 11
Harmonic emissions
IEC 61000-3-2
Voltage fluctuations /
flicker emissions
IEC 61000-3-3
Group 1
Class B
Compliance Electromagnetic environment - guidance
The Pulse Oximeteruses RF energy only for its internal function.
Therefore, its RF emissions are very low and are not likely to
cause any interference in nearby electronic equipment.
The Pulse Oximeter is suitable for use in all establishments,
including domestic establishments and those directly connected
to the public low-voltage power supply network that supplies
buildings used for domestic purposes.
N/A
N/A
Immunity test
IEC 60601
test level
Compliance
level
Electromagnetic environment guidance
Electrostatic
discharge (ESD)
IEC 61000-4-2
Electrostatic
transient / burst
IEC 61000-4-4
Surge
IEC 61000-4-5
Voltage dips, short
interruptions and
voltage variations
on power supply
input lines
IEC 61000-4-11
Floors should be wood, concrete orceramic tile.
If floors are covered withsynthetic material, the
relative humidityshould be at least 30 %.
Mains power quality should be that of a typical
commercial or hospital environment.
Mains power quality should be that of a typical
commercial or hospital environment.
Mains power quality should be that of a typical
commercial or hospital environment. If the user
of the Pulse Oximeter requires continued
operation during power mains interruptions, it
is recommended that the Pulse Oximeter
be powered from an uninterruptible power
supply or a battery.
± 8 kV contact
± 15 kV air
± 2 kV for power
supply lines
± 1 kV for input/
outputlines
± 1 kV differential
mode
± 2 kV common
mode
0 % UT; 0,5 cycle
g)
At 0°, 45°, 90°,
135°, 180°, 225°,
270° and 315°
0 % UT; 1 cycle
and 70 % UT;
25/30 cycles at 0°
0 % UT; 250/300
cyclee
± 8 kV contact
± 15 kV air
N/A
N/A
N/A
Guidance and manufacturer´s declaration – electromagnetic immunity
–for EQUIPMENT and SYSTEM that are not LIFE-SUPPORTING
Guidance and manufacturer´s declaration – electromagnetic immunity
The Pulse Oximeter is intended for use in the electromagnetic environment specified below. The
customer or the user of the Pulse Oximeter should assure that it is used in such an environment.
Power frequency
(50/60 Hz)
magnetic field
IEC 61000-4-8
Power frequency magnetic fields should be at
levels characteristic of a typical location in a
typical commercial or hospital environment.
NOTE UT is the a. c. mains voltage prior to application of the test level.
30A/m 30A/m
Immunity test
IEC 60601
test level
Compliance
level
Electromagnetic environment - guidance
Conducted RF
IEC 61000-4-6
Radiated RF
IEC 61000-4-3
3 Vrms
150 kHz to
80 MHz
6Vrms in ISM
banda between
150 kHz to
80 MHz
80 MHz to
2.7 GHz
N/A
10 V/m
Portable and mobile RF communications equipment should be used no
closer to any part of the Pulse Oximeter, including cables, than the
recommended separation distance calculated from the equation applicable
to the frequency of the transmitter.
Recommended separation distance
where p is the maximum output power rating of the transmitter in watts
(W) according to the transmitter manufacturer and d is the recommended
separation distance in metres (m).b
Field strengths from fixed RF transmitters, as determined by an
electromagnetic site survey, a should be less than the compliance level in
each frequency range. b
Interference may occur in the vicinity of equipment marked with the
following symbol:
P
V
d ]
5.3
[
1
=
P
E
d ]
5.3
[
1
=
P
E
d ]
7
[
1
=
80 MHz to 800 MHz
800 MHz to 2.5 GHz
Recommended separation distances between
portable and mobile
RF communications equipment and the
EQUIPMENT or SYSTEM -for EQUIPMENT
and SYSTEMS that are not
LIFE-SUPPORTING
a Field strengths from fixed transmitters, such as base
stations for radio (cellular/cordless) telephones and land
mobile radios, amateur radio, AM and FM radio broadcast
and TV broadcast cannot be predicted theoretically with
accuracy. To assess the electromagnetic environment due
to fixed RF transmitters, an electromagnetic site survey
should be considered. If the measured field strength in the
location in which the Pulse Oximeter is used exceeds the
applicable RF compliance level above, the Pulse Oximeter
should be observed to verify normal operation. If abnormal
performance is observed, additional measures may be
necessary, such as reorienting or relocating the Pulse
Oximeter.
b Over the frequency range 150 kHz to 80 MHz, field
strengths should be less than 3V/m.
NOTE 1 At 80 MHz and 800 MHz, the higher frequency
range applies.
NOTE 2 These guidelines may not apply in all situations.
Electromagnetic is affected by absorption and reflection
from structures, objects and people.
Recommended separation distances between
portable and mobile RF communications equipment
and the Pulse Oximeter
The Pulse Oximeter is intended for use in an
electromagnetic environment in which radiated RF
disturbances are controlled. The customer or the
user of the Pulse Oximeter can help prevent
electromagnetic interference by maintaining a
minimum distance between portable and mobile RF
communications equipment (transmitters) and the
Pulse Oximeter as recommended below,
according to the maximum output power of the
communications equipment
P
V
d ]
5.3
[
1
=
P
E
d ]
5.3
[
1
=
P
E
d ]
7
[
1
=
Separation distance according to
frequency of transmitter / m
Rated
maximum
output of
transmitter
W
0.01
0.1
1
10
100
0.12
0.38
1.2
3.8
12
/
/
/
/
/
0.23
0.73
2.3
7.3
23
150 kHz to
80 MHz
80 MHz to
800 MHz
800 MHz
to 2.7 GHz
For transmitters rated at a maximum output power not listed
above the recommended separation distance d in metres (m)
can be estimated using the equation applicable to the
frequency of the transmitter, where P is the maximum
output power rating of the transmitter in watts (W)
according to the transmitter manufacturer.
NOTE 1 At 80 MHz and 800 MHz, the separation distance
for the higher frequency range applies.
NOTE 2 These guidelines may not apply in all situations.
Electromagnetic propagation is affected by absorption and
reflection from structures, objects and people.
Environmental
Sound Reminder Limit default value:
Power
Probe LED Specification
Electronics Parameters
±3% (70%-100%),
Unspecified
(<70%)
Display
Resolution
Measure
Accuracy
PI
0-20%
0.1%
0-1%: 0.1%
1-20%: 1%
CAUTION: Avoid pouring liquids on the device
while cleaning.
CAUTION: Don’t remain any cleaning solution
on the surface of the device.
Section 5
Troubleshooting and Maintenance
5.1 Maintenance
Replace the batteries timely when battery
indication is low. Clean surface of thе Pulse
Oximeter before it is used in diagnosis for user.
Remove the batteries inside the battery
cassette if the Oximeter will not be operated for
a long time.
It is better to preserve the product in a place
where ambient temperature is –25°C to 55°C
(-13℉-131℉) and humidity is 15%-93%.
Regular inspection to make sure that no
obvious damage existed to affect the safety and
performance of device.
No flammable substance, overtop or lower
temperature and humidity existed in operation
conditions.
5.2 Troubleshooting
Table 5.2.1 troubleshooting
Problems Possible Reason
Resolutions
Oxyhemo-
globin or
heart rate
can not be
shown
normally
Oxyhemo-
globin or
heart rate
is shown
unstably
Oxyhemo-
globin or
heart rate is
abnormal
and cause
sound
reminder
The
oximeter
can not be
powered
on
The screen
are
suddenly
off
1. Finger is not plugged
correctly.
2. User’s perfusion is
too low to be measured.
1. Finger might not be
plugged deep enough
2. Finger is trembling or
user's body is in
movement status
1. Finger is not plugged
correctly.
2. User’s SPO2&PR
is abnormal.
1. Power of batteries
might be inadequate or
not be there at all
2.Batteries might be
installed incorrectly
3.The Oximeter might
be damaged
1.The product is automa-
tically powered off when
no signal is detected
longer than 16 seconds
2.Power quantity of the
batteries is exhausted
1. Retry by plugging the
finger
2. Try some more times,
if you can make sure
about no problem
existing in the product,
Please go to a hospital
timely for exact diagnosis
1.Retry by plugging the
finger
2.Try not to move, let the
user keep calm
1. Retry by plugging the
finger
2. go to the hospital for
further examination
1.Please replace batteries
2.Please reinstall the
batteries
3.Please contact with
local customer service
center
1.Normal
2.Replace the batteries
File No.: A340-OPE V 2.0 2020/03
3.4.3 Read correspondent data from display
screen.
3.4.4 Display Description
of OLED
It is shown as below:
WARNING: EXPLOSION HAZARD — Do
not use the Fingertip Pulse Oximeter in a
flammable atmosphere where concentrations of
flammable anesthetics or other
WARNING: Do not throw batteries in fire as
this may causes them to explode.
WARNING: Do not attempt to recharge normal
dry-cell batteries, they may leak. And may cause
a fire or even explode.
WARNING: Do not use the Fingertip Pulse
Oximeter in an MRI or CT environment.
WARNING: Do not modify this equipment
without authorization of the manufacturer.
WARNING: If this equipment is modified,
appropriate inspection and testing must be
conducted to ensure continued safe use of
equipment.
CAUTION: Keep the operating environment
free of dust, vibrations, corrosive, or flammable
materials, and extremes of temperature and
humidity.
CAUTION: Do not operate the unit if it is damp
or wet because of condensation or spills. Avoid
using the equipment immediately after moving it
from a cold environment to a warm, humid
location.
CAUTION: Never use sharp or pointed objects
to operate the front-panel switches.
CAUTION: The batteries must be taken out
from the battery compartment if the device will
not be used for a long time.
CAUTION: The device shall only be used if the
battery cover is closed.
CAUTION: The batteries must be proper
disposed according to local regulation after their
use.
CAUTION: The device should keep away from
the children, pets and pests to avoid swallowing.
Section 4
Cleaning and Disinfection
4.1 Cleaning
Switch off the power and take out the batteries
before cleaning, Keep the exterior surface of the
device clean and free of dust and dirt. Cleaning
exterior surface (OLED display screen included)
of the unit with a dry and soft cloth. Use 75%
density of medical alcohol to clean the surface
and use dry fabric with little alcohol to avoid
alcohol permeates into the device.
4.2 Disinfection
Disinfecting the machine after using by mutiple
users.
Use 75% density of medical alcohol to clean the
surface that contacting with the users.
CAUTION: Don’t use strong solvent. For
example, acetone.
CAUTION: Never use an abrasive such as steel
wool or metal polish.
CAUTION: Do not allow any liquid into the
product, and do not immerse any parts of the
device into any liquids.
Type BF Equipment
Batch code*
Date of manufacture*
Serial NO*
Information of manufacture,
including name and address
Temperature limitation
Follow instruction for use
Anti-dust& Anti-water class
The information you should know to
protect
users from possible injury
The information you should know to
protect the equipment from possible
damage
When the end-user wishes to discard
this product, it must be sent to
separate collection facilities for
recovery and recycling
The important information you
should know
1.3 Definitions and Symbols
* Batch code, Date of manufacturer and Serial
No are printed on the label on the battery cover.
Section 2
Introduction
2.1 General
This chapter provides a general description of
the Fingertip Pulse Oximeter including:
Brief device description
Product features
2.2 Indication for use/ intended use
The Pulse Oximeter is a non-invasive device
intended for spot checking of functional oxygen
saturation of arterial hemoglobin (SpO2) and
pulse rate (PR). This portable device is indicated
for sport and aviation use, not in clinical
institution.
2.3 Brief Device Description
The Fingertip Pulse Oximeter, based on all
digital technology, is intended for noninvasive
spot-check measurement of functional oxygen
saturation of arterial hemoglobin (SpO2).
Advanced DSP algorithm* can minimize the
influence of motion artifact and improve
measurement accuracy of low perfusion*.
The Oximeter can be used to measure human
Section 1
Safety
1.1 Instructions for the Safe Operation and
Use of the Fingertip Pulse Oximeter
Do not attempt to service the Fingertip Pulse
Oximeter. Only qualified service personnel
should attempt any needed internal servicing.
Prolonged use or the user's condition may
require changing the sensor site periodically.
Change sensor site and check skin integrity,
circulatory status and correct alignment at least
every 2 hours.
SpO2 measurements may be adversely
affected in the presence of high ambient light.
Shield the sensor area (with a surgical towel, or
direct sunlight, for example) if necessary.
The following reason will cause interference
to the testing accuracy of the Fingertip Pulse
Oximeter.
High-frequency electrosurgical equipment.
Placement of a sensor on an extremity with a
blood pressure cuff arterial catheter, or
intravascular line
The user has hypotension severe vasocon-
striction severe anemia or hypothermia.
The user is in cardiac arrest or is in shock.
Fingernail polish or false fingernails may
cause inaccurate SpO2 readings.
1.2 Warnings
3.3.1 Remind Setup
Press the select button for 1 second and enter
into the Remind Setup menu. User can adjust the
setting through moving the “*” symbol to the
back of the Sound Reminder, Beep, Restore or
Brightness.
Sound Reminder
Press the select button to move the “*” symbol to
the back of Sound Reminder, long press the
select button to turn it on/off.
(Note: If the measured value exceeds the
maximum or minimum value of SPO2 or PR,
there will give off sound when sound reminder is
turned on.)
Beep
Press the select button to move the “*” symbol to
the back of Beep, long press the select button to
turn it on/off.
(Note: When Beep is turned on, the sound
emitted during the test indicates the pulse rate
sound)
Restore
When the “*” symbol show behind “Restore”,
long press the select button can be changed to
“OK”, which causes the device to restore factory
data setting.
3.3 Parameter setting
When the device is under measuring interface,
press the select button for 1 second in order to
enter into menu page (figure 3.3.1 and figure
3.3.2 ). There are two submenus for choice:
3.2.Display
After switch on, the OLED display of the
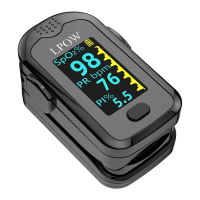
Fingertip Pulse Oximeter is as follows:
Table 3.1.1 Part Definition and Description
Item Name Description
1
2
3
Power button Turn on the machine
OLED Panel
Battery
Compartment
Display the SPO2/PR data
& Plethysmogram
3.3.2.Limit Value Setting
When the * symbol show on the Reminder
Setup, long press the select button until enter
into the Remind Limit setup menu (figure 3.3.2).
User can press the select button to select the
items. And press the select button for 1 second to
change the data you need.
On the Reminder Limit setup menu page (figure
3.3.2), when the * symbol show behind the
“+/-”. Press select button for 1 second to change
the “+” to “-” or change the “-” to “+”.
When “+” shows on the right side, move the “*”
after the Spo2 Hi or PR Hi setting and long press
the select button for 1 second can increase the
value to a higher value (until it reaches to the
highest.)
When “-” shows on the right side, move the “*”
after the Spo2 Lo or PR Lo value setting and
long press the select button for 1second can
reduce the value to a lower value (untill it
reaches to the lowest).
Demo
Press the select button to move the “*” symbol to
the back of Demo, long press the select button to
turn it on/off.
Brightness
When the “*” symbol show on “Brightness”,
long press the select button to change the
Brightness value from 1 to 5.
Note:
1. when battery power is at lowest level, the
battery capacity indicates symbol of “ ”in
OLED, remind users of replacement of battery.
2. The plethymogram can been regarded as
correct if the wave is fluctuated regularly.
*DSP algorithm: Digital signal processor algorithm.
*Low Perfusion: In physiology, perfusion is the process
of a body delivering blood to a capillary bed in its biological
tissue. Under the condition of low perfusion, the
measurement of non-invasive saturation of pulse-blood
oxygen is low-accurate.
*Plethysmograph: is an instrument for measuring
changes in volume within an organ or whole body (usually
resulting from fluctuations in the amount of blood or air it
contains).
PI (Perfusion Index )is the ratio of the pulsatile blood
flow to the non-pulsatile static blood flow in a body's
peripheral tissue, such as finger tip, toe, or ear lobe.
Perfusion index is an indication of the pulse strength at the
sensor site.
Section 3
Installation,Setup,and Operation
3.1 Description of the Front Panel
(as figure 3.1.1)
Figure 3.1.1 Parts of front & back panel
3.4.2 Turn the Fingertip Pulse Oximeter on
Put one of fingers into rubber hole of the
Oximeter (it is best to put the finger thoroughly)
with nail surface upward, then releasing the
clamp.
Press power button to turn the Fingertip Pulse
Oximeter on.
Figure 3.3.1 Figure 3.3.2
Remind Setup *
Sound Reminder on
Beep off
Demo on
Restore OK
Brightness 4
Exit
Limit Setup *
SpO2 Hi 100
SpO2 Lo 94
PR Hi 130
PR Lo 50
+/- +
Exit
Note:
1..The sound reminder have 1 second delay after
the incorrect result being detected.
2. The customer can preset the limit value to the
98 or 99 to check whether it is normal for sound
reminder setting.
3.4 Operation
3.4.1 Install battery
Installing two AAA batteries into battery
cassette in correct polarities and cover it.
WARNING: Do not attempt to recharge normal
alkaline batteries, they may leak and may cause
a fire or even explode.
Operation quick guide
This device is intended for noninvasive spot-checking your
blood oxygen saturation levels and pulse rate.
3. Turn the device
on by pressing the
Power button.
1. Install two AAA
batteries into the
battery compartment
according to the indicated
polarity + /-.
2. Insert one of your
finger into the finger
chamber. Finger
should also be
inserted completely into the chamber.
4. Read the Oxygen
Saturation Level and Pulse Rate from the OLED Screen after
a few seconds.
The device will automatically shut down for longer than 16
seconds after finger is removed from the chamber.
* Please refer to the manual for detailed operation of the
Display Switching & Parameter Setting.
CAUTION: The device can not be used to
measure the child below 3 years as the test result
is not guarantee to accurate.
CAUTION: The fingertip pulse oximeter is
intended only as an adjunct in user assessment. It
must be used in conjunction with other methods
of assessing clinical signs and symptoms.
2.4 Product Features
Lightweight for carrying and Easy-To-Use.
Color OLED display, simultaneous display
for testing value and plethysmogram*.
Low Perfusion : 0.3%. (Advanced DSP
algorithm can improve measurement accuracy,
under the condition of low perfusion.)
Visual & Sound reminder function. Real-time
spot-checks.
Low Battery voltage indicator.
Automatically switch off.
Standard two AAA 1.5V Alkaline Bаttеrу
support more than 20 hours continuous work.
CAUTION: A function tester cannot be used to
assess the accuracy of a Fingertip Pulse
Oximeter monitor or sensor. Clinical testing is
used to establish the SpO2 accuracy. The
measured arterial hemoglobin saturation value
(SpO2) of the sensor is compared to arterial
hemoglobin oxygen(SaO2) value, determined
from blood samples with a laboratory
CO-oximeter. The accuracy of the sensors in
comparison to the CO-oximeter samples
measured over the SpO2 range of 70 -100%.
Accuracy data is calculated using the
root-mean-square(Arms value) for all subjects.
Only about two-thirds of FINGERTIP PULSE
OXIMETER EQUIPMENT measurements can
be expected to fall within ±Arms of the value
measured by a CO-Oximeter.
Pulse simulator shall be used to assess Pulse
rate Accuracy. The measured pulse rate is
compared to the preset pulse rate value in
simulator. Accuracy data is calculated using the
root-mean-square (Arms value) for all subjects.
Plethymogram
Power /
Select
Button
SpO
2
%
PR bpm
PI%
98
75
5.5
Shenzhen Aeon Technology Co., Ltd.
RM6H02, Block 27-29 Tianxia IC Industrial Park,
Majialong No.133 of Yiyuan road, Nantou Street
Nanshan District, Shenzhen, China.
Shanghai International Holding Corp. GmbH (Europe)
Eiffestrasse 80, 20537 Hamburg, Germany
Service contact:
www.LPOW.com
cs@LPOW.com
Hemoglobin Saturation and heart rate through
finger. The product is suitable for family, sport,
aviation and etc.
–25°C to 55°C
(-13℉-131℉)
15% to 93%
non-condensing
70Kpa-106Kpa