www.LSDA.com
Knob & Lever Locks
Grade 1, LF2000 Series
Copyright © All rights reserved. • MCKLLF 0819
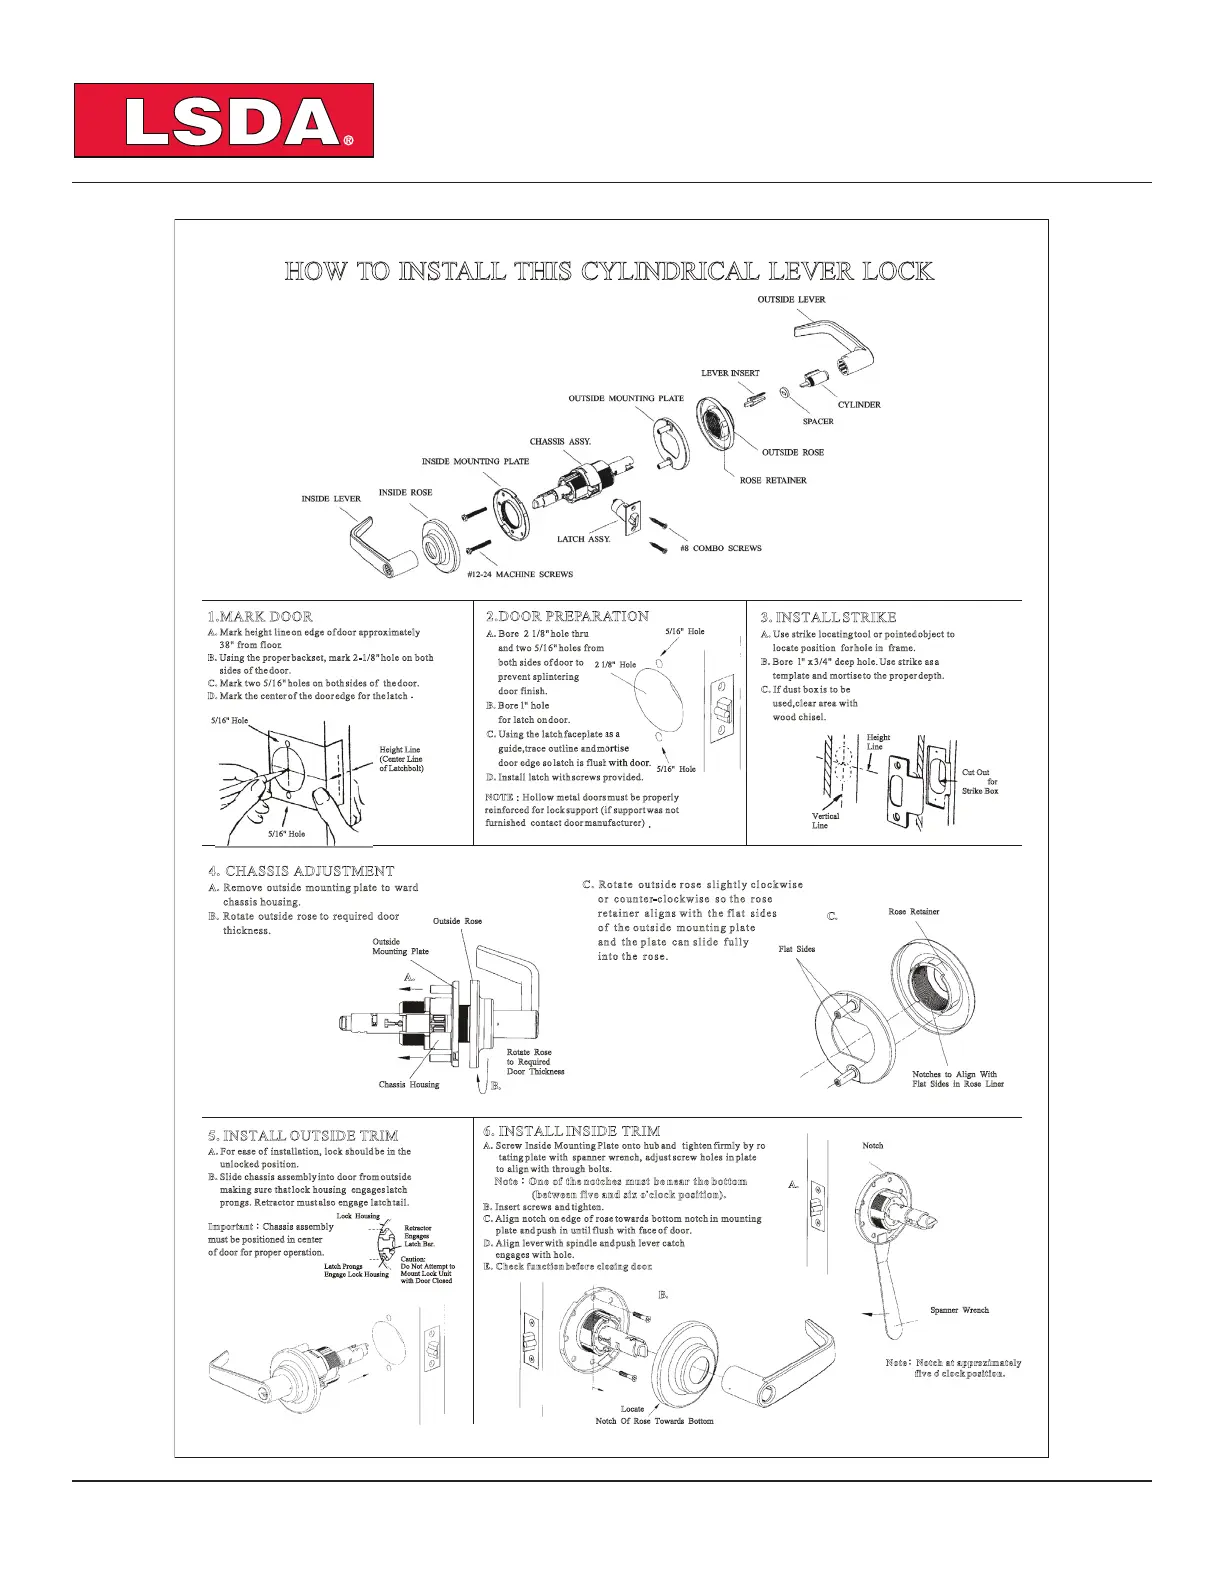
1.MARK DOOR
A. Mark height line on edge of door approximately
38" from floor.
B. Using the proper backset, mark 2-1/8" hole on both
sides of the door.
C. Mark two 5/16" holes on both sides of the door.
D. Mark the center of the door edge for the latch
2.DOOR PREPARATION
A. Bore 2 1/8" hole thru
and two 5/16" holes from
both sides of door to
prevent splintering
door finish.
B. Bore l" hole
for latch on door.
C. Using the latch faceplate as a
guide,trace outline and mortise
door edge so latch is flush with door.
D. Install latch with screws provided.
3. INSTALL STRIKE
A. Use strike locating tool or pointed object to
locate position for hole in frame.
B. Bore l" x 3/4" deep hole. Use strike as a
template and mortise to the proper depth.
C. If dust box is to be
used,clear area with
wood chisel.
NOTE Hollow metal doors must be properly
reinforced for lock support (if support was not
furnished contact door manufacturer)
Important Chassis assembly
must be positioned in center
of door for proper operation.
4. CHASSIS ADJUSTMENT
A. Remove outside mounting plate to ward
chassis housing.
B. Rotate outside rose to required door
thickness.
5. INSTALL OUTSIDE TRIM
A. For ease of installation, lock should be in the
unlocked position.
B. Slide chassis assembly into door from outside
making sure that lock housing engages latch
prongs. Retractor must also engage latch tail.
HOW TO INSTALL THIS CYLINDRICAL LEVER LOCK
Notch
Spanner Wrench
Locate
Notch Of Rose Towards Bottom
Lock Housing
Retractor
Engages
Latch Bar.
Caution:
Do Not Attempt to
Mount Lock Unit
with Door Closed
Latch Prongs
Engage Lock Housing
A.
B.
Rose Retainer
Flat Sides
Notches to Align With
Flat Sides in Rose Liner
C.
5/16" Hole
5/16" Hole
5/16" Hole
5/16" Hole
2 1/8" Hole
Outside Rose
Chassis Housing
A.
B.
Outside
Mounting Plate
Rotate Rose
to Required
Door Thickness
Height Line
(Center Line
of Latchbolt)
Height
Line
Vertical
Line
Cut Out
for
Strike Box
C. Rotate outside rose slightly clockwise
or counter-clockwise so the rose
retainer aligns with the flat sides
of the outside mounting plate
and the plate can slide fully
into the rose.
D. Align lever with spindle and push lever catch
engages with hole.
E. Check function before closing door.
6. INSTALL INSIDE TRIM
A. Screw Inside Mounting Plate onto hub and tighten firmly by ro
tating plate with spanner wrench, adjust screw holes in plate
to align with through bolts.
Note One of the notches must be near the bottom
(between five and six o clock position).
B. Insert screws and tighten.
C. Align notch on edge of rose towards bottom notch in mounting
plate and push in until flush with face of door.
Note Notch at approximately
five o clock position.
 Loading...