Fold
Fold Fold
You will be asked to change the admin password for accessing
the user interface of the P40. Change that, and click “Continue.”
You will then be asked if you want the LEDs on or o . Make
your choice, and click “Continue.”
After 60 seconds, you will lose access to that page, and your P40
should be ready. You can then move it to where you would like
it to be.
3
Access and Setup for Client Mode
Flip the switch on the bottom of the P40 to “Client.”
c Caution: Moving this switch will set the P40 back to
factory default.
The P40 setup can be initiated two ways; choose the one below
that works best for you:
Option 1. Open an Internet Browser. Using your OS settings,
connect to a wireless network called “repeater.setup” (no
password required).
Option 2. Open an Internet Browser. Connect an Ethernet cable
from your device to the Ethernet port on the P40.
After performing either Option 1 or 2, a login window will open
in your Internet Browser to start the setup of the P40. The
default username and password are both “admin.”
Default IP: 192.168.1.1
Username: admin
Password: admin
After logging in, click “Continue” to start the setup wizard or
you can click “Skip Wizard” to see the main menu.
After clicking “Continue,” the P40 will scan for and display a list
of the wireless networks (SSIDs) it can see. Select yours, then
click “Continue.” If you don’t see your network, you can click
“Refresh” to refresh the list.
You will be prompted to enter a password for that wireless
network (SSID). Enter the exact same password you use for
that existing wireless network (SSID). It is case sensitive. Click
“Continue.”
Next, you will be asked to change the admin password for
accessing the P40 user interface. Change that, and click
“Continue.”
You will then be asked if you want the LEDs on or o . Make
your choice, and click “Continue.”
In Client Mode, the P40 will not broadcast any SSIDs; you will
use the Ethernet port to connect a device.
n Note: When done setting the P40 up in Client Mode,
you should have internet access through the
Ethernet port on the P40.
4
Hardware Description
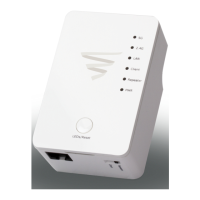
Front & Bottom Panels
The front of the P40 includes fi ve link/activity LEDs, one power
LED, and a LEDs/Reset button; the bottom has the mode slector
and Ethernet port. For more information on these LEDs, refer to
the table describing these indicators in the next section.
P40 front panel view
P40 bottom view
5
LEDs/Reset
LED Indicators
The front panel of the P40 includes fi ve link/activity LEDs and
one power LED. For more information on these LEDs, refer to
the table describing these indicators below.
LED
Color Status Description
5G
Amber Steady
On
Good signal reception
Blinking Normal signal reception:
slow blinking (RSSI
<50%-25%)
Poor signal reception:
quick blinking (RSSI <25%)
O No signal or LED o mode
2.4G
Green Steady
On
Good signal reception
Blinking Normal signal reception:
slow blinking (RSSI
<50%-25%)
Poor signal reception:
quick blinking (RSSI <25%)
O No signal or LED o mode
LAN
Green Steady
On
LAN port is connected
Blinking LAN port is active
(transferring or receiving data)
O LAN port is not connected or
LED o mode
Client
Green Steady
On
P40 is in Client Mode
Repeater
Green Steady
On
P40 is in Repeater Mode
PWR
Green Steady
On
Power is turned on. When
device is in LED o mode,
even when device is powered
on, all LEDs will be o ,
including power LED
Slow
Blinking
Performing a “reset to factory
default”
O Power is turned o
LED/Reset Button
To turn the LEDs on or o , press and release the “LEDs/Reset”
button once. To reset the Range Extender, press and hold the
“LEDs/Reset” button for 5 seconds (“PWR” LED will blink after 5
seconds), then release.
6
P40 Placement
Placing the P40 is similar to placing any wireless access point.
Please refer to this support page for details about wireless AP
placement: https://www.luxul.com/support/ap-placement .aspx
 Loading...