EasyManua.ls Logo

MacAllister COD2000FLS - User Manual

MacAllister COD2000FLS
12 pages
Print Icon
To Next Page IconTo Next Page
Loading...
Thank you for purchasing a MacAllister product. We are confident that this product will meet and
exceed your expectations of quality and reliability. Please take the time to carefully read this entire
instruction manual before using your new product, and take note of the basic safety precautions
contained herein.
MacAllister Power Tools,
1 Hampshire Corporate Park, Chandlers Ford,
Eastleigh,
Hants S053 3YX
Technical Helpline 0845 300 2577
MacAllister Power Tools,
1 Hampshire Corporate Park, Chandlers Ford,
Eastleigh,
Hants S053 3YX
Technical Helpline 0845 300 2577
2000W
FLIP OVER SAW
COD2000FLS
SAFETY AND OPERATING MANUAL
CCaauuttiioonn
: Carefully read this entire Instruction Manual before using this product
050707 COD2000FLS ED04
25 2726 28 3029
31 32 33 34 35 36
37 3938 40 4241
43 44 45 46 47 48
Question and Answer IconNeed help?

Do you have a question about the MacAllister COD2000FLS and is the answer not in the manual?

Summary

Safety Instructions

General Safety Instructions

General warnings and instructions for safe operation of power tools.

Work Area Safety

Guidelines for maintaining a safe and clean work environment to prevent accidents.

Electrical Safety

Precautions regarding power supply, plugs, cords, and wet conditions.

Personal Safety

Advice on operator alertness, attire, and use of protective equipment.

Power Tool Use and Care

Best practices for operating, maintaining, and storing power tools.

Service and Maintenance

Guidelines for ensuring the power tool is properly maintained and repaired.

Additional Safety Rules for Flip Over Saws

Specific safety precautions for operating the flip over saw, including blade guards.

Blade Safety and Handling

Rules regarding blade types, guards, rotation, and safe handling practices.

Workpiece Handling and Feeding

Guidance on securing, supporting, and feeding workpieces during cuts.

Symbols

Personal Protective Equipment Symbols

Icons indicating the need for hearing, eye, and respiratory protection.

Safety Compliance and Usage Symbols

Symbols for safety standards, manual reading, and safe handling practices.

Waste Disposal Symbol

Icon indicating proper recycling of electrical products.

Getting Started

Accessories

List of items included with the flip over saw.

Assembly and Setup

Instructions for assembling the leg stand and attaching components like the ON/OFF switch.

Blade to Table Alignment

Procedure for ensuring the blade is correctly aligned with the table for accuracy.

Blade Adjustment and Alignment

Steps for aligning the blade to 90° and adjusting 45° bevel stops.

Final Check

Performing a thorough check after all adjustments are made.

Convert to Table Saw Mode

Instructions for switching the machine from mitre saw to table saw configuration.

Component Installation

Installing the blade guard, mitre gauge, and rip fence for operation.

Blade Adjustment Controls

Details on raising, lowering, and tilting the blade assembly.

Operation

Mitre Saw Mode: Switching On;Off

Procedures for starting and stopping the saw in mitre mode using the safety switch.

No Volts Emergency Stop Switch

Explanation of the emergency stop function and operation.

Performing Mitre and Angle Cuts

Guides for making standard mitre and angle cuts on the workpiece.

Performing Bevel and Compound Cuts

Instructions for bevel, compound, and mitre compound cuts.

Table Saw Mode Operation

How to turn the saw on and off when in table saw mode.

Types of Cuts

Explanations of cross, mitre cross, bevel cross, and repetitive cutting techniques.

Ripping Operation

Instructions for cutting wood lengthwise with the grain using the rip fence.

Maintenance

Replacing the Blade

Step-by-step guide for safely removing and refitting the saw blade.

Drive Belt Replacement;Tensioning

Instructions for replacing or tensioning the drive belt.

Table Insert Replacement

Procedure for removing and replacing the table insert.

General Inspection

Regular checks for tightness of screws and overall condition.

Plug Replacement

Wiring Instructions

Guidance on connecting wires to the correct terminals for plug replacement.

Guarantee

Product Guarantee Information

Details on the warranty period, registration, and conditions for domestic use.

Overview

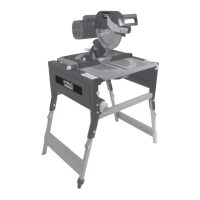
The MacAllister 2000W Flip Over Saw (model COD2000FLS) is a versatile power tool designed for both mitre saw and table saw operations, offering a range of cutting capabilities for various woodworking tasks. This dual-mode functionality allows users to switch between precision cross-cutting and ripping, making it suitable for a wide array of projects.

Function Description:

The device functions as a 2000W flip-over saw, meaning its cutting head and table can be inverted to transform it from a mitre saw to a table saw. In mitre saw mode, it is used for precise cross-cuts, mitre cuts, bevel cuts, and compound cuts on workpieces. The cutting head can be lowered onto the material, and the rotating table allows for angle adjustments. In table saw mode, the blade protrudes through a table, enabling ripping and cross-cutting operations where the material is fed into the blade. The saw is equipped with safety features such as blade guards, an emergency stop switch, and a no-volts release function to prevent accidental restarts after power interruptions. Dust extraction facilities are also provided to help maintain a cleaner work environment.

Important Technical Specifications:

  • Voltage: 230-240V~50Hz
  • Rated Input: 2000W S6 40% (4min load/6min no load)
  • No Load Speed: 2800min⁻¹
  • Blade Size: Ø250 x Ø30 x3mm
  • Mitre Saw Mode:
    • Max cut at 90°: 210 x 75mm
    • Max compound mitre cut at 45° x 45°: 150 x 50mm
    • Max mitre cut at 90° x 45°: 150 x 75mm
    • Max bevel cut at 45°: 210 x 50mm
  • Table Saw Mode:
    • Max cut at 90°: 65mm
    • Max cut at 45°: 45mm
    • Tilting range: 0-45°
  • Weight: 53kg
  • Noise and Vibration Data:
    • A-weighted sound pressure: 92.7dB(A)
    • A-weighted sound power: 105.7dB(A)
    • Typical weighted vibration: 3.227m/s²
    • Sound protection measures are necessary if the sound intensity level for the operator exceeds 85dB(A).

Usage Features:

The saw comes with several features designed to enhance usability and safety. It includes a folding workstand for stability, adjustable feet to compensate for uneven floors, and the option to use it on a suitable bench with the legs folded.

  • Mitre Saw Mode Setup: To set up for mitre saw mode, the blade guard (if fitted) is removed, and the blade is fully lowered using the height adjustment knob. The riving knife is relocated to a storage position, and the chip collection case is attached. The saw table is then tilted over and locked into position. The cutting head is unlocked by applying downward pressure to the handle and rotating the lock knob clockwise.
  • Adjustments: Before operation, critical adjustments must be made for accuracy and safety. These include blade-to-table alignment, blade-to-fence alignment, and adjusting the 45° bevel stop. These adjustments involve loosening lock nuts and adjusting screws to achieve precise angles (90° for vertical cuts, 45° for bevels) using a protractor or set square.
  • Switching On/Off: The machine features a "No Volts ON/OFF switch" with an emergency stop cover. To start, the emergency stop cover is lifted, and the green ON button is pressed. To stop, the red OFF button is pressed, or the emergency stop cover is hit to mechanically lock the switch.
  • Cutting Operations (Mitre Saw Mode):
    • Mitre and Angle Cuts: The rotating table locking lever is loosened, the table is rotated to the desired angle, and then re-secured. The cut is made with a smooth action.
    • Bevel Cuts: The bevel locking lever is loosened, the saw head is tilted to the desired angle, and then re-secured.
    • Compound Cuts: This combines mitre and bevel cuts, requiring both the rotating table and bevel locking levers to be adjusted and secured.
  • Table Saw Mode Setup: To convert to table saw mode, the rotating table is set to 0°, the saw head to vertical 0°, and the cutting head is lowered and locked in the down position. The saw table tilt lock handle is pulled, and the table is gently turned over and locked.
  • Rip Fence and Mitre Gauge: The rip fence can be attached to either side of the mounting bracket and slid into the guide channel for desired position, then locked. The mitre gauge locates in the left-side groove for cutting at various angles.
  • Blade Adjustment (Table Saw Mode): The blade height adjustment knob at the front of the saw table is used to elevate or lower the blade. The blade assembly can also be tilted between 0° and 45° by slackening the bevel position locking lever and selecting the desired angle.
  • Cutting Operations (Table Saw Mode):
    • Cross Cutting: Cutting wood across the grain at 90° to both the edge and flat side.
    • Mitre Cross Cutting: Cutting wood at an angle other than 90° with the edge of the wood, using the mitre gauge.
    • Bevel Cross Cutting: Cutting wood at an angle other than 90° with the flat side, adjusting the blade to the desired angle. The mitre gauge should be used in the groove to the left of the blade.
    • Compound Mitre Cutting: A combination of mitre and bevel cross cutting, requiring adjustment of both the mitre gauge and blade angle.
    • Repetitive Cutting: The rip fence is set to the required length, ensuring the cut-off piece is clear of the fence to prevent kickback.
    • Ripping: Cutting wood with the grain or lengthwise using the rip fence, ensuring it is parallel to the blade and the riving knife is aligned. Work supports and smooth, steady pressure are recommended for long boards.

Maintenance Features:

Regular maintenance is crucial for the saw's longevity and safe operation.

  • Blade Replacement: Before changing the blade, the machine must be disconnected from the mains power supply, and sturdy gloves should be worn. In mitre saw mode, the blade guard is removed, the blade is fully lowered, and the riving knife is relocated. The blade bolt (left-hand thread) is unscrewed clockwise using the supplied hex key, and the blade securing flange is removed. The old blade is removed from below the table, and a new one is fitted in reverse order. The guard operation must be checked after replacement.
  • Drive Belt Replacement/Tensioning: The machine must be disconnected from the mains power supply. The belt guard is removed, and the four motor screws are loosened. The old belt is removed, and the new belt is fitted, ensuring grooves are correctly located. To tension, the motor is pushed to the right, and the screws are retightened. Correct tension is checked by pressing the belt's center, which should move approximately 5mm. The belt guard is then refitted.
  • Table Insert Replacement: In table saw mode, the blade guard is removed, the blade is fully lowered, and the old table insert is removed and replaced with a new one.
  • General Inspection: All fixing screws should be regularly checked for tightness, as they may vibrate loose over time.
  • Supply Cord Replacement: If the supply cord needs replacing, it must be done by the manufacturer, their agent, or an authorized service center to avoid safety hazards.
  • Plug Replacement: If the fitted plug needs replacement, the instructions detail connecting the blue wire to neutral (N), brown to live (L), and green/yellow to earth (E). Only an approved 13 Amp BS1363/A plug with the correct fuse should be used. Severed molded plugs must be disposed of carefully to prevent accidental engagement into a socket.

The manual emphasizes safety precautions throughout, including wearing personal protective equipment (hearing, eye, respiratory protection), keeping hands clear of rotating blades, and using the supplied push stick for feeding workpieces. It also highlights the importance of proper guarding and avoiding modifications to the machine.

MacAllister COD2000FLS Specifications

General IconGeneral
BrandMacAllister
ModelCOD2000FLS
CategorySaw
LanguageEnglish

Related product manuals