7
Quick Start Guide
Quick Start Guide
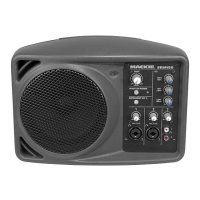
1. Power Connector Connect the supplied AC power
cord to this IEC jack.
2. Power Switch Turns the loudspeaker on and o.
The front LED will illuminate when powered.
3. Input Connect a mic or line-level signal from a
mixer or other signal source.
4. Gain Adjusts the input sensitivity.
5. Direct Out Allows for a direct output of the input
signal, pre-gain, for daisy chain purposes.
6. Mix Out Connect subwoofer or additional full
range loudspeakers.
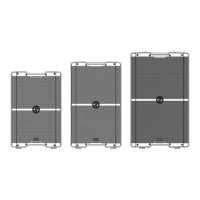
7. LCD Display Displays the loudspeaker
information.
8. Speaker Control Rotate / push to see and adjust
levels, EQ, select voicing, screen brightness,
settings and to lock / unlock the controls and
more.
Rear Panel Descriptions –
1. Toma de corriente Conecte en esta toma IEC
el cable de alimentación incluido.
2. Interruptor Power Le permite encender y apagar
el recinto acústico. El piloto frontal se iluminará
cuando la unidad esté encendida.
3. Input Conecte una señal de nivel de micro
o línea procedente de un mezclador u otra
fuente de señal.
4. Gain Ajusta la sensibilidad de entrada.
5. Direct Out Permite la emisión directa de la señal
de entrada, pre-ganancia, para cuando la vaya
a usar en conexiones en cadena.
6. Mix Out Conecte aquí el subwoofer o recintos
acústicos de rango completo adicionales.
7. Pantalla LCD Le muestra la información
del altavoz.
8. Speaker Control Gire/pulse para visualizar
y ajustar niveles, EQ, elegir distintos voicing,
brillo de la pantalla, ajustes y para bloquear/
desbloquear los controles y más.
Descripción del panel trasero –
ES
CH1
CH2 CH3/4
PUSH FOR SETTINGS
MAXOFF
SPEAKER CONTROL
GAIN
SRM210 V-CLASS • SRM212 V-CLASS • SRM215 V-CLASS
1
3
5
4
7 8
3
6
4
2
 Loading...