Do you have a question about the Magnavox 19MDTR20 and is the answer not in the manual?
Important warnings to prevent fire or shock hazards.
FCC warning regarding unauthorized changes to equipment.
Safety precautions for laser operation and potential eye injury.
Explains compliance with FCC rules for digital devices and interference.
Prohibits unauthorized copying, broadcasting, and performance of discs.
Guideline for proper grounding of cable TV systems.
Manufacturer's declaration of product compliance.
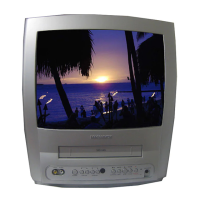
Lists features related to the TV and VCR functions of the unit.
Lists features related to playing various types of discs.
Explains how to navigate and use DVD menus for customized playback.
Describes accessing and using the TV/VCR and DVD setup menus.
Notes that not all disc features are available on every disc.
Details the types of discs (DVD, CD, MP3, etc.) supported by the player.
Explains DVD region coding and compatibility for playback.
Discusses color systems (NTSC, PAL, SECAM) and the unit's compatibility.
Recommends VHS tapes and mentions HQ system compatibility.
Step-by-step guide for installing batteries in the remote control.
Safety precautions regarding battery usage to prevent leakage and damage.
Explains how to use the record tab on videotapes to prevent accidental erasure.
Basic instructions on pointing the remote control at the sensor.
Advice on maintaining the unit, including head cleaning.
Instructions for connecting to cable TV or an outdoor antenna.
Guide for connecting via a cable box or satellite receiver.
Steps for connecting an indoor antenna for TV reception.
How to connect external video sources like camcorders.
Connecting the unit to a stereo system via analog audio cables.
Connecting to a stereo system using a digital coaxial cable.
Initial setup process including language and channel selection.
Basic steps to watch television using the unit.
Instructions on how to insert a tape into the cassette compartment.
Steps to start playing a videotape.
Instructions on how to insert a disc into the tray.
Steps to start playing a disc.
Accesses picture adjustment controls.
Turns the unit on or off.
Used for channel selection and entering numbers.
Pauses and steps through playback.
Starts a videotape recording.
Shows status information on screen.
Accesses DVD Title menus.
Sets the sleep timer.
Switches between TV/VCR and DVD modes.
Starts playback of discs or tapes.
Skips tracks or searches forward.
Stops playback or recording.
Used to select or adjust menu items.
Navigates back in menus or removes displays.
Sets playback to repeat a disc, title, chapter, or track.
Enlarges the picture during DVD playback.
Resets the tape counter or cancels timer recordings.
Selects tape recording speed (SP or SLP).
Reverses playback or searches backward.
Accesses the unit's setup menus.
Resets or erases settings or incorrect information.
Selects program or random playback modes.
Finds specific points on discs or sets markers.
Selects memorized TV channels.
Adjusts the volume level.
Mutes or restores the audio.
Accesses DVD Disc menus.
Accepts or changes menu settings.
Sets a section of a disc to play repeatedly.
Changes camera angles for DVD playback.
Selects subtitle language.
Selects audio language or sound mode.
Slot for inserting videotapes.
Compartment for inserting discs.
Selects TV channels.
Opens or closes the disc tray.
Stops DVD playback.
Adjusts the volume.
Turns the unit on or off.
Starts DVD playback.
Navigates between DVD chapters or tracks.
Indicates the unit is in DVD mode.
Selects AUX, TV/VCR, or DVD mode.
Indicates the unit is in TV/VCR mode.
Flashes during recording or standby for timer recording.
Starts a videotape recording.
Rewinds tape or searches backward.
Stops tape playback or ejects the tape.
Fast-forwards tape or searches forward.
Starts tape playback.
Connects external audio/video sources.
Port for connecting headphones.
Receives signals from the remote control.
Connection point for antenna or cable TV signals.
Connects the unit to the AC power outlet.
Digital audio output for connecting to a stereo.
Analog audio output for stereo connection.
Sets the display language for menus and on-screen terms.
Resets or rescans available TV channels.
Procedures for adding or removing TV channels from the list.
Step-by-step guide to manually set the current time.
Completes manual clock setting by adjusting day, year, hour, and minute.
How to automatically set the clock using PBS channel time signals.
Continues the auto clock setup process, including channel search.
Instructions to turn Daylight-Savings Time ON or OFF.
How to view videotape counter, time, and channel on screen.
Adjusting brightness, sharpness, tint, color, and contrast.
Instructions for inserting a tape with an intact record tab.
Selecting the desired tape recording speed.
Choosing the TV channel to record.
Starting a videotape recording.
Pausing and resuming a recording in progress.
Halting the recording process.
Choosing the channel for the one-touch recording.
Setting the recording speed (SP or SLP).
Initiating the one-touch recording process.
Stopping a one-touch recording before its scheduled end.
Accessing the timer programming menu.
Choosing a slot for the timer recording.
Choosing the channel to record, including Cable Box/Satellite Receiver considerations.
Setting the date for the timer recording (single or daily/weekly).
Setting the start hour and minute for the recording.
Setting the stop hour and minute for the recording.
Setting the tape speed (SP or SLP) for the recording.
Exiting the timer programming menus.
Turning off the unit to activate the timer recording.
Adjusting start and end times of a scheduled recording.
Modifying the details of an existing timer recording.
Procedures to cancel recordings in progress or not yet started.
Viewing the details of programmed timer recordings.
Enabling or disabling the feature to rewind tape after recording.
Connecting the source unit (VCR/Camcorder) for duplication.
Inserting blank tape into the TV/VCR/DVD for recording.
Setting the unit to auxiliary mode for input.
Choosing the recording speed (SP or SLP).
Initiating the tape duplication process.
Halting the tape duplication.
Enabling ALL or BLANK REPEAT modes for videotapes.
Enabling the rental play feature for worn cassettes.
Resetting the tape counter to a specific point for reference.
Programming the unit to shut off automatically after a set time.
Deactivating the sleep timer function.
Ensuring a tape is loaded for searching.
Activating the time search function.
Specifying the time to search for.
Executing the tape search to the specified time.
Activating the index search function.
Using index search to skip to desired recorded programs.
Playing back tapes in slow motion.
Searching forward or backward at different speeds.
Searching at high speeds for LP/SLP tapes.
Pausing playback to view a still frame.
Unit automatically rewinds, ejects, or turns off after playback.
Unit automatically adjusts tracking for optimal picture quality.
Manually adjusting tape tracking for better picture.
Choosing caption display modes (CAPTION1, CAPTION2, TEXT1, TEXT2, OFF).
Blocking programming based on TV ratings.
Inputting the four-digit access code to access V-Chip settings.
Choosing the TV rating category to set parental controls.
Adjusting rating levels and blocking specific subratings.
Blocking specific programming elements like language or violence.
Re-entering the access code to proceed.
Navigating to the TV rating settings menu.
Choosing specific rating levels and subratings to block or view.
Blocking TV channels based on Motion Picture Association ratings.
Setting a new or custom access code for V-Chip.
Shows sound status (STEREO, SAP) during TV viewing or tape playback.
Choosing between HIFI or Monaural sound for videotape playback.
Configuring the unit to receive/record in Stereo, SAP, or Mono.
Using menus to customize DVD playback and select features.
Navigating DVD titles to select specific content for playback.
Fast forwarding or reversing DVD playback at various speeds.
Selecting and playing specific DVD titles or chapters.
Entering elapsed time to start playback at a specific point.
Entering track numbers directly to play them.
Selecting tracks using the search mode function.
Skipping to next or previous tracks during playback.
Pausing and advancing playback frame-by-frame.
Resuming playback from the last stopped point.
Setting playback to repeat tracks, titles, chapters, or all content.
Repeating a specific section of a CD or DVD.
Marking favorite places on CDs or DVDs for later recall.
Navigating back to a previously set marker.
Selecting available subtitle languages during DVD playback.
Switching between different camera angles for DVD scenes.
Playing back DVD content in slow motion.
Enlarging the DVD picture to different magnifications.
Establishing a four-digit password to control DVD viewing.
Modifying the existing parental password.
Adjusting the overall rating level for DVD playback.
Choosing the specific rating level to restrict viewing.
Selecting available audio languages for DVD playback.
Adjusting stereo sound for Audio CD playback (L-CH, R-CH, STEREO).
Playing Audio CD tracks in a random, unsequenced order.
Setting a custom playback order for Audio CD tracks.
Specifications for MP3 and JPEG files for playback.
Navigating and selecting files for playback.
Halting the playback of MP3 or JPEG files.
Displaying track/file number, total files, and playback time.
Choosing languages for Audio, Subtitles, and Disc Menus.
Choosing a language from a list or entering a code for other languages.
Accessing display options like TV Mode, Angle Icon, and Auto Power Off.
Configuring TV Mode (Letter Box/Pan & Scan), Angle Icon, and Auto Power Off.
Adjusting DRC, Dolby Digital, and Down Sampling for DVD audio.
Shows chapter/title progress, bit rate, and repeat status during DVD playback.
Displays track progress, total tracks, and repeat status during CD playback.
Adjusting the black level to brighten dark parts of the DVD picture.
Enabling enhanced stereo sound for DVDs and CDs.
Defines audio input jacks.
Explains automatic TV channel memorization.
Defines the auxiliary input for external devices.
Explains VHF/UHF and Cable TV bands.
Defines brightness adjustment.
Defines the digital audio output jack.
Defines color adjustment.
Explains the surround sound system.
Defines copying videotapes.
Explains the HQ feature for enhanced video.
Defines one-touch timed recording.
Defines sharpness adjustment.
Explains SP, LP, and SLP tape speeds.
Defines tint adjustment.
Defines the video input jack.
Guidelines for optimal placement and ventilation of the unit.
Precautions regarding power cord handling and electrical hazards.
Advice on preventing damage from moisture buildup.
Solutions for issues preventing timer recordings.
Tips for resolving problems with recording to videotape.
Steps to improve TV channel reception quality.
Steps to diagnose and fix power issues.
Reasons and fixes for tape ejection when starting recording.
Troubleshooting common problems preventing disc playback.
Steps to resolve issues with the screen displaying no picture.
Solutions for poor sound or no sound from the unit.
Explains why DVD features might be unavailable.
Tips for addressing issues with worn tapes or poor playback.
Reasons for closed captions not displaying correctly.
Troubleshooting steps for a non-functional remote.
Information on channel selection limits and how to overcome them.
Solutions for difficulties inserting videotapes.
Troubleshooting steps for problems removing tapes.
Technical specifications for the TV and VCR components.
Technical specifications for the DVD player component.
Details on sound output and power requirements.
Information on terminals, operating temperature, and weight.
Defines who is covered by the warranty and proof of purchase requirements.
Details the duration and scope of warranty coverage.
Lists conditions and damages not covered by the warranty.
Information on obtaining warranty service globally.
Reminders about keeping sales receipts and original packaging.
Advice to check the manual before calling for service.
Instructions for obtaining service in specific US territories.
Contact information for warranty service in Canada.
Prompt to record model/serial numbers and mail the warranty card.
| Brand | Magnavox |
|---|---|
| Model | 19MDTR20 |
| Category | TV VCR Combo |
| Language | English |