Do you have a question about the MAGUIRE Weigh Scale Blender and is the answer not in the manual?
Points for disconnecting electrical power before servicing.
Points for disconnecting air supply before servicing.
Recommendation to always wear safety glasses.
States recorded noise levels for the equipment.
Explains the interlock switch function and not to disable it.
Notes on finger guards and not to reach through them.
Warning about potential automatic startup without warning.
Warning about rotating mix blades and potential injury.
Caution about sharp mix blades during cleaning or touching.
Warning to keep fingers clear of closing slide valves.
Electrical connections should only be made by qualified technicians.
Caution about rotating shafts and augers.
Warning about opening hopper doors with material above.
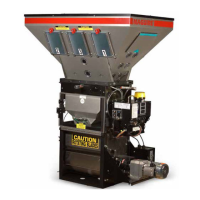
Components for material feeding, storage, and access.
Central controller, air assembly, and cleaning airline.
Load cells, weigh bin, mix chamber, and blades.
Dump valve, level sensor, mix motor, and flow control valve.
Identifies keypad, display, and other front panel components.
Lists serial, USB, Ethernet, and other ports on the left side.
Details alarm silence, mixer controls, and level sensor input.
Lists components on the front panel of the 12-12 controller.
Lists ports and controls on the left side panel.
Lists controls and inputs on the right side panel.
Specifies operating temperature, humidity, and altitude limits.
Cautions on handling and lifting the blender to avoid damage.
Instructions on securely anchoring the machine before use.
Importance of a solid power supply and avoiding heavy power lines.
Advice to avoid long extension cords to minimize static effect.
Requirement for controller and frame to share the same ground path.
Separating low and high voltage lines in remote systems.
Keeping conveying lines separate from electrical supply lines.
Note on internal "STAR" washers for grounding.
Overview of the 8 main model categories and sub models.
Step-by-step guide to changing the controller's model.
Steps for powering up the controller and initial display checks.
Verifying the displayed model number matches the blender.
Checking readout response to light pressure on the weigh bin.
Steps to enter program mode for dispense device testing.
Checks to ensure proper conditions before calibration.
Procedure for performing zero and full weight calibration.
Steps to perform material flow rate calibration.
Lists models that use Micro Pulse valves for metering.
Control on/off timing and pulsing of valves via parameters.
Approximate airflow adjustments for cylinders and valves.
Notes on accuracy and PT parameter settings.
Steps for filling hoppers, setting thumbwheels, and powering on.
Keypad sequence to save current settings.
Keypad sequence to retrieve saved parameters.
Order of REGRIND, NATURAL, ADDITIVE dispenses and material run-out.
Handling of alarms, weigh bin dump, and flow control valve.
Tagging usage data with Work Order and Operator numbers.
Storing and retrieving recipes using thumbwheel settings.
Increasing throughput with rapid volumetric dispenses.
Blending a preset batch amount and then stopping.
Identifies front panel controls, displays, and their functions.
Explains keypad functions and display readouts.
Details air solenoids, power switch, and thumbwheels.
Switch to stop the system at the end of a cycle.
Switch for pausing and resuming the process immediately.
Lists serial, USB, Ethernet, and load cell ports.
Port for printing material usage, parameters, and cycle data.
Requirements for saving printout information to a USB drive.
Ports for load cells and optional extrusion control.
Outlets for feeders, mixer motor, fuses, and level sensor input.
Information on internal fuses for various circuits.
Overview of the keypad and its functions.
Details the Vacuum Fluorescent Display (VFD) and its readouts.
Information shown during material dispensing.
Using mechanical and digital thumbwheels for component settings.
Details air solenoid connections and component power outlets.
Information on internal fuses and the power switch.
Functionality of visual and audible alarms.
Switch to stop the system at the end of a cycle.
Switch for pausing and resuming the process immediately.
Lists serial, USB, Ethernet, and load cell ports.
Port for printing material usage, parameters, and cycle data.
Requirements for saving printout information to a USB drive.
Ports for load cells and optional extrusion control.
Button to stop strobe and beeper alarms.
Mixer motor switch, fuse, outlet, and level sensor input.
Information on internal fuses for various circuits.
Explains Automatic, Manual, and Program modes of operation.
Details VIEW, RECIPE, EXIT, CE, and other keys.
Methods to enter Program Mode and change passwords.
Lists functions accessible via star key combinations.
Normal mode; available keys and operation between cycles.
Displaying current date, time, and material usage totals.
Getting, loading, and saving recipes.
Blending a preset batch amount and then stopping.
Increasing throughput with rapid volumetric dispenses.
Setting component percentages and overriding thumbwheels.
Tagging data with Work Order and Operator numbers.
Exiting any keypad sequence.
Displaying raw load cell readout for diagnostics.
Operating functions manually for test purposes.
Enabling the flag for weight calibration.
Setting the displayed gram weight of the empty bin to zero.
Guidelines for setting weights after warm-up.
Procedure for setting the full weight calibration.
Keypad sequence for navigating parameter lists.
Clearing data, setting date format, and managing prompts.
Restoring defaults, selecting language, and managing settings.
USB recipe commands and firmware updates.
Setting cycle end conditions and manual mode passwords.
Managing totalizer display and calibration modes.
Enabling cycle printouts and double bin dumps.
Viewing and setting Ethernet IP, MAC, and TCP/IP parameters.
Setting blender ID number and enabling Modbus communications.
Configuring regrind to be treated as a second natural component.
Setting color and additive as percent of mix or regrind.
Setting max weight and weight loss alarms, changing password.
Printing parameters and enabling precision ratioing.
Selecting progressive metering and managing backdoor passwords.
Operating in volumetric mode and forcing display printouts.
Updating software and selecting weight units.
Updating controller software via USB drive.
Setting COM port speed and updating USBC driver.
Enabling raw signal display and load cell calibration.
Overview of FLG, Pulsed Output, Mixer, and Flow Control parameters.
Dump time, stable weight, bailout threshold, and decimal settings.
Parameters related to regrind usage and component percentages.
Parameters for regrind usage and tare weight limits.
Report interval, setting limits, and cycle start delay.
Loader timers, dispense rate, and calibration parameters.
Parameters for error correction and dispense lag time.
Load cell parameters, special requests, and barcode input.
Settings for extruder and takeoff control.
Explanation of flags for TAG, RECIPE, FAST, and BATCH keys.
Parameters for Micro Pulse devices and mixer motor timing.
Instructions for material run-out or dispense failure.
Settings for mixer run time and jogging operations.
Parameters for flow control valve delays and alarms.
Parameters for weigh bin dump time and weight reading variation.
PRN and RAC parameters for regrind management.
RLC and RHL parameters for controlling regrind levels.
Parameters for full batch weight and maximum dispensing weight.
Configuring controller for dispense station operation.
TH/TL parameters for tare weight and PRT for automatic printing.
Setting upper limits for thumbwheel switches.
RLO for regrind limits, DLY for cycle delay, LT timers for loaders.
First try dispense percentage and rate calibration parameters.
Parameters for material amount per second and allowable error.
Tolerances for dispense shortage errors.
Lag time settings and max rate change per cycle.
Load cell limits, special requests, barcode input, and extrusion controls.
Voltage and rate settings for extruder speed control.
Voltage and rate settings for takeoff speed control.
Limits on extruder speed adjustments.
MCT for cycle time monitoring and LIQ for liquid color.
CPL for counts per length and PTD for pulse train delta.
G2F for communications, XMO for extruder output.
LTP, LLF, and HLF for loss in weight monitoring.
SBO parameter for clearing sensor dust.
Step-by-step keypad sequence to alter parameters.
Sequence to copy and save system parameter information.
Sequence to clear memory and restore settings.
Primary communication protocol for PLC communication.
Protocol for two-way communications to blenders.
Enabling and understanding diagnostic cycle reports.
Printing current parameter values to a USB drive.
Explains the header, cycle, and data line formats.
Details for final weight, rate, and first dispense data.
Analyzing total batch weight and tare weight variations.
Interpreting retries, flow rates, and dispense timing.
Examining percentage errors, bailouts, and vibration issues.
Steps for verifying load cell accuracy with printouts.
Printout for determining lag times and device repeatability.
Printout for learning device flow rate.
Using VIEW key to print all material usage totals.
Setting PRT parameter for periodic automatic printing.
Step-by-step guide for troubleshooting problems.
Keypad sequence to print the parameter table.
Keypad sequence to print cycle-by-cycle data.
Problems with initial display readings and controller resets.
Alarms for out-of-range weight and dispense issues.
Issues with material flow, thumbwheel control, and retries.
System stuck in retries or unexplainable behavior after memory alteration.
Load cell readings and slide gate dispense consistency.
Mix motor behavior and power supply issues.
Component alarms for out of material and batch completion alerts.
Alarms for maximum weight exceeded and component bailouts.
Alarms for load cell calibration, over dispense, and recipe timeouts.
Alarms for weigh bin weight loss and material leakage.
Alarms for cycle time issues and alternate liquid color.
Alarms for mix motor failure and G2F communication issues.
Alarms related to USB recipe errors.
Alarms for regrind settings not totaling 100%.
Alarms for flow control valve and component valve leaks.
Alarm when remote recipe number is not found.
Adjusting batch size and sensor settings for optimal mixing.
DLY parameter, continuous mixing, and flow control valve usage.
Baffles, bulk density, vacuum conveying, and air drive mixer benefits.
Specific issues and solutions for air drive mixers.
Reducing throughput with flow control gate and counteracting with END FULL flag.
Ensuring adequate material reserve to avoid run-outs.
Increasing batch size to increase throughput.
Reducing weigh bin open time to shorten cycle time.
Turning on FAST for rapid volumetric dispenses.
Clarifying the difference between reserve and throughput.
Steps for powering on the unit and initial display status.
Conditions for starting operation and troubleshooting dump flap problems.
Causes of alarms and the start of the dispense sequence.
Verifying proper function, movement, and wiring of load cells.
Understanding drift, empty weight consistency, and pellet tests.
Identifying overstressed cells and operating with damaged cells.
Checking RAW COUNT number for diagnostics.
Understanding RAW COUNT numbers and sensitivity tests.
Current settings in use, stored in EEPROM.
Memory area for backing up user settings.
Blender's factory default settings.
Holding CE key while powering on to reset User Settings.
Resetting settings to model-specific defaults.
Note that Load Cell calibration is lost after Clear All.
Steps for updating firmware using a USB drive.
Important notes on not turning off the controller during update.
Steps for pneumatic and electrical lockout before work.
Material removal, opening access, removing components, and cleaning interior.
Reinstalling components and closing access doors.
Setting air pressure and adjusting level sensor sensitivity/position.
Ensuring free movement of weigh bin and slide valves.
Inspecting mix blades and routine load cell calibration.
Table mapping pins to devices and wire colors.
Sequence to enable continuous display of accumulated totals.
Procedures for starting and stopping the totalizer.
Methods for retrieving and resetting accumulated totals.
Exploded view of the MicroBlender components.
Exploded view of the WSB 140 model components.
Exploded view of the WSB 220 model components.
Exploded view of the WSB 240 model components.
Exploded view of the WSB 420 model components.
Exploded view of the WSB 440 model components.
Exploded view of the WSB 940 model components.
Exploded view of the WSB 1840 model components.
Exploded view of the WSB Additive Feeder.
Diagram showing external component connections.
Diagram showing WSB tray and air assembly.
Safety circuit diagram for single-phase motors.
Safety circuit diagram for three-phase motors.
Safety circuit diagram for WSB-18 three-phase motors.
Customer's responsibility to verify performance and suitability.
Maguire's responsibility limited to repair/replacement for design flaws.
Comprehensive 5-year warranty on plastics equipment.
Items excluded from warranty, like load cells if mishandled.
Customer responsibility for product performance and losses.
Contact details for the US headquarters.
Contact details for Maguire Europe.
Contact details for Maguire Asia office.
| Category | Blender |
|---|---|
| Manufacturer | MAGUIRE |
| Model | Weigh Scale Blender |
| Number of Materials | Up to 12 |
| Type | Gravimetric |
| Blending Accuracy | ±0.1% |
| Hopper Capacity | Varies by model |
| Control System | Microprocessor-based |
| Display | Typically a touchscreen LCD |
| Communication Interface | Ethernet, RS232 |
| Power Requirements | 110/220V AC, 50/60 Hz |