6
FUNCTIONAL
DESCRIPTION
CAUTION:
• Always be sure that the tool is switched off and
unplugged before adjusting or checking function on the
tool.
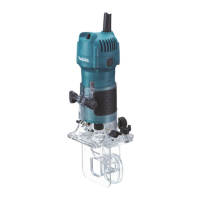
Adjusting bit protrusion
To adjust the bit protrusion, loosen the lever and move the
tool base up or down as desired by turning the adjusting
roller. After adjusting, tighten the lever firmly to secure the
tool base.
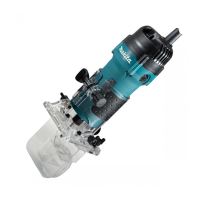
Switch action
CAUTION:
• Before plugging in the tool, always be sure that the tool
is switched off.
To start the tool, move the switch lever to the I (ON) position.
To stop the tool, move the switch lever to the O (OFF) posi-
tion.
Lighting up the lamps
CAUTION:
• Do not look in the light or see the source of light directly.
To turn on the lamp, start the tool. Then, the lamp lights up
thetopofthebit.Toturnitoff,stopthetool.
NOTE:
• Use a dry cloth to wipe the dirt off the lens of lamp. Be
careful not to scratch the lens of lamp, or it may lower the
illumination.
ASSEMBLY
CAUTION:
• Always be sure that the tool is switched off and
unplugged before carrying out any work on the tool.
1. Base
2. Lever
3. Scale
4. Adjusting roller
1
2
3
4
001981
1. Switch lever
1
001982
 Loading...